
Manual

Advanced LCD users: These are the actual LCD instruction codes. When the interface receives the instruction prefix, it clears
the register select (RS) bit. The next received byte is written to the LCD with RS low. After writing that byte, it returns RS high
(normal data mode). This means that you can send any valid LCD instruction through the interface. Since the interface intializes
the LCD at startup, you must not send any initialization instructions. If you did not understand the preceding, don’t worry. You
don’t need to know any of this to use this product. The info may be handy to advanced users adapting programs written to drive
the BPI-216 to applications that drive an LCD directly through its parallel interface.
User’s Manual
Scott Edwards Electronics, Inc.
1939 S. Frontage Road, Suite F, Sierra Vista, AZ 85635 USA
ph: 520-459-4802 • fax: 520-459-0623 • www.seetron.com
BPI-216 • v1.2 • 07/00 • pg 4
Table 1. LCD Instructions
Instruction/Action Code
Clear Screen 1
Scroll display one character left (all lines) 24
Scroll display one character right (all lines) 28
Home (move cursor to top/left character position) 2
Move cursor one character left 16
Move cursor one character right 20
Turn on visible underline cursor 14
Turn on visible blinking-block cursor 13
Make cursor invisible 12
Blank the display (without clearing) 8
Restore the display (with cursor hidden) 12
Set cursor position (DDRAM address) 128 + addr
Set pointer in character-generator (CG) RAM 64 + addr
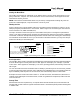
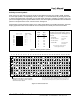
Positioning the Cursor
You can position the cursor anywhere on the screen by sending the proper instruction. Figure 4 shows
the layout of the 2x16 LCD screen with the cursor-positioning instruction for each character location.
These instructions take more than 1 ms for the LCD to execute. At 9600 bps, either pause
1ms after these instructions or follow them with <254><128> (where <#> means a byte
set to #). At 2400 bps, no pause or extra instruction is required.
To position the cursor, send the instruction-prefix byte, ASCII 254, followed by the set-position
byte value. For example, to move to line 2, character 4, send <254><196>. Note: <#> means
a byte set to the value #. See program examples.
Figure 4. Cursor positioning.
128
192
129
193
130
194
131
195
132
196
133
197
134
198
135
199
136
200
137
201
138
202
139
203
140
204
141
205
142
206
143
207
LINE 1
LINE 2
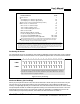
Off-Screen Memory (No Line Wrap)
When you print past the end of a line, the next 24 characters do not show up on the screen. They are
not lost, they are in an off-screen memory area. All alphanumeric LCD modules have 80 bytes of
memory, arranged appropriately for a 2x40 screen. On LCDs with smaller screens (such as this 2x16),
text printed past the end of a visible line goes into memory, but can’t be seen on the screen. Use cursor-
positioning instructions to print to a particular location on the display. Or deliberately print in off-
screen memory to temporarily hide text, then send scroll-left instructions to reveal it.
Character
0 1 2 3 4 5 6 7 8 9 10 11 12 13 14 15