Installation and User's Manual for Refrigerator Model SCR33
SCR33 User's Manual Introduction Congratulations on your purchase of a Scotsman refrigeration product. For future reference, keep this guide in a safe, accessible location. If you need additional information or assistance, please contact your seller or Scotsman directly. Contact information appears on the back cover of this guide. Table of Contents Specifications . . . . . . . . . . . . . . . . . . . . . . . . . . . . . . . . . . . . . . . . . . . . . . . Page 2 General Information . . . . . . . . . . . .
SCR33 User's Manual Specifications Scotsman Ice Systems are designed and manufactured with the highest regard for safety and performance. They meet or exceed the standards of agencies like UL. Capacity • 2.9 cubic feet. Adjustable tempered glass shelves. Scotsman assumes no liability or responsibility of any kind for Scotsman brand products that have been altered in any way, including the use of any parts and/or other components not specifically approved by Scotsman. • Sleek, streamlined interior.
SCR33 User's Manual General Information Never attempt to repair or perform maintenance on the unit until the electricity has been disconnected. IMPORTANT PLEASE READ all instructions before installing, operating, or servicing the appliance. Never remove the round grounding prong from the plug and never use a two-prong grounding adaptor. Proper installation procedures must be followed when completing an installation or relocation of a unit. Consult the installation guide before any installation begins.
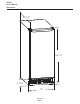
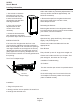
SCR33 User's Manual Installation Your unit has been designed for either free-standing or a built-in installation. When built-in, your unit does not require additional air space for top, sides or rear. However, the front grille must NOT be obstructed and clearance is required for an electrical connection in the rear. Cut-Out Dimensions Follow the cut-out drawing The 15-1/4" width allows 1/4" for ease in installation and removal of the unit. 24" is the cabinet depth in most installations.
SCR33 User's Manual Dimensions 23 1/2” 34 1/4” 4 1/16” 15” May 2011 Page 5
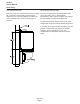
SCR33 User's Manual Door Swing Door Swing Dimensions Environmental Requirements Your unit has a zero clearance for the door to open 90°. Scotsman recommends a minimum door clearance of 2" to accommodate the handle if the unit is installed next to a wall or similar type of structure. The units are designed to operate between 50°F (10°C) and 100°F (37°C). High ambient temperatures (100°F [37°C] or higher) may reduce the unit’s ability to reach low temperatures.
SCR33 User's Manual Door Alignment and Adjustment Align and adjust the door if it is not level, or is not sealing properly. Door Swing Change Location of the unit may make it desirable to mount If the door is not sealed the unit may not cool the door on the opposite side of the cabinet. properly, or excessive frost may form in the interior. IMPORTANT Properly aligned, the door’s gasket should be firmly in contact with the cabinet all the way around the door (no gaps).
SCR33 User's Manual Door Swing Change Instructions Remove top hinge, and door: 2. Reinstall the two screws. 1. Hold door to keep it from falling. Prepare door for reinstallation: 2. Remove top hinge from cabinet by removing the three screws. 1. Remove plastic hole plug from top of door handle and reinstall on opposite side. 2. Remove plastic hinge bushing on bottom of door and reinstall on opposite side. Clean out bushing hole in door bottom with a screwdriver if necessary. 3.
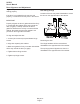
SCR33 User's Manual Leveling Information 3. Re-check the leveling, from front to back and side to side. Make any necessary adjustments. The unit’s top surface should be approximately 1/8" below the countertop. It is recommended that the unit is level. 1. Use a level to check the levelness of the unit from front to back and from side to side. Level should be placed along top edge and side edge as shown 4.
SCR33 User's Manual Air Flow IMPORTANT Adjusting Air Temperature The unit requires proper air flow to perform at its IMPORTANT highest efficiency. Do not block the front grille or internal fans at any time, or the unit will not perform Adjust the set point temperature in small as expected. Do not install the unit behind a door. increments, and wait 24 hours for the temperature to stabilize before rechecking. Factory recommended set-point is MID setting on dial control.
SCR33 User's Manual Removing and Installing Interior Shelves 1. Pull shelf out about 6" (1), until back of shelf clears the rib on the right-hand side. Removing and Installing Door Shelves 2. Tilt up right-hand edge of shelf (2). To remove the door shelf: 3. Remove shelf from unit by pulling out (3). 1. Grasp shelf in center, and lift until the shelf notches (1) clear the pins (2). 2. Carefully pull the shelf away from the door. To install the door shelf: 1.
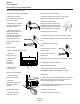
SCR33 User's Manual Removing and Installing Grille WARNING Installing grille: Disconnect electric power to the unit before removing the grille. 1. Place the hook-hinge located on the rear bottom side of the grille (3) onto the front lip of the unit base. Swing the grille up into position. WARNING DO NOT touch the condenser fins. The condenser fins are SHARP and can be easily damaged. 2. Align cabinet and grill holes and secure, but do not overtighten grille screws (1). 3. Install control knob (2). 4.
SCR33 User's Manual Maintenance Exterior Cleaning cause personal injury and damage to the inner lining. Clean surfaces with a mild detergent and warm water solution. IMPORTANT Wipe with a soft, clean towel to prevent water spotting. The drain pan was not designed to capture the water created when manually defrosting. To prevent water from overflowing the drain pan, place towels or other absorbent materials over the interior drain trough, under the evaporator (1), before defrosting.
SCR33 User's Manual Condenser Cleaning Interval - Every Six Months WARNING To maintain operational efficiency, keep the front grille free of dust and lint, and clean the condenser every six months. Depending on environmental conditions, more or less frequent cleaning may be necessary. Electrical Shock Hazard. Disconnect power before servicing. Before operating, replace all panels. Failure to do so may result in death or electrical shock.
SCR33 User's Manual Service Normal Operating Sounds Replacement Parts Listed below are common refrigeration components When you need replacement parts, always request with brief description of the normal operating genuine Scotsman replacements. Scotsman sounds they make. designs and engineers products using components that work efficiently, and provide superior service Compressor: The compressor makes a hum or life and performance.
SCR33 User's Manual Service Diagnosis Problem Unit Develops Frost on Internal Surfaces. Possible Cause and Remedy Frost on the rear wall is normal and will melt during each off cycle. If there is excessive build-up of 1/4” or more, manually defrost the unit. Ensure the door is closing and sealing properly. High ambient temperature and excessive humidity can also produce frost.
SCR33 User's Manual Service Parts 15 13 1 7 2 14 12 Door Rear View 3 8 9 11 4 10 5 Item Number 1 2 3 4 5 6 7 8 9 10 11 12 13 14 15 Rear View Front View Part Number Description 6 02-4655-10 Gasket 02-4655-04 Door shelf 02-4655-08 Edge trim 02-4655-05 Shelf 02-4655-11 Crisper 02-4655-02 Dryer 02-4655-12 Hinge assembly 02-4655-14 Grill 02-4655-16 Fan motor and blade 02-4655-03 Fan blade 02-4655-07 Control 02-4655-06 Compressor 02-4655-01 Power cord 02-4655-09 Evaporator 02-4655-13 Door 15-0731-03 La
SCR33 User's Manual Wiring Diagram Compressor Winding Resistance: at 72 degrees F. Start: 21.2 Ohms Run: 7.
SCOTSMAN ICE SYSTEMS 775 Corporate Woods Parkway, Vernon Hills, IL 60061 800-726-8762 www.scotsman-ice.