
Service manual


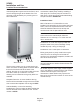
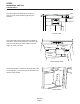

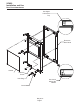


Table Of Contents
- Table of Contents
- Product Description: Page 2
- Cabinet Dimensions Page 3
- Location Recommendations: Page 4
- Familiarization Page 5
- Decorating Features: Page 6
- Door Panel Attachment Page 7
- Door Swing Page 8
- Plumbing - Pump Model Page 9
- Plumbing: Gravity Drain Model Page 10
- Electrical and Start Up Page 11
- Use Page 12
- Maintenance Page 13
- How to remove scale from the ice making system. Page 14
- Service Table of Contents
- SCN60 service Page 1
- Components: Page 2
- Evaporator and Auger Page 3
- Control System Page 4
- Water System Page 5
- Storage Page 6
- Performance and Technical Specs Page 7
- Electrical Sequence Page 8
- Service Diagnosis Page 9
- Service Diagnosis Page 10
- Component Diagnostics Page 11
- Ice Capacity Page 12
- Removal and Replacement Page 13
- SCN60 Gearbox Access & Removal Page 14
- Water Seal Replacement Page 16
- Evaporator Replacement Page 18
- Drain Pump (if equipped) Page 19
- Compressor replacement. Page 20
- Bin and Cabinet Page 21
- Table of Contents

Location Recommendations:
The machine can be built into a cabinet. It is an air
cooled refrigeration system and so air flows in and
out of it through the grill at the bottom front. The
grill must not be blocked by any covering door or
other obstruction.
There are two models, one is a gravity drain type
and it must have a building drain connection below
the level of the drain tube at the back of the
cabinet; the other is a pump drain model which can
force drain water up a maximum of 10 feet,
allowing it to be located where a gravity drain isn’t
available.
Kickplate Extension: In some situations the leg
levelers will be extended enough to become visible.
A kit to extend the kickplate over the legs is KKPF.
Cabinet Stability: In some free standing
installations it may be prudent to add a bracket that
secures the back of the cabinet to a wall. That kit
number is KATB.
Drain Conversion: A gravity drain model can be
converted to a drain pump model by installing a
drain pump kit. The drain pump kit consists of a
drain pump, wiring harness and associated tubing.
The part number is A39462-021.
Installation Notes
Built In Situations: If a finished floor is to be
installed in the area after the ice machine has been
built in, shims the expected thickness of the floor
should be installed under the unit to keep the
machine level with the planned floor level.
Note: The water connection is at the back and adds
a few inches to the cabinet depth. Minimum
clearance is 0 in. at the top, 2 in. at the rear and
1/8 in. at each side.
Installations on a slab: Use a pump model and
pump the water to the point of drainage. Pump
models will pump 1 story (10 feet) high.
Installations over a crawl space or basement:
Either gravity drain or pump model units may be
used, if there is not enough room behind the
machine for a drain/waste receptacle, the drain will
have to be below the floor.
Note: When installed in a corner, the door swing
may be limited due to handle contact with the wall
or cabinet face.
All models require a water supply. Water supplies
vary in the degree of mineral content. High mineral
content water will require more frequent
maintenance. Water filtration may improve the
taste of the ice as well as cut down on some of the
mineral build up.
May 2011
Page 4
SCN60
Installation and Use
Air Intake
Warm Air Out