
Service manual
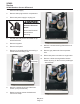
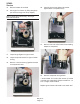
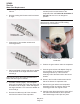
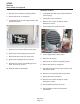
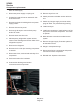
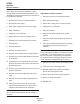
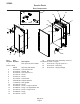
Table Of Contents
- Table of Contents
- Product Description: Page 2
- Cabinet Dimensions Page 3
- Location Recommendations: Page 4
- Familiarization Page 5
- Decorating Features: Page 6
- Door Panel Attachment Page 7
- Door Swing Page 8
- Plumbing - Pump Model Page 9
- Plumbing: Gravity Drain Model Page 10
- Electrical and Start Up Page 11
- Use Page 12
- Maintenance Page 13
- How to remove scale from the ice making system. Page 14
- Service Table of Contents
- SCN60 service Page 1
- Components: Page 2
- Evaporator and Auger Page 3
- Control System Page 4
- Water System Page 5
- Storage Page 6
- Performance and Technical Specs Page 7
- Electrical Sequence Page 8
- Service Diagnosis Page 9
- Service Diagnosis Page 10
- Component Diagnostics Page 11
- Ice Capacity Page 12
- Removal and Replacement Page 13
- SCN60 Gearbox Access & Removal Page 14
- Water Seal Replacement Page 16
- Evaporator Replacement Page 18
- Drain Pump (if equipped) Page 19
- Compressor replacement. Page 20
- Bin and Cabinet Page 21
- Table of Contents
Bin and Cabinet
The bin and cabinet can be separated from the
base. Either the ice making evaporator system
must be lifted out and securely suspended or the
refrigeration system opened and the connections to
the evaporator unbrazed.
1 Remove the unit from its installed position.
2 Disconnect water supply.
3 Disconnect / unplug unit from power supply.
4 Drain evaporator.
5 Empty bin of ice and water.
6 Disconnect drain hose from bottom of bin.
1 Remove top, back and side service panels.
7 Remove door.
8 Remove kickplate.
9 Remove front service panel
10 Remove screw holding service panel bracket.
11 Remove two screws holding baffle at right side
of condenser.
12 Unplug wires from compressor and fan motor.
Be sure wires from control box to base are free
and disconnected.
13 Remove four screws holding each corner of the
chassis to the base.
14 Remove two screws holding left rear strut to
base.
15 Remove one screw holding left side panel to
base.
16 Either go thru the process to remove gear
reducer and evaporator from unit or recover
refrigerant and disconnect at evaporator.
Note: If leaving evaporator & gear reducer in unit,
have a helper support them while the cabinet is
removed.
17 Lift bin and cabinet off chassis.
Auger Motor or Motor Capacitor
1 Remove the unit from its installed position.
2 Disconnect water supply.
3 Disconnect / unplug unit from power supply.
4 Empty bin of ice and water.
5 Remove top panel.
6 Remove both bolts holding motor to gear
reducer.
7 Lift motor winding and capacitor up and out of
machine.
8 Cut wires and separate winding from capacitor.
Change either and reconnect motor to
capacitor.
Note: Be SURE wires are connected per the label
on the motor: Black to Black to Capacitor and Red
to Capacitor. If connected incorrectly, motor will
turn the wrong way. Output shaft or auger MUST
turn CCW (counterclockwise) looking from above
or the unit will be damaged during ice making.
9 Pull rotor from gear reducer (if changing motor)
10 Insert new rotor (if changing motor).
11 Reinstall winding and capacitor assembly.
Secure with the original screws.
12 Return all panels to their original positions.
13 Reconnect water and power.
14 Reinstall unit.
May 2011
Page 21
SCN60
Service