
Service manual


Page 28
Page 28
3. Trace the electric wires belonging to the hot
gas valve coil and disconnect them; then lift the
valve coil from the valve body.
4. To install the replacement hot gas valve coil
follow previous steps in reverse.
I. REPLACEMENT OF WATER DRAIN
SOLENOID VALVE
1. Remove the rear panel.
2. Trace and disconnect the electrical leads
from the water drain solenoid valve coil.
3. Remove the corbin clamps and the plastic
hoses from the valve.
4. Unloose the screws securing the valve to
the unit base and remove it.
5. To install the replacement water drain
solenoid valve follow the above steps in reverse.
NOTE. When installing the new valve pay
attention to the water flow direction.
J. REPLACEMENT OF FAN MOTOR
1. Remove left side panel.
2. Remove screws and yellow green ground
wire. Trace the electrical leads of fan motor and
disconnect them.
3. Remove the bolts securing the fan motor
bracket to the cabinet base and then remove the
assembly.
4. To install the replacement fan motor follow
the above steps in reverse.
NOTE. When installing a new fan motor
check that the fan blades do not touch any
surface and move freely.
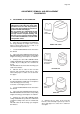
K. REPLACEMENT OF SPRAY BAR
1. Remove the right side panel and then the
plastic ice chute.
2. Reach through the ice opening and feel for
the spray bar.
3. Rotate spray bar so that one of its end is
aligned with ice opening.
4. Grab the spray bar center and lift it up off the
jet bearing hub together with its race washer;
then draw it out through the ice opening.
5. To install the replacement spray bar follow
above steps in reverse.
L. REPLACEMENT OF DRIER
1. Remove left side panel.
2. Recover the refrigerant from the system
and transfer it in a container so to reclaim or
recycle it.
3. Unsolder the refrigerant lines from the two
ends of the drier.
4. To install the replacement drier remove
factory seals and solder the refrigerant lines
taking precautions to NOT OVERH EAT the drier
body.
5. Thoroughly evacuate the system to remove
moisture and non condensable after drier
replacement.
6. Charge the system with R 404 A by weight
(see data plate of machine) and check for leaks.
7. Replace panel previously removed.
M. REPLACEMENT OF HOT GAS VALVE
BODY
1 . Follow the steps in procedures J to remove
the hot gas valve coil.
2. Recover the refrigerant from the system
and transfer Ìt in a container so to reclaim or
recycle it.
3. Unsolder the refrigerant lines from the hot
gas valve body and remove it from the unit.
NOTE. Always install a replacement drier
whenever the sealed refrigerafion systern is
open.
Do not replace the drier until all other repairs
or replacements have been completed.
4. To install the replacement hot gas valve
body follow the above steps in reverse.
NOTE. Thoroughly evacuate the system to
remove moisture and non condensables after
hot gas valve replacement.
N. REPLACEMENT OF EVAPORATOR
PLATEN
1. Remove top, rear and left panels.
2. Remove the plastic cover from the upper
part of the evaporator platen.