Product Manual for Ice Machine Model DCE33
DCE33 User's Manual INTRODUCTION The Scotsman DCE33 is a restaurant type ice machine designed for home use. It produces the same high quality ice as large Scotsman commercial ice cube machines, and stores that ice in a heavily insulated storage bin. This service manual is intended as a resource for people installing, using, and servicing the DCE33. Because it contains information on safety and maintenance, Scotsman strongly recommends that this manual be kept where it is readily available.
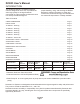
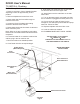
DCE33 User's Manual CABINET DIMENSIONS DCE33 Cabinet Views Refrig.
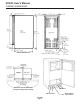
DCE33 User's Manual INSTALLATION To properly make and store ice, the DCE33 requires access to air, potable water, 115 volt electricity and a drain. The machine must be installed indoors, in a controlled environment. Air: The ice machine uses a fan to take in room air at the front of the machine through the right side of the kick plate. It discharges warm air out the left side of the kick plate.
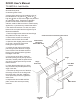
DCE33 User's Manual TO INSTALL: Plumbing The water supply and drain should be roughed in and ready at the point of installation. A wall outlet directly behind the ice machine will make undercounter installation easier. All electrical, water and drain connections must conform to local codes. Installation Cautions: Although the DCE33 has been designed to be serviced in place, in some cases it may be necessary to pull the unit out for service.
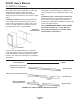
DCE33 User's Manual TO INSTALL: Plumbing Free Standing Cabinet, Gravity Drain Model: All horizontal runs of drain lines must have a 1/4" per foot fall. An air gap will likely be required between the ice machine drain tube and the drain/waste receptacle. A stand pipe with a trap below it would be acceptable for the drain/waste receptacle. A floor drain is also acceptable. FOLLOW ALL LOCAL PLUMBING CODES 5.
DCE33 User's Manual TO INSTALL: Plumbing Free Standing Cabinet, Pump Model: 1. Remove the kickplate and control box cover. 2. Route the water supply, which should be a 1/4" O.D. copper tube through the back of the cabinet to the front. 3. Install a flare nut and flare the end of the tube. 4. Flush the water line and fasten the flare nut to the male flare on the inlet water valve. 5. Locate the coil of 3/8" ID plastic drain tubing secured to the back of the cabinet. 6.
DCE33 User's Manual TO INSTALL: Plumbing Built In, Gravity Drain Model: 6. Push ice machine into installed position. The drain and inlet water tubes must be plumbed before connecting to the ice machine. All horizontal runs of drain lines must have a 1/4" per foot fall. An air gap will likely be required between the ice machine drain tube and the drain/waste receptacle. A stand pipe with a trap below it would be acceptable for the drain/waste receptacle. 7. Cut off water inlet line at required length.
DCE33 User's Manual TO INSTALL: Plumbing Built In Pump Model: 1. Place ice machine in front of installed location. Adjust leg levelers to approximately correct position. 2. Remove kickplate and control box cover. 9. Flush water line. Place flare nut on inlet water line and flare the end of the copper tube. 10. Attach flare nut to the male flare on the inlet water valve. 11. Turn on the water supply, and make sure that the ice machine is plugged in and the power is on. 3.
DCE33 User's Manual TO INSTALL: Add On Kits Door Kit: The door may be modified to accept a decorator door panel. Customizing Door Panel: A custom door panel may be installed in front of the standard one. Any panel 14 3 4" wide, 28 15 16" high and 14" thick or less at the edges may be used as a decorator panel. Examples of decorator panels include wood to match the adjacent cabinets; metal of different colors to match nearby appliances; or just about any material that will fit.
DCE33 User's Manual AFTER INSTALLATION - OPERATION Final Check List How To Use: 1. Has the machine been properly uncrated, and have all packing materials and tape been removed from inside the bin? The ice machine is extremely simple to use, just turn the ice machine control knob to the on position. The DCE33 will automatically begin to freeze ice and will continue to do so until the bin is full. A new machine, warm out of the box, could take as long as 48 hours to fill and shut off. 2.
DCE33 User's Manual AFTER INSTALLATION Reversing Door Swing: The hinged side of the door may be reversed to the other side if desired: The DCE33 was shipped with the door hinged at the right. The door and hinges are designed for placing the hinges on either the right or the left side of the cabinet. Moving the hinges to the left allows the door to pivot from the left side. Note: There is a part, packed with the machine, that is required for this procedure. Door Handle 1.
DCE33 User's Manual COMPONENT LOCATION Door Gasket Curtain Reservoir Bin Thermostat Bracket Control Knob Control Box Cover Kickplate June 2013 Page 12
DCE33 User's Manual MAINTENANCE AND CLEANING What shouldn’t be done? How to clean the condenser. Never keep anything in the ice storage bin that is not ice; objects like wine or beer bottles are not only unsanitary, but the labels may slip off and plug up the drain. The condenser is like the radiator on a car, it has fins and tubes that can become clogged. To clean: Never allow the machine to operate without regular cleaning. The machine will last longer if it is kept clean.
DCE33 User's Manual CLEANING How to clean the ice making system. 4. Turn the ice machine control to ON. 1. Open the door and turn the ice machine control knob to off. 2. Scoop out all of the ice, either discard it or save it in a ice chest or cooler. 5. Allow the machine to operate for about 2 hours. 6. Pour hot (950F. - 1150F.) water into the bin to melt the ice that has formed. That ice will likely be white and frosty looking. 7.
DCE33 User's Manual ADJUSTMENTS There are three items that may be adjusted: Cube Size, Harvest Time, and Bin Level. Note: Cube Size and Harvest Time adjustments should only be done by a qualified service person. SIDE VIEW OF CUBES Cube size control. The cube size control should only be adjusted to bring the cubes to the correct shape, the overall size cannot be adjusted. Try to adjust the cube size control when the ice machine is in the harvest cycle, or in the first 10 minutes of the freeze cycle.
DCE33 User's Manual ADJUSTMENTS Bin’s ice level. Harvest Time Adjustment When the ice machine shuts off the ice level in the bin should be even with the metal tube inside the bin. If the ice in the bin is too high or low, turn the ice machine control knob to adjust the bin thermostat. The harvest time can be adjusted so that all the ice is released during the harvest period, with a few seconds extra for a safety margin. The adjustment range is between 2 to 5 minutes. 1.
DCE33 User's Manual SERVICE DIAGNOSIS PROBLEM No ice falling in bin, but machine operates Standing water in the bin POSSIBLE CAUSE PROBABLE CORRECTION Ice may be stuck in the evaporator Check water supply - filter may be and the unit is “frozen up”. restricted Check inlet water valve - screen may be restricted, or valve does not operate. Hot gas valve may not operate check and repair/replace. Harvest time set too short - timer needs adjustment. Too much heat load.
DCE33 User's Manual WIRING DIAGRAM June 2013 Page 18
DCE33 User's Manual SCHEMATIC DIAGRAM June 2013 Page 19
SCOTSMAN ICE SYSTEMS 101Corporate Woods Parkway Vernon Hills, IL 60061 800-726-8762 www.scotsman-ice.com 17-3354-01 Rev.