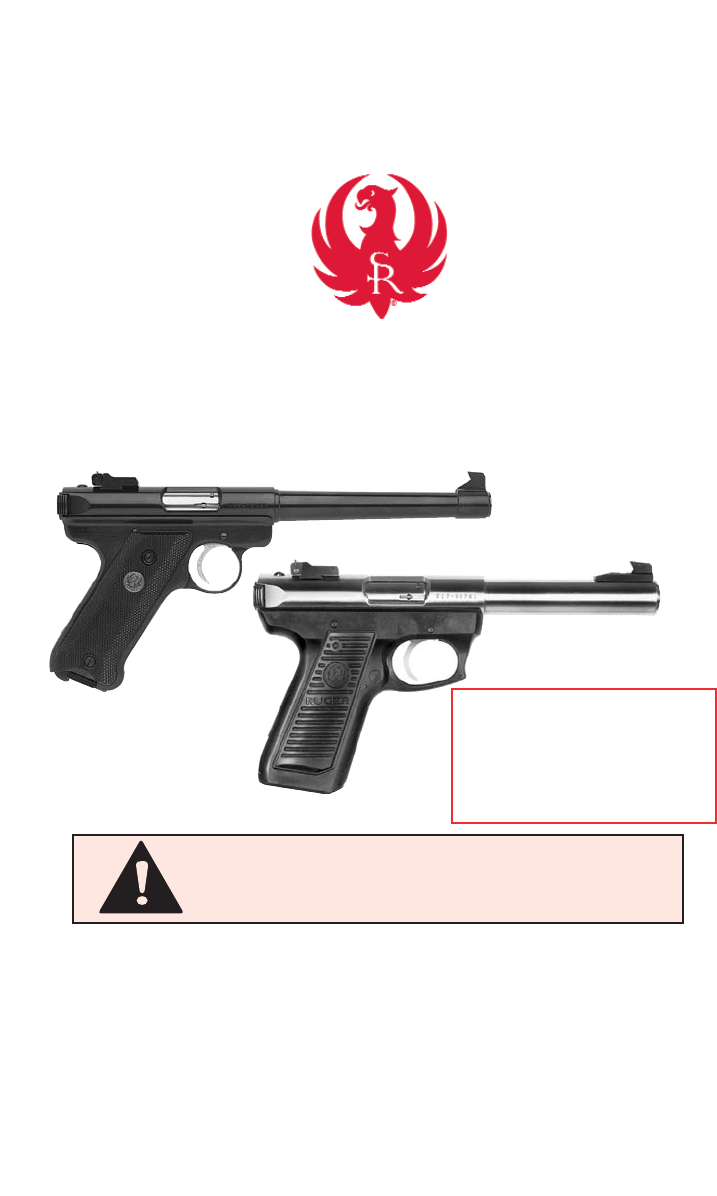
INSTRUCTION MANUAL FOR BLUED & STAINLESS STEEL CALIBER .22 Long Rifle RUGER® MARK II AUTOLOADING PISTOLS STANDARD, TARGET, GOVERNMENT TARGET, COMPETITION, AND 22/45 MODELS FOR REFERENCE ONLY These models are out of production. They have been superceded by the Ruger Mark III Autoloading Pistols. READ THE INSTRUCTIONS AND WARNINGS IN THIS MANUAL CAREFULLY BEFORE USING THIS FIREARM For Product Service on This Model Please Call: (928) 778-6555 (See p. 29) STURM, RUGER & Company, Inc.
State-By-State Warnings Certain states require by law that their own specified warning notices in larger-than-normal type be conspicuously included by the manufacturer, distributor, or retail dealer with firearms sold in that state. Sturm, Ruger sells its products in compliance with applicable laws and regulations. Because our products may be sold in these states, we include the following: California: WARNING ADVERTENCIA “A los niños los atraen las armas de fuego y las pueden hacer funcionar.
Maine: “ENDANGERING THE WELFARE OF A CHILD IS A CRIME. IF YOU LEAVE A FIREARM AND AMMUNITION WITHIN EASY ACCESS OF A CHILD, YOU MAY BE SUBJECT TO FINE, IMPRISONMENT OR BOTH. KEEP FIREARMS AND AMMUNITION SEPARATE. KEEP FIREARMS AND AMMUNITION LOCKED UP. USE TRIGGER LOCKS.” Maryland: “WARNING: Children can operate firearms which may cause death or serious injury.
New Jersey: “IT IS A CRIMINAL OFFENSE TO LEAVE A LOADED FIREARM WITHIN EASY ACCESS OF A MINOR.” New York City: “THE USE OF A LOCKING DEVICE OR SAFETY LOCK IS ONLY ONE ASPECT OF RESPONSIBLE WEAPONS STORAGE. ALL WEAPONS SHOULD BE STORED UNLOADED AND LOCKED IN A LOCATION THAT IS BOTH SEPARATE FROM THEIR AMMUNITION AND INACCESSIBLE TO CHILDREN AND ANY OTHER UNAUTHORIZED PERSONS.
WHY ARE WE INCLUDING A FIRED CARTRIDGE CASE WITH EVERY RUGER PISTOL AND REVOLVER? Certain states and jurisdictions now require that all newly manufactured pistols and revolvers must be accompanied by a cartridge case, which has been test fired from that gun at the factory. The case must be placed in a sealed container bearing certain information concerning this test cartridge.
FIREARMS SAFETY-YOUR RESPONSIBILITY SAFETY MUST BE THE FIRST AND CONSTANT CONSIDERATION OF EVERY PERSON WHO HANDLES FIREARMS AND AMMUNITION. This Instruction Manual is designed to assist you in learning how to use and care for your RUGER® MARK II pistol properly. Please contact us if you have any questions about it. Only when you are certain you fully understand the Manual and can properly carry out its instructions should you practice loading, unloading, etc. with live ammunition.
WARNINGS OF GREAT IMPORTANCE ARE FOUND ON THE FOLLOWING PAGES: Locking Devices Alterations Manual Safety Lead Exposure Ammunition Firing Handling 6 8 10 11 12 14 15 Unloading Malfunctions Disassembly Lubrication Storage Parts Purchasers 15 18 19 26 27 30 OTHER CAUTIONS AND WARNINGS APPEAR THROUGHOUT THE MANUAL. FIREARMS ARE DANGEROUS WEAPONS– READ THE INSTRUCTIONS AND WARNINGS IN THIS MANUAL THOROUGHLY AND CAREFULLY BEFORE USING.
NOMENCLATURE (All Mark II’s other than 22/45) (22/45 shown below) 9
Safety: The safety locks the sear when the safety is “on”. Because the safety cannot be moved to its “on” (S) position unless the hammer is cocked, the safety therefore serves as a cocking indicator. The bolt can be manually retracted and released when the safety is “on” (S). This feature allows the pistol to be loaded or unloaded when the safety is “on” (S).
The bolt stop is spring-loaded to move downward. Therefore, when there is a loaded magazine in place and the pistol is jarred, the bolt may fly forward and chamber a cartridge. For this reason and as an essential safety practice, the safety of the pistol should always be in the “on” (S) position except when the user is firing the gun at a selected target.
AMMUNITION The RUGER® MARK II pistol is chambered only for the .22 caliber Long Rifle cartridge, standard velocity or high velocity, manufactured to U.S. Industry Standards. Do not attempt to load .22 Long, .22 Short, or any other type .22 caliber cartridge into the magazine or in the chamber of the pistol. Use of .22 shot shells is not recommended. See MALFUNCTION WARNING, p. 18.
TO LOAD AND FIRE (WITH MAGAZINE) Practice this important aspect of gun handing (with an unloaded pistol) until you can perform each of the steps — described below — with skill and confidence. But before you do anything with the pistol, first read completely through this manual. 1. Keep the muzzle is pointed in a safe direction. (See Rule 2, p. 41) 2. Grasp the grooved ears of the bolt and pull the bolt to the rear as far as it will go.
Once the safety is pushed down so the “F” shows, the pistol will fire a cartridge each time the trigger is pulled, until all of the cartridges in the magazine, and the one in the chamber, have been fired. KEEP SAFETY ON 7. The pistol is ready for instant use once the safety is disengaged. Firing will automatically reload and recock the pistol.
WARNING – HANDLING If dropped or struck with the safety “off”, the pistol may fire. Keep chamber empty unless actually firing! Keep safety “on” unless actually firing! ANY GUN MAY FIRE IF DROPPED 9. When the last cartridge loaded into the pistol has been fired, the magazine follower presses the slide stop upward to engage the slide automatically holding the action open.
TO UNLOAD NOTE: This sequence must be followed exactly as spelled out. Failure to do so can result in the pistol’s chamber becoming unintentionally loaded with a cartridge. 1. The muzzle of the pistol must be pointing in a safe direction at all times, and fingers must be outside the trigger guard. If the pistol is cocked, put the safety on by pushing safety button fully upward. 2. Remove the magazine from the pistol and place it where it will not get damaged or collect dirt.
4. If desired, the bolt can be left in the open position, being held there by the bolt stop. If it is desired to close the bolt, again look to be certain the chamber is empty. Assuming that the magazine is not in the pistol and that the safety is “on” (S), retract the bolt to its rearmost position, release it, and the bolt will snap forward. Keep your fingers out of the receiver! 5.
WARNING – MALFUNCTIONS The .22 Long Rifle rimfire cartridge fires when the firing pin impacts the relatively soft cartridge case rim, and also can be “discharged” before it is chambered if its rim receives a sharp blow. If a cartridge hangs up, jams, or binds when being chambered or when being fed from the magazine into the chamber, do not attempt to force it into the chamber by pushing or striking the bolt.
a. Make certain the gun and the magazine are unloaded and that the safety is “on” (S). Remember, the magazine should be removed first, then check the chamber and be certain it and the magazine-well are clear of cartridges. b. Thoroughly clean the magazine and bolt mechanism, paying particular attention to removing accumulated grease. Use a bristle brush and solvent to remove grease and fouling from the bolt face, the extractor, the chamber, and the feed ramp.
DISASSEMBLY 1. Remove the magazine. Draw the bolt fully rearward and visually inspect the chamber to be certain there is no cartridge in it and then release the bolt. Place the safety in the “off” (F) position. Point the pistol in a safe direction and pull the trigger, to be sure hammer has fallen. Hammer must be uncocked before pistol can be disassembled. 2.
4. Point muzzle up and pull trigger. Gravity will cause the hammer to return to its cocked position if it became dislodged in step 3. (See Figure 4). 4 FIRING PIN STOP 5 HAMMER CAN BE SEEN INSIDE SLOT 6 5. Slide bolt (recoil spring upward) fully into receiver. NOTE: Before sliding bolt into receiver, BE CERTAIN that the firing pin stop (part number A03500, a small pin) is in the bolt.
PUSH UP UNTIL BOLT STOP PIN PROTRUDES HERE 7 7. Hold the pistol and the mainspring housing bolt stop pin assembly in a horizontal position and press bolt stop pin upward through the holes in the receiver and bolt until the tip of the pin protrudes beyond the top of the receiver. (See Figure 7). Pin must be fully in place to close latch in step 11. 8. (Not applicable to 22/45 models only) Always make sure you can see the hammer strut hanging down inside the housing slot (See Figure 8).
TIP OF HAMMER STRUT OVAL CUT INSIDE MAINSPRING HOUSING 10A 10B 10. Make sure you can see the end of the hammer strut when you lift the housing up (See Figure 10A). The hammer strut should go into the oval-shaped cut inside the mainspring housing. Spring pressure should be felt just before the housing is fully shut if the internal parts are correctly aligned (See Figure 10B). 11 11. The housing latch can now be snapped shut, completing reassembly.
MAGAZINE NOMENCLATURE FOR 22/45 ONLY FOR ALL OTHER RUGER MARK II PISTOLS MAGAZINE DISASSEMBLY TO DISASSEMBLE MAGAZINE: Withdraw magazine from pistol and remove all cartridges (Check chamber to be certain no cartridge remains in it). Hold magazine upside down in left hand so that the hole in the Magazine Block is accessible. 1. With right hand, insert drift punch in hole and depress Magazine Block Retaining Plunger approximately 1/4". 2.
MAGAZINE DISASSEMBLY 5 Remove Follower 2 Slide Block Forward 4 1 Remove Button Push Up 3 Remove Spring & Plunger DAMAGED, NON-STANDARD, OR IMPROPERLY ASSEMBLED MAGAZINES SHOULD NOT BE USED. THEY CAN CAUSE THE PISTOL TO MALFUNCTION. CARE AND CLEANING Make Sure Gun is Unloaded! Before cleaning, be certain the pistol and its magazine contain no cartridges (See “To Unload”, p. 16).
3. Using powder solvent on a clean patch or bristle brush, remove powder residue from all components of the mechanism. After cleaning, run a dry patch through the bore, then follow with a patch that is very lightly oiled. Wipe all surfaces clean with a cloth, then wipe all surfaces with a patch or cloth that has been very lightly oiled. 4. NOTE: Only a light application of oil is needed to provide adequate lubrication of moving parts and to prevent rust.
Using a paper clip or similar non-marring tool, pull down on the main spring housing latch located at the lower rear of the pistol grip. Swing the main spring housing upward. With the pistol pointed upward, pull the trigger. Keeping the pistol pointing downward swing the main spring housing back in to the pistol grip and push the latch back into the main spring housing until it is flush with the pistol grip.
SIGHT ADJUSTMENT The Standard RUGER® MARK II pistol is equipped with a rear sight which is adjustable for windage only. The rear sight can be drifted laterally in its dovetail on the top of the slide by tapping it with a wooden or plastic headed hammer or similar implement. The front sight is fixed. Target models are equipped with adjustable sights. Turning the top (elevation) sight adjustment screw clockwise lowers the impact of the shot.
Disassemble one ring and reassemble over the scope body between the turret and the eyepiece so that the clamp nut (D-73) is positioned to the right of the scope. Install the four top screws. Do not tighten. Disassemble the other ring and install it on the forward section of the scope tube with the clamp nut positioned to the right of the scope. Install the four top screws. Again, do not tighten.
Enclose a letter which includes your name, address, telephone number, serial number and model of the firearm. Describe in detail the trouble you have experienced with your firearm, or the work you wish to have done. Merely stating that the firearm “needs repair” is inadequate information. State precisely what is wrong. Please enclose copies of any previous correspondence. Work performed will bear a net minimum labor charge of $20.00 plus a $20.00 shipping and handling charge.
RUGER® MARK II PARTS LIST Design, prices and specifications subject to change without notice.
* 32 * * * * * * * Part Name Bolt Stop Thumbpiece Bolt Stop Thumbpiece Case Only, Not Illustrated Case Only, Not Illustrated Disconnector Assembly Ejector, Not Illustrated Ejector, Not Illustrated Ejector Rivet, Not Illustrated Ejector Rivet, Not Illustrated Extractor Extractor Plunger Extractor Plunger Extractor Spring Firing Pin Firing Pin Stop Firing Pin Stop Front Sight, Must Be Drilled For Cross Pin Front Sight, Must Be Drilled For Cross Pin Front Sight, Must Be Drilled For Cross Pin Front Sight Fron
Part No.
34 Part Name Hammer Strut Hammer Strut Pin Hammer Strut Pin Magazine, Assembly, Complete, 10-Shot Capacity Magazine, Assembly, Complete, 10-Shot Capacity Magazine Block Bottom Magazine Block Bottom Magazine Block Retaining Plunger Magazine Follower Magazine Follower Button Magazine Latch Magazine Latch Magazine Latch Magazine Latch Pin, 2 Req’d. Magazine Latch Pin, 2 Req’d.
35 Part Name Mainspring Housing/Latch Assembly, Not Illustrated Mainspring Housing/Latch Assembly, Not Illustrated Mainspring Housing/Latch Assembly, Not Illustrated Mainspring Housing Latch Pin Mainspring Housing Latch Pin Mainspring Plunger Medallion, Black Medallion, Red Rear Sight, Fixed Rear Sight, Adjustable, Complete Part No.
36 * * * * * Part Name Rear Sight Pivot Pin Part No. KMR05600 Rear Sight Windage Adjustment Screw E05903 Rear Sight Windage Spring MR05907 Rebound Spring Rebound Spring Rebound Spring Support Rebound Spring Support Recoil Spring Assembly Safety, Assembly, Complete Safety, Assembly, Complete Safety, Assembly, Complete Safety Detent Plunger Safety Detent Plunger Safety Detent Spring, Not Illustrated Safety Detent Spring Scope Mount Base (3.421”), with Screws Scope Mount Base (4.
* * * * 37 * Part Name Sear Pivot Pin Sear Pivot Pin Sear Spring Sear Spring Sear Spring Sear Spring Stop Pin Sear Spring Stop Pin Trigger, Black Trigger, Silver Trigger, Black Trigger, Silver Trigger Pivot Pin Trigger Pivot Pin Trigger Pivot Pin Trigger Pivot Retainer Trigger Pivot Retainer Trigger Spring Trigger Spring Trigger Spring Plunger Trigger Spring Plunger Trigger Stop Screw PARTS SO MARKED MUST BE FACTORY FITTED Part No.
RUGER® MARK II EXPLODED VIEW Note A — The Bolt Stop components in this group are for holding open the bolt and are not functionally related to the Bolt Stop Pin (A00100) and Bolt Stop Pin Pivot (A02602). These two later components are attached to the Mainspring Housing (A00900). See parts drawing below for relationship of parts. Front and rear sights for the Target Models are not adaptable to Standard Models.
RUGER® 22/45 EXPLODED VIEW Note B — The Bolt Stop components in this group are for holding open the bolt and are not functionally related to the Bolt Stop Pin (A00100) and Bolt Stop Pin Pivot (A02602). These two later components are attached to the Mainspring Housing (AP00901). See parts drawing below for relationship of parts. Front and rear sights for the Target Models are not adaptable to Standard Models.
RUGER® COMPETITION MODEL COMPONENT PARTS (All other parts the same as Mark II) NOTE C — Scope mount bases and rings listed will fit all Mark II and 22/45 pistols. Only the Mark II Competition model is drilled and tapped at the factory. All other models must be drilled and tapped by your local gunsmith. Drilling and tapping instructions are available on request.
THE BASIC RULES OF SAFE FIREARMS HANDLING We believe that Americans have a right to purchase and use firearms for lawful purposes. The private ownership of firearms in America is traditional, but that ownership imposes the responsibility on the gun owner to use his firearms in a way which will ensure his own safety and that of others. When firearms are used in a safe and responsible manner, they are a great source of pleasure and satisfaction, and represent a fundamental part of our personal liberty.
A safe direction must take into account the fact that a bullet may penetrate a wall, ceiling, floor, window, etc., and strike a person or damage property. Make it a habit to know exactly where the muzzle of your gun is pointing whenever you handle it, and be sure that you are always in control of the direction in which the muzzle is pointing, even if you fall or stumble. Keep your finger off the trigger until you are ready to shoot. 3. FIREARMS SHOULD BE UNLOADED WHEN NOT IN USE.
5. BE SURE OF YOUR TARGET BEFORE YOU SHOOT. Don’t shoot unless you know exactly where your bullet is going to strike. Be sure of the bullet stop behind your target, even when dry-firing with an unloaded gun. If you are in the field hunting, do not fire at a movement or noise. Take the time to be absolutely certain of your target before you pull the trigger. 6. WEAR SHOOTING GLASSES AND HEARING PROTECTORS WHEN YOU SHOOT.
8. DON’T SHOOT AT A HARD SURFACE, OR AT WATER. Bullets can glance off many surfaces like rocks or the surface of water and travel in unpredictable directions with considerable velocity. 9. NEVER TRANSPORT A LOADED FIREARM. Firearms should always be unloaded before being placed in a vehicle. A suitable carrying case or scabbard should by used to carry an unloaded firearm to and from the shooting area. 10. AVOID ALCOHOLIC BEVERAGES WHEN SHOOTING. Don’t drink until the day’s shooting is over.
A BRIEF ACCOUNT OF AN EXTRAORDINARY ACHIEVEMENT: RUGER FIREARMS One of the few American firearms manufacturers whose management has remained in the same family since starting in business, Sturm, Ruger & Company, Inc., had its beginning in a small machine shop occupying a rented frame building in Southport, Connecticut. In January, 1949, with an initial investment of only $50,000 and an idea, William B. Ruger and Alexander M. Sturm started production of a .
WHY NO WARRANTY CARD HAS BEEN PACKED WITH THIS NEW RUGER FIREARM The Magnuson-Moss Act (Public Law 93-637) does not require any seller or manufacturer of a consumer product to give a written warranty. It does provide that if a written warranty is given, it must be designated as “limited” or as “full” and sets minimum standards for a “full” warranty. Sturm, Ruger & Company, Inc.