
User`s guide


Dazzle Digital Video Creator 150 User’s Guide • Capturing Video • Page 16
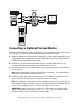
Capturing Video
To capture video to your computer’s hard disk, follow the steps below (for more detailed
instructions on capturing video, see your MovieStar 5 User’s Guide).
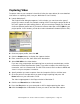
1. Launch MovieStar 5.
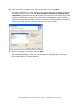
The Project Profile dialog box appears. In this window, you can choose the type of
project you want to create, for example, making a DVD. Choosing the project profile at
this point speeds the video editing process, but you can always change your mind and
choose a different profile later. If you want to create a video tape, choose DVD for your
project profile. In this window, you can also select a broadcast standard (NTSC or PAL).
2. Choose a project profile, then click OK.
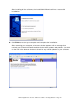
3. Click the Capture button to display the Capture window.
4. Enter a name for your file, then select a file destination.
5. Select DVC 150 as the video device.
If you are using a camcorder and capturing from a previously recorded tape, set the
camcorder to Video Tape Recorder mode. If you want to capture live video from the
camcorder, set it to Camera mode. The DVC 150 converts the live video to MPEG and
stores it on your computer’s hard disk.
6. Specify whether you want to capture from the Composite (RCA) or S-Video input.
7. Go to the point on the tape where you want to begin capturing and press the
Pause button on your camcorder or VCR.
The video image appears in the Player window in MovieStar 5.
8. Click the red Record button in MovieStar 5.
9. Press the Play button on your camcorder or VCR to begin capturing the video.
10. Click the Stop button in MovieStar 5 when you want to end the video capture.