Dazzle Digital Video Creator 150 User’s Guide Copyright SCM Microsystems. All rights reserved. Trademarks are used for informational purposes, and remain the property of their owners.
Table of Contents Introduction Congratulations!. . . . . . . . . . . . . . . . . . . . . . . . . . . . . . . . . . . . . . . . . . . . . . . 3 What’s Included . . . . . . . . . . . . . . . . . . . . . . . . . . . . . . . . . . . . . . . . . . . . . . . 4 About This Guide . . . . . . . . . . . . . . . . . . . . . . . . . . . . . . . . . . . . . . . . . . . . . . 5 Getting Started Minimum System Requirements . . . . . . . . . . . . . . . . . . . . . . . . . . . . . . . . . . . 6 Hardware Overview. . . . . .
Introduction Congratulations! You have just purchased the Dazzle Digital Video Creator 150. The Dazzle Digital Video Creator 150 (referred to as DVC 150 throughout this guide) is the ultimate solution for creating Hollywood style movies from your home videos. The DVC 150 captures DVD quality video from any camcorder, VCR or TV. The DVC 150 has a Hi-Speed USB 2.0 interface to the computer which means if your computer supports USB 2, you will get even higher quality video.
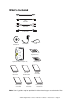
What’s Included USB Cable RCA Video Cable RCA Audio Cable S-Video Cable Stand Power Adapter Installation CD Registration Card Digital Video Creator 150 (DVC 150) DVC 150 User’s Guide DVC 150 Quickstart Guide DVD Complete User’s Guide OnDVD User’s Guide Warranty Card MovieStar User’s Guide Technical Support Information Kit Note: Users’ guides may be provided in either hard copy or as electronic files.
Other Items You Might Need For some configurations, you may need additional audio and video input/output cables. For example, if you are outputting to a VCR, you may want to connect a TV monitor to the VCR to view your material. This requires the right kind of cable, which varies depending on the VCR and monitor. It may be necessary to use a coaxial video cable, which is usually included with VCRs.
Getting Started Minimum System Requirements To use the DVC 150, your computer system must meet the following minimum requirements: CPU: 500 MHz processor Hard Disk Requirement: Minimum 5400 RPM, 150MB of free disk space for software installation Operating System: Microsoft® Windows® 98 SE, Me, 2000, or XP Video: 1024 x 768, 24-bit color, DirectX 8 or above RAM: 128MB minimum Sound: PC must have a sound card Interface: USB 1.
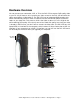
Hardware Overview You can connect your camcorder, VCR, or TV to the DVC 150 to capture DVD quality video to your PC. All you have to do is connect your video source to the DVC 150 and click the video record button in MovieStar 5. The DVC 150 has an integrated DVD encoder chip, which automatically converts video in real-time into the DVD format (MPEG-2) before it lands on your hard disk. This process shrinks the video to about 1/4 of its original size while retaining DVD quality.
Software Overview The DVC 150 includes three Dazzle software applications: MovieStar 5, DVD Complete, and OnDVD. Following is a description of each of these software applications. MovieStar 5 MovieStar 5 makes editing your video easy, but it doesn’t leave out the powerful features you want. Cut unwanted scenes and add 3D transitions, titles, and special effects. Add your favorite background music to set the mood or do a voice-over narration to explain important scenes.
Software Installation You must install the DVC 150 software before you connect the hardware. To install the required DVC 150 drivers and the included software applications, follow these steps: 1. Insert the provided DVC 150 Installation CD in your computer’s CD-ROM/DVD-ROM drive. The InstallShield Wizard Welcome screen appears.
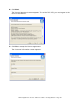
2. Click Next. The License Agreement screen appears. To use the DVC 150, you must agree to the terms of the license. 3. Click Yes to accept the license agreement. The Customer Information screen appears.
4. Enter your name, company name, and serial number, then click Next. The Select Components screen appears. This screen allows you to select the drivers and applications you want to install. Dazzle strongly recommends installing all the components. The Hardware drivers and utilities are required for the video input/output operations. MovieStar is required for video capture and playback. DVD Complete is required to design and burn DVDs. OnDVD is required to create Slideshows.
After installing all the software, the InstallShield Wizard confirms a successful installation. 6. Click Finish to restart your computer and complete the installation. After restarting your computer, a browser window appears with a message that reminds you to check the Dazzle website for the latest updates and patches. Just click on the link in the browser window to check for any critical updates to your software.
Hardware Installation After you install the DVC 150 software, you can install the hardware. Installing the DVC 150 hardware is an easy, two step process, as described below. 1. Connect one end of the AC power cord to the back of the DVC 150 and the other end to an electrical outlet. To avoid damaging your DVC 150, use only the supplied power adapter. DVC 150 Power Adapter 2.
Capturing Video This section explains how to capture video from an analog source, such as a camcorder, VCR, or TV, so you can edit the video and create special effects on your computer. You’ll learn how to set up the DVC 150 for analog video input, which is converted into DVD compatible video (MPEG-2) for use on your computer. Connecting Video Input To connect your camcorder, VCR, or TV to the DVC 150 to capture DVD quality video, follow these steps: 1.
DVC 150 VHS Audio Out Audio In RCA Video Out S-Video Out Or RCA Video In S-Video In Audio Out Audio In RCA Video Out S-Video Out RCA Video In Or TV S-Video In TV Optional Preview Monitor Connecting an Optional Preview Monitor Although you can preview your video in MovieStar 5, you may prefer to view it at full size on a TV monitor. To connect an optional preview monitor, follow these steps: 1.
Capturing Video To capture video to your computer’s hard disk, follow the steps below (for more detailed instructions on capturing video, see your MovieStar 5 User’s Guide). 1. Launch MovieStar 5. The Project Profile dialog box appears. In this window, you can choose the type of project you want to create, for example, making a DVD. Choosing the project profile at this point speeds the video editing process, but you can always change your mind and choose a different profile later.
Editing Video Now that your video has been captured, you can edit it with MovieStar 5. Cut out unwanted scenes, splice together different clips and add Hollywood-style special effects like titles, transitions, voice-overs and background music. For detailed information on editing video, see your MovieStar 5 User’s Guide. Creating DVDs, VCDs and S-VCDs For instructions on creating DVDs, VCDs, S-VCDs, and Webcasting, see the supplied MovieStar 5, DVD Complete, and OnDVD users’ guides.
Outputting Video This section explains how to set up the DVC 150 for analog video output, so you can transfer your edited video to a camcorder or VCR to create customized video tapes. Note: If you have an optional preview monitor connected, you may need to disconnect it to attach the camcorder or VCR that you want to record to. However, you may be able to connect it to the output device as described on page 19.
IMPORTANT: Make sure that your camcorder, VCR, or TV is set up properly to receive a video signal. It may be necessary to set your camcorder to VTR mode, while a VCR or TV may need to be set to “Line In,” “L1,” “L2,” “Aux” or a similar channel. Remember that you need to use a Y-adapter if your device only supports mono input. Check your camcorder, VCR, or TV documentation for specific details.
Outputting Video For instructions on outputting your edited video to a camcorder or VCR, see your MovieStar 5 User’s Guide. Note: The DVC 150 captures audio in LPCM format. Before you burn a VCD or S-VCD, you must manually render your video file. This converts the audio stream to PCM format. If you try to burn a non-rendered video file to a VCD or S-VCD in MovieStar 5, an error message appears. For DVD burning, MovieStar 5 uses DVD Complete, which automatically converts the audio stream to PCM format.
Troubleshooting Frequently Asked Questions If you experience difficulties with your DVC 150, please check the troubleshooting section below for possible solutions. If the problems persist, please go to page 24 of this user’s guide for information on contacting Dazzle’s Technical Resource Center. During installation, my DVC 150 is connected to my computer’s USB port, but does not find the required drivers. Before connecting the DVC 150 to your computer’s USB port, you must install the required drivers.
When I try to capture video using the DVC 150 and MovieStar 5, the preview screen in MovieStar 5 displays a green and black image. Begin by closing and reopening MovieStar 5. Located below the profile option buttons (DV, Video CD, S-Video CD, DVD, MultiMedia), a radio button appears with two options: PAL/Europe and NTSC/USA. Make sure the NTSC/USA radio button is checked (has a black dot in it). How do I increase my computer system’s resources for optimal video performance? 1.
12. Run a disk defragmenting program to speed up your computer's data access functions. Windows 98SE, Me: • Click Start. • Click Run. • Type Defrag. Windows 2000, XP: • Click Start. • Click Programs. • Click Accessories. • Click System Tools. • Click Disk Defragmenter. 13. Disable Windows Visual Effects. Windows XP only: • Open the System Properties. • Click the Advanced tab. • Click the Performance - Settings button. • Click the Adjust for best performance radio button. • Click OK. • Click OK. 14.
Technical Support Dazzle Technical Resource Center The Dazzle DVC 150 is easy to use and normally should not produce complications. However, if you need assistance or have questions of any kind, our trained staff members are ready to help. We highly recommend that you use the Dazzle Interactive Knowledgebase at www.Dazzle.com, as this is the fastest method of accessing support resources for your Dazzle product. Begin by clicking the Support link, then select Interactive Support from the provided menu.