Dazzle ® ZiO!™ Hi-Speed Portable Reader/Writer User’s Guide Copyright SCM Microsystems. All rights reserved. Trademarks are used for informational purposes, and remain the property of their owners.
Table of Contents Introduction Congratulations! . . . . . . . . . . . . . . . . . . . . . . . . . . . . . . . . . . . . . . . . . . . . . . . . . . . 3 What’s Included . . . . . . . . . . . . . . . . . . . . . . . . . . . . . . . . . . . . . . . . . . . . . . . . . . . 4 About This Guide . . . . . . . . . . . . . . . . . . . . . . . . . . . . . . . . . . . . . . . . . . . . . . . . . . . 4 Getting Started Minimum System Requirements . . . . . . . . . . . . . . . . . . . . . . . . . . . . . . . . . . . . .
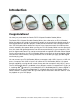
Introduction Congratulations! You have just purchased the Dazzle ZiO!™ Hi-Speed Portable Reader/Writer. The Dazzle ZiO! Hi-Speed Portable Reader/Writer (also referred to as ZiO HS Reader/ Writer throughout this guide) is designed for people on the go who have digital cameras or other digital devices like MP3 players, mobile phones and PDAs that use digital media. Your ZiO HS Reader/Writer addresses the two most important needs for mobile professionals, durability and speed.
What’s Included Dazzle Installation CD ZiO! Hi-Speed Portable Reader/Writer (Also referred to as ZiO HS Reader/Writer) OnDVD User’s Guide (PC-only Included on CD) ZiO! Hi-Speed Portable Reader/Writer User’s Guide (Included on CD) USB Extender Cable ZiO! Hi-Speed Portable Reader/Writer Quickstart Guide (included on inside of packaging) Dazzle Technical Resource Center Information (Included on CD) About This Guide This Guide explains how to use the Dazzle ZiO HS Reader/Writer.
Getting Started Minimum System Requirements To use the ZiO HS Reader/Writer, your system must meet the following requirements: PC Requirements 200MHz or faster processor USB Port USB 2.0 port for maximum performance Windows® 98 SE, 2000, Me, or XP CD-ROM drive (for driver software and bonus software installation) 64MB RAM minimum (128MB recommended) 4MB free disk space Macintosh® Requirements G3 processor or faster (iMac®, iBook®, PowerBook®, PowerMac® G3 and G4) USB Port USB 2.
Registering Your ZiO HS Reader/Writer Thank you again for purchasing the Dazzle ZiO HS Reader/Writer. In order for us to better serve you, we encourage you to register your ZiO HS Reader/Writer as soon as possible.
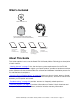
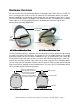
Hardware Overview You can connect your ZiO HS Reader/Writer to computers with USB 1.1 ports or USB 2.0 ports. Computers with USB 2.0 ports will utilize the ZiO HS Reader/Writer’s Hi-Speed transfer capability, moving data at a much faster rate than computers with USB 1.1 ports. The ZiO HS Reader/Writer is available in four different models: SmartMedia/xD, CompactFlash (Type I & II, including IBM Microdrive), MultiMediaCard/Secure Digital, and MemoryStick (including MagicGate).
Software Overview Driver Software PC driver software is required for Windows 98 SE. It is not required for Windows Me, XP, or 2000. Driver software is not required for Macintosh computers running Mac OS 9.x or Mac OS 10.0.4 or higher. If you are running a Mac OS X version prior to version 10.0.4, please contact Apple® for an upgrade. PC and Macintosh installation instructions are provided on the following pages.
Installing the Software On a PC The Dazzle Installation CD includes the following PC software components: • • • • • • • Hardware Drivers (Windows 98 SE only) Dazzle OnDVD Software Adobe Acrobat Reader 5 Installer (required for electronic documentation) Dazzle Technical Resource Center Information* Dazzle Product Demo (English only) Dazzle Product Registration Electronic Users’ Guides *You can also find information on Dazzle’s North American and European Technical Resource Centers on page 45 and page 46 re
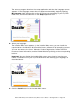
The auto-run program launches the setup application and then the Language screen appears. If the Language screen does not appear automatically, begin by opening My Computer. Next, double-click on the drive letter corresponding to your CD/DVDROM drive, and then double-click on the Setup application icon. 2. Select your language. The Installer Main menu appears. In the Installer Main menu, you can install the required drivers for Windows 98 SE and the bonus software for all operating systems.
The Dazzle Setup prepares for the installation, and then the InstallShield Wizard Welcome screen appears. Note: The screens below differ slightly for each of the supported operating systems. 4. Click Next. The License Agreement screen appears. To use the ZiO HS Reader/Writer, you must agree to the terms of the license. 5. Click Yes to accept the license agreement.
The Select Components screen appears. This screen allows you to select the software you want to install. Dazzle strongly recommends installing all the components. OnDVD is required to create Slideshows. Acrobat is required to read the electronic users’ guides. The Product Demo provides an overview of many current Dazzle products. For an OnDVD tutorial on creating slideshows, refer to the supplied OnDVD User’s Guide (requires Adobe Acrobat 5). 6. Select the desired components and click Next.
After restarting your computer, a browser window appears with a message that reminds you to check the Dazzle website for the latest updates and patches. Just click on the link in the browser window to check for any critical updates to your software.
Installing the Hardware on a PC You can connect your ZiO HS Reader/Writer to computers with USB 1.1 ports or USB 2.0 ports. Computers with USB 2.0 ports will utilize the ZiO HS Reader/Writer’s Hi-Speed transfer capability, moving data at a much faster rate than computers with USB 1.1 ports. ( Note: If you are running Windows 98 SE, you must install the required drivers before connecting your ZiO HS Reader/Writer to your computer, as described in the previous section, beginning on page 9.
Connecting to a Computer’s USB Port Connect the ZiO HS Reader/Writer directly to an available USB port on your computer. If your computer is located in an inconvenient location, connect one end of the provided USB extender cable to the USB connector on the back of your ZiO HS Reader/Writer, and then connect the other end of the cable to an available USB port on your computer. Note: Be sure the cable ends are properly aligned before connecting and do not force the connection.
Connecting to a USB Hub 1. Connect the USB hub (purchased separately) to an available USB port on your computer. 2. Connect the ZiO HS Reader/Writer directly to an available USB port on the USB hub. If your hub is located in an inconvenient location, connect one end of the provided USB extender cable to the USB connector on the back of your ZiO HS Reader/Writer, and then connect the other end of the cable to an available USB port on the USB hub.
Installing the Software On a Macintosh Driver software is not required for Macintosh computers running Mac OS 9.x or Mac OS 10.0.4 or higher. For these operating systems, simply connect the ZiO HS Reader/Writer to your Mac’s USB port or a USB hub, as described on the following pages. You can then insert a media card and access any of its files using the removable disk icon displayed on your Mac desktop. For more detailed instructions, see “Using the ZiO HS Reader/Writer” beginning on page 20.
Connecting to a Macintosh USB Port Connect the ZiO HS Reader/Writer directly to an available USB port on your Mac. If your Mac is located in an inconvenient location, you can connect one end of the provided USB extender cable to the USB connector on the back of your ZiO HS Reader/Writer, and then connect the other end of the cable to an available USB port on your Mac. Note: Be sure the cable ends are properly aligned before connecting and do not force the connection.
Connecting to a USB Hub 1. Connect the USB hub (purchased separately) to your Mac’s USB port. 2. Connect the ZiO HS Reader/Writer directly to an available USB port on the USB hub. If your hub is located in an inconvenient location, you can connect one end of the provided USB extender cable to the USB connector on the back of your ZiO HS Reader/ Writer, and then connect the other end of the cable to an available USB port on the USB hub.
Using the ZiO HS Reader/Writer This section shows you how to use your ZiO HS Reader/Writer to insert, access, format, and remove digital media cards, and how to transfer files between your computer and a card. Digital Media Card Compatibility The ZiO HS Reader/Writer is available in four different models: SmartMedia/xD, CompactFlash (Type I & II, including IBM Microdrive), MultiMediaCard/Secure Digital, and Memory Stick (including MagicGate). Following is card compatibility information for each model.
Inserting a SmartMedia or xD Card Before you insert a SmartMedia or xD card in the ZiO HS Reader/Writer, position the unit with the Access Indicator on top, as shown below. Then flip its protective ring to the open position to uncover the USB connector and the card slot and convert the ring to a stand, as described in “Hardware Overview” on page 7.
Inserting a CompactFlash Card Before you insert a CompactFlash card in the ZiO HS Reader/Writer, position the unit with the Access Indicator on top, as shown below. Then flip its protective ring to the open position to uncover the USB connector and the card slot and convert the ring to a stand, as described in “Hardware Overview” on page 7. To insert a CompactFlash card, follow these steps: 1. Position the CompactFlash card in the direction shown in the illustration below. 2.
Inserting a MultiMediaCard or Secure Digital Card Before you insert a MultiMediaCard or Secure Digital card in the ZiO HS Reader/Writer, position the unit with the Access Indicator on top, as shown below. Then flip its protective ring to the open position to uncover the USB connector and the card slot and convert the ring to a stand, as described in “Hardware Overview” on page 7.
Inserting a Memory Stick Card Before you insert a Memory Stick card in the ZiO HS Reader/Writer, position the unit with the Access Indicator on top, as shown below. Then flip its protective ring to the open position to uncover the USB connector and the card slot and convert the ring to a stand, as described in “Hardware Overview” on page 7. If you plan on writing to or deleting from your Memory Stick card, make sure the card is not locked (see the illustration below). MagicGate secure mode is not supported.
Accessing a Card on a PC When the ZiO HS Reader/Writer is installed on your system (as explained earlier in this guide), you can access a card as follows: 1. Insert a card in the ZiO HS Reader/Writer, as explained in the previous section. If you are running Windows XP and you insert a digital media card, a dialog box may appear that asks what you want to do with the files on the Removable Disk. You can access the files by selecting from several options in the dialog box.
3. Double-click on the Removable Disk icon. The files and/or folders on the card appear in the Removable Disk’s window. In the example below, the Removable Disk’s window displays nine tiff files. You can now copy, open, edit, or delete any of the files on the card. For instructions on copying files from a card to your computer, see “Transferring Files on a PC” on page 27. Digital cameras usually create one or more folders on a card, containing your digital images.
Transferring Files on a PC You can use the ZiO HS Reader/Writer to transfer files between your computer and a card using the basic Windows file transfer functions. For example, you can copy and paste or drag and drop files from a card to your computer or from your computer to a card. Although there are numerous approaches for copying or moving files, the instructions below show you how to copy a file from a card and paste it into a folder on your computer.
Note: There are numerous approaches for transferring files between your computer and a card. For complete details on transferring files, please refer to your Windows Help file, or Help and Support in Windows XP. You can find the Windows Help file and Help and Support under the Start button located in the lower left corner of your desktop. After you open Windows Help, click on the Index tab to display its contents. Then scroll down to, and double-click on copying files, folders.
Formatting a Card on a PC Sometimes it may be more convenient to format a digital media card in the ZiO HS Reader/Writer rather than in your original digital device. In some cases, your device may not have a format option, or you may be required or prompted to format a card. To format a digital media card in the ZiO HS Reader/Writer, follow the steps below. Caution: Formatting a card completely erases any data on the card.
4. Select a format type (Quick or Full) in the Format window. The Windows XP and 2000 default format type is Full. The Windows 98 SE and Me default format type is Quick. The Quick option works only on previously formatted cards and erases any existing files. The Full option prepares a non-formatted card for initial use, so you can store files on it.
6. Click OK in the warning dialog box. The formatting operation begins. When formatting is completed, a confirmation dialog box appears. 7. Click OK in the confirmation dialog box. Removing a Card on a PC Before you remove a digital media card, make sure that the Access Indicator at the top of the ZiO HS Reader/Writer is not flashing. The Indicator flashes when the ZiO HS Reader/ Writer is reading or writing data on a card.
Mounting and Accessing a Card on a Macintosh When the ZiO HS Reader/Writer is installed on your system (as explained earlier in this guide), you can access a card as follows: 1. Insert a card in the ZiO HS Reader/Writer, as explained earlier in this guide. A removable disk icon representing your card appears on the Mac desktop (see the example below). This is the card’s mounted state, which allows you to perform read and write operations on the card.
Transferring Files on a Macintosh You can use the ZiO HS Reader/Writer to transfer files between your Mac and a card using the Mac’s drag and drop function. For example, you can drag and drop files from a card to your Mac or from your Mac to a card. The instructions below show you how to copy a file from a card to a folder on your Mac. You can copy a file from your Mac to a card by reversing these instructions.
Formatting a Card on a Macintosh Dazzle strongly recommends that you format your digital media cards in your digital device (camera, MP3 player, cell phone, etc.). However, there may be times when you need to format a card in the ZiO HS Reader/Writer. In some cases, your digital device may not have a format option, or you may be required or prompted to format a card. Caution: Formatting a card completely erases any data stored on the card.
Formatting a Card Using Mac OS X To format a digital media card in the ZiO HS Reader/Writer using Mac OS X or higher, follow the steps below. 1. Choose Applications from the Go menu. The Applications window appears. 2. Double-click the Utilities icon.
The Utilities window appears. 3. Double-click the Disk Utility icon. The Mac OS X Disk Utility window appears. In this window, you can test, repair, and/or erase a partition or disk.
4. Insert your digital media card in the ZiO HS Reader/Writer. The card mounts on your Mac desktop and appears as a disk icon. The card also registers in the Disk Utility, and its disk icon and disk volume icon appear in the Disk Utility window’s left pane, as shown in the example below. Note: If the volume icon does not appear, simply click the disk icon (see the illustration below).
5. Select the disk icon in the Disk Utility window, then click the Erase tab. The Erase instructions and related information appear in the Disk Utility window. 6. Click on the Volume Format box, then choose MS-DOS File System from the dropdown menu. Important: Do not specify a name in the Name field. The Disk Utility retains the existing volume name or provides a default volume name.
7. Click the Erase button in the Disk Utility window. A warning dialog box informs you that erasing the disk destroys any data on the disk. 8. Click the Erase button in the warning dialog box to format the card, or click Cancel to quit.
Removing a Card on a Macintosh Before you remove a digital media card, be sure the Access Indicator at the top of the ZiO HS Reader/Writer is not flashing. The Indicator flashes when the ZiO HS Reader/Writer is reading or writing data on a card. Removing a card during read/write access causes lost or corrupted data. Removing a Card Using Mac 0S 9.x To remove a digital media card from the ZiO HS Reader/Writer using Mac OS 9.
Removing a Card Using Mac OS X To remove a digital media card from the ZiO HS Reader/Writer using Mac OS X, please wait until the Access Indicator stops flashing, then follow the instructions below. 1. Select the card’s removable disk icon and choose Eject from the File Menu (or drag the removable disk icon over the Trash icon), as shown below. The removable disk icon disappears from the desktop. It is now safe to remove the card.
Troubleshooting Frequently Asked Questions If you experience difficulties with your ZiO HS Reader/Writer, please check the troubleshooting section below for possible solutions. If the problems persist, please go to page 45 for information on Dazzle’s North American Technical Resource Center, or page 46 for information on Dazzle’s European Technical Resource Center. During installation, my ZiO HS Reader/Writer is connected to my computer’s USB port, but does not find the required drivers.
When I insert a digital media card and double-click the Removable Disk Icon, I cannot access my data. PC If you are using a SmartMedia card, be sure to insert the card with the gold contacts facing down and the notch at the top left corner. For more information on inserting your SmartMedia card, please refer to “Inserting a SmartMedia or xD Card” on page 21 of this user’s guide. If you are using an xD card, be sure to insert the card with the gold contacts facing down and the notch on the left side.
When I try to write to a SmartMedia card, an error message appears. Make sure the card’s write protection sticker is not covering the write protect area (see illustration on page 21). You cannot write to or delete from the card until you remove the sticker. When I try to write to a Secure Digital card an error message appears. Make sure the write protect switch is not in the locked position (see the illustration on page 23).
Technical Support Dazzle’s North American Technical Resource Center The Dazzle ZiO HS Reader/Writer is easy to use and normally should not produce complications. However, if you need assistance or have questions of any kind, our trained staff members are ready to help. Visit www.Dazzle.com and use the Support menu item to access Dazzle’s various support resources.
Dazzle’s European Technical Resource Centers The Dazzle ZiO HS Reader/Writer is easy to use and normally should not produce complications. However, if you need assistance or have questions of any kind, our trained staff members are ready to help. We highly recommend that you first check the Dazzle Europe website at www.Dazzle-Europe.com or the Dazzle German website at www.Dazzle.de for updates and downloads for your Dazzle product. E-mail support is also available via the Dazzle Europe and German websites.
United Kingdom: 09062 160 180 (25p/Min) Italy: If you have checked the Dazzle website for updates and downloads and if you have been unable to resolve your difficulties or answer your questions via E-mail, please contact local support using the phone numbers listed on our website at www.Dazzle-Europe.com. Click the Support link and select Contact from the provided menu.
SCM Microsystems, Inc. One Year Limited Warranty Coverage SCM warrants this hardware product to be free from defects in materials and workmanship for the warranty period. This non-transferable, limited warranty is only to you, the first end-user purchaser. The warranty begins on the date of purchase and lasts for one (1) year, unless otherwise stated on the product packaging.
If the SCM representative determines your product is eligible for warranty service, you will be required to return it to SCM packaged sufficiently to avoid damage, shipping prepaid, along with proper identification, a return authorization number provided by the representative, and proof of purchase. Customers located in Latin America may obtain warranty service by returning the SCM product to the dealer where it was purchased.