
Installation Guide


Page 10
4. Installation
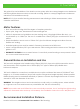
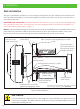
Wall Installation
This type of installation is similar to roof mounting, ensuring that the pipe extends at least 50mm past
the wall surface refer gure 2. If the pipe length is shortened, reproduce the power cord exit slot on
the inside of the wall.
IMPORTANT FOR 1600 MOTOR: Weather shield must be tted to the top cover of the side ange using
the 3 screws provided. Also, it is required to use the hanging bracket for wall mount installation, for
more information please refer to page 15.
NOTE: By decreasing the length of the exi duct from which specied (refer to installation instructions)
there will be an increase in airow and noise levels as a result. This increase in airow can cause
movement of air to be heard through the system and inhibit the system to run silently.
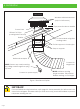
Figure 2 Wall Installation
Wall
Wall Optional
Fitment Pipe
Weather shield
must be at top
(1600 motor only)
Optional Mounting Flange
(P40113MF*)
150mm PVC Stormwater Pipe
From outside face of ange to end of
pipe (or wall if mounting ange not used)
50
50
Locking screws to be fully
tightened engaging in holes
Locking holes at 4 and 10 o’clock
Locking screws
Power cord to
240V supply
Seal with silicone
or urethane
Fill gap between
pipe and wall or t
second wall mount
ange if required
1600
motor
IMPORANT
For more exible ducting instructions, refer page 22. Shutter assembly for 1600 motor is not
shown in the diagram. Weather shield (for 1600 motor only) should be installed to prevent
rain/water entering the unit.
*Optional wall mounting ange (P40113MF) is available
from Schweigen, please contact 1300 829 066.