
Operating instructions


infraSchwank D / calorSchwank D - shape U
29
Version 005 infra_calor D shape U Australia 42/14 Technical specification subject to change
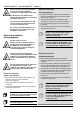
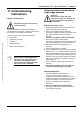
11 Commissioning
instructions
Before commissioning
Only authorised personnel can curry
out this operation.
The correct operation and fixing of the heater is
prerequisite for the warranty. Checking gas lines and
flue system is not included in this service.
Check the function of the following equipment:
Exhaust flue
Combustion air supply
Control unit
Safety equipment
Safety of electrical circuit
Pay attention when commissioning!
Vaporization of remaining grease of
metal units may cause greasy mist.
This kind of mist disperses after
approx. 30 minutes. During this time
the room has to be ventilated.
Adjusting nominal thermal load at
single-stage operation
Attention!
The pressure control unit is pre-
adjusted on natural gas / propane. Do
not put the appliance into operation
uncontrolled.
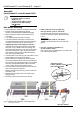
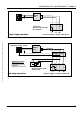
Adjusting the nozzle pressure
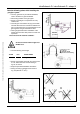
1. Open first the gas cock which is at the end of the
flexible gas hose (Fig.28, page 30).
2. Open the test nipple connection pressure.
Connect the pressure measuring instrument to the
test nipple and determine the connection
pressure.
Close the test nipple after the measurement!
3. Open the test nipple nozzle pressure.
Connect the pressure measuring instrument to the
test nipple to determine the connection pressure.
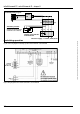
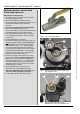
4. Remove the protection cap A (see Fig. 29,
page 30).
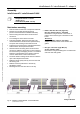
5. Put the radiant tube into operation.
6. Turn the adjusting screw on the pressure regulator
slowly in the “+” or “-” -direction while continuously
watching the pressure measuring instrument. Stop
turning as soon as the required nozzle pressure is
reached. The required nozzle pressure for natural
gas H (W
o,B
=50.0 MJ/m
3
) or propane is shown in
table 5, page 18.
7. Put the protection cap A on the valve after the
adjusting.
8. Close the test nipple after the measurement
and check if the test nipple is gas-tight.
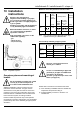
Checking adjustment
1. Turn the adjustment screw slightly to “-“
-direction. Nozzle pressure must drop
immediately. If this does not happen, you must
readjust the jet pressure until the point is reached
at which a decrease or increase in the nozzle
pressure is noticeable on the measuring
instrument.
2. Close test nipple after the measurement!
3. Remove the measuring instrument and check if
the test nipple is gas-tigh