
Instructions


26
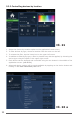
4. To add a new time trigger to a scenario, tap the Add option in the upper right corner
(see Illustration 23) and choose the Time Trigger option.
a. Select the activation time on the Time Trigger dialog.
b. Tap the option button, if a one-time event is desired. In that case, choose the date
when the event should occur.
c. If the event should repeat, select the Weekly option button and the weekdays when
the scenario should be executed (see Illustration 26).
5. To add the trigger, tap the OK button.
6. Repeat steps 3 through 5 until all trigger events have been added.
7. Tap the button in the bottom right corner to continue making device settings.
Adding state settings for the device.
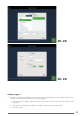
8. To add a new triggering component to a scenario, tap the Add option in the upper right
corner (see the upper right corner of Illustration 26a)
9. Select the triggering device from the Add Device dialog and tap OK. The devices can
be filtered by type or location by selecting the corresponding button at the top of the
dialog.
10. After being added to the scenario, the button for the device will be available for state
configuration.
11. Repeat steps 9 through 11 until all displayed devices have been configured.
12. To complete the scenario, tap the button in the bottom right corner.
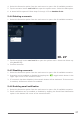
Setting a scenario name
13. Enter a scenario name in the depicted dialog and tap the OK button.
5.4.2 Executing a scenario
1. Select the Scenarios option from the main menu to open a list of available scenarios
2. Briefly tap the quick control for the scenario to execute the scenario.
3. Confirm execution.
5.4.3 Editing a scenario
Ill. 26a