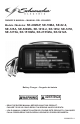
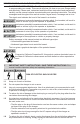
OWNER’S MANUAL • Manual del usuario Models / Modelos: SE-40MAP, SE-70MA, SE-82-6, SE-125A, SE-520MA, SE-1010-2, SE-1052, SE-1250, SE-1275A, SE-1510MA, SE-2151MA, SE-5212A Battery Charger • Cargador de batería ADVERTENCIA • READ THE ENTIRE MANUAL BEFORE USING THIS PRODUCT. FAILURE TO DO SO COULD RESULT IN SERIOUS INJURY OR DEATH. • LEA EL MANUAL COMPLETO ANTES DE UTILIZAR ESTE PRODUCTO. CUALQUIER FALLA PODRÍA RESULTAR EN SERIAS LESIONES O PODRÍA SER MORTAL.
DO NOT RETURN THIS PRODUCT TO THE STORE! Call Customer Service for Assistance: 800-621-5485 ¡NO LO DEVUELVA este producto A LA TIENDA! Llame a Servicios al Cliente para Asistencia: 800-621-5485
Table of Contents Section Page IMPORTANT SAFETY INSTRUCTIONS 1 PERSONAL PRECAUTIONS 2 PREPARING TO CHARGE 3 CHARGER LOCATION 3 DC CONNECTION PRECAUTIONS 3 FOLLOW THESE STEPS WHEN BATTERY IS INSTALLED IN VEHICLE 4 FOLLOW THESE STEPS WHEN BATTERY IS OUTSIDE VEHICLE 4 grounding and ac power cord connections 5 ASSEMBLY INSTRUCTIONS 5 CONTROL PANEL 5 OPERATING INSTRUCTIONS 7 CALCULATING CHARGE TIME 8 MAINTENANCE INSTRUCTIONS 9 Moving and STORAGE INSTRUCTIONS 9 TROUBLESHOOTING 10
ÍNDICE SECCIÓN PÀGINA INSTRUCCIONES IMPORTANTES DE SEGURIDAD 17 PRECAUCIONES PERSONALES 18 PREPARACIÓN PARA LA CARGA 19 UBICACIÓN DEL CARGADOR 19 PRECAUCIONES DE CONEXIÓN EN CC 20 SIGA ESTOS PASOS CUANDO LA BATERÍA ESTÉ COLOCADA EN EL VEHÍCULO 20 SIGA ESTOS PASOS CUANDO LA BATERÍA SE ENCUENTRE FUERA DEL VEHÍCULO 21 Conexiones a tierra y energía de CA 21 INSTRUCCIONES DE MONTAJE 22 PANEL DE CONTROL 22 INSTRUCCIONES DE OPERACIÓN 24 CÁLCULO DE TIEMPO DE CARGA 25 INSTRUCCIONES DE MANTE
IMPORTANT: READ AND SAVE THIS SAFETY AND INSTRUCTION MANUAL. SAVE THESE INSTRUCTIONS – The SE series chargers offer a wide range of features to accommodate your needs. This manual will show you how to use your charger safely and effectively. Please read, understand and follow these instructions and precautions carefully, as this manual contains important safety and operating instructions. The safety messages used throughout this manual contain a signal word, a message and an icon.
1.7 Do not operate the charger with a damaged cord or plug; have the cord or plug replaced immediately by a qualified service person. (Call customer service at: 1-800-621-5485.) 1.8 Do not operate the charger if it has received a sharp blow, been dropped or otherwise damaged in any way; take it to a qualified service person. (Call customer service at: 1-800-621-5485.) 1.9 Do not disassemble the charger; take it to a qualified service person when service or repair is required.
2.11 3. If battery acid is accidentally swallowed, drink milk, the whites of eggs or water. DO NOT induce vomiting. Seek medical attention immediately. PREPARING TO CHARGE RISK OF CONTACT WITH BATTERY ACID. BATTERY ACID IS A HIGHLY CORROSIVE SULFURIC ACID. 3.1 If it is necessary to remove the battery from the vehicle to charge it, always remove the grounded terminal first. Make sure all of the accessories in the vehicle are off to prevent arcing. 3.
6. FOLLOW THESE STEPS WHEN BATTERY IS INSTALLED IN VEHICLE A SPARK NEAR THE BATTERY MAY CAUSE A BATTERY EXPLOSION. TO REDUCE THE RISK OF A SPARK NEAR THE BATTERY: 6.1 Position the AC and DC cables to reduce the risk of damage by the hood, door and moving or hot engine parts. NOTE: If it is necessary to close the hood during the charging process, ensure that the hood does not touch the metal part of the battery clips or cut the insulation of the cables. 6.
8. grounding and ac power cord connections RISK OF ELECTRIC SHOCK OR FIRE. 8.1 This battery charger is for use on a nominal 120-volt circuit and has a grounded plug that looks like the plug illustrated. The charger must be grounded to reduce the risk of electric shock. The plug must be plugged into an outlet that is properly installed and grounded in accordance with all local codes and ordinances. The plug pins must fit the receptacle (outlet). Do not use with an ungrounded system. 8.
NOTE: Not all switches and LED’s are available on all models. Ammeter The Ammeter indicates the amount of current, measured in amps, that is being drawn by the battery. As a battery takes on a charge, it draws less current from the charger. Correspondingly, the meter will show less current being drawn by the battery. When the current stops decreasing, the battery is charged. The start area of the meter indicates a high rate of current being drawn from the charger.
any apparent battery filler caps. If, however, the battery manufacturer/distributor recommends periodic checking of the electrolyte level and provides access to the battery for water additions, the battery is probably a conventional/low maintenance type. Charge Rate Selector Switch (Voltage/Amp Selector) Use this switch to set the maximum charge rate to one of the following.
In this mode, the charger keeps the battery fully charged by delivering a small current, when necessary. If the battery voltage drops below a preset level, the charger will go back into charge mode until the battery voltage returns to the full charge level, at which point the charger will return to maintain mode. The voltage is maintained at a level determined by the BATTERY TYPE selected. NOTE: An Automatic charger automatically switches between Charge Mode and Maintain Mode as necessary.
BATTERY SIZE/RATING SMALL BATTERIES CARS/ TRUCKS Motorcycle, garden, tractor, etc. 6 - 12 AH 200 - 315 CCA 40 - 60 RC 315 - 550 CCA 60 - 85 RC 550 - 1000 CCA 80 - 190 RC MARINE/DEEP CYCLE 13.
15. TROUBLESHOOTING PROBLEM No reading on the ammeter. Ammeter reading stays high. Charger will not turn on when properly connected. POSSIBLE CAUSE REASON/SOLUTION Charger is not plugged in. Plug the charger into an AC outlet. No power at the receptacle. Check for open fuse or circuit breaker supplying AC outlet. Clips are not making a good connection to the battery. Check for poor connection to battery and frame. Make sure connection points are clean.
PROBLEM The charger is making an audible clicking sound. Charger makes a loud buzz or hum. Short or no start cycle when cranking engine. POSSIBLE CAUSE REASON/SOLUTION Circuit breaker is cycling. The settings may be wrong. Check the charger settings. Battery is defective. Have the battery checked. Shorted battery cables or clips. Circuit breaker cycles when current draw is too high. Check for shorted cables or clips and replace if necessary.
. BEFORE RETURNING FOR REPAIRS 16.1 When a charging problem arises, make certain that the battery is capable of accepting a normal charge. Use a good battery to double check all connections, AC outlet for a full 120-volts, charger clips for correct polarity and the quality of the connections from the cables to the clips and from the clips to the battery system. The clips must be clean. 16.
To activate the warranty, please fill in the warranty registration card on page 15 and mail it in, OR go to www.batterychargers.com to register your product online.
• 14 •
2 YEAR LIMITED WARRANTY PROGRAM REGISTRATION MODEL:___________________ DESCRIPTION:___________________________ This is the only express limited warranty, and the manufacturer neither assumes nor authorizes anyone to assume or make any other obligation. There is no other warranty, other than what is described in the product owner’s manual. The warranty card should be submitted within 30 days of purchase. The customer must keep the ORIGINAL receipt because it will be required for any warranty claims.
• 16 •
IMPORTANTE: LEA Y GUARDE ESTE MANUAL DE INSTRUCCIONES Y SEGURIDAD. GUARDE ESTAS INSTRUCCIONES: Los SE cargadores ofrece una amplia gama de características para satisfacer sus necesidades. Este manual le mostrará cómo utilizar su cargador en forma segura y efectiva. Por favor, lea, comprenda y siga estas instrucciones y precauciones cuidadosamente, ya que este manual contiene instrucciones operativas y de seguridad de importancia.
• El tamaño del cable sea lo suficientemente extenso para el amperaje en C.A. del cargador como se especifica en la sección 8. 1.6 Para reducir el riesgo de descarga eléctrica, desenchufe el cargador del tomacorriente antes de intentar llevar a cabo cualquier actividad de mantenimiento o limpieza. El simple apagado de los controles no reducirá este riesgo. 1.
2.7 Considere la idea de que alguna persona se encuentre cerca suyo para poder ayudarlo cuando trabaje en forma cercana a una batería de plomo-ácido. 2.8 Cuente con una gran cantidad de agua potable y jabón a mano en caso de que el ácido de la batería tenga contacto con su piel, ropa u ojos. 2.9 Utilice protección visual y corporal completa, incluyendo gafas de seguridad y prendas de protección. Evite tocar sus ojos mientras trabaje en forma cercana a la batería. 2.
4.3 No ubique la batería encima del cargador. 4.4 Nunca permita que el ácido de la batería gotee sobre el cargador al leer el peso específico del electrolito o al cargar la batería. 4.5 No utilice el cargador en un área cerrada o restrinja la ventilación en cualquier forma. 5. PRECAUCIONES DE CONEXIÓN EN CC 5.1 Conecte y desconecte los ganchos de salida C.C.
7. SIGA ESTOS PASOS CUANDO LA BATERÍA SE ENCUENTRE FUERA DEL VEHÍCULO UNA CHISPA PROVOCADA CERCA DE LA BATERÍA PUEDE CAUSAR LA EXPLOSIÓN DE LA BATERÍA. PARA REDUCIR EL RIESGO DE PROVOCAR CHISPAS CERCA DE LA BATERÍA: 7.1 Verifique la polaridad de los bornes de la batería. El borne POSITIVO (POS, P, +) de la batería generalmente posee un diámetro mayor al borne NEGATIVO (NEG, N, -). 7.
8.3 Tamaño AWG mínimo recomendado para alargadore: Consumo nominal de C.A., Amperes* Tamaño del cable en AWG, Longitud del cable, en pies (metros) Al menos Pero menor a 25 (7.6) 50 (15.2) 100 (30.5) 150 (45.
Interruptor para establecer diferentes tipos de batería Utilice este interuptor para establecer el tipo de batería a cargar. • SLI: Estas iniciales señalan Arranque (S), Encendiendo (L) e Ignición (I), que son las tres funciones básicas que una batería debe realizar en todo vehículo normal. Este tipo de batería generalmente se utiliza en automóviles, camiones y motocicletas.
• Arranque de motor: proporciona amperios adicional para el arranque de un motor con una batería débil o agotada. Siempre utilizar en combinación con una batería. Interruptor de selección de tensión Utilice este interruptor para configurar el cargador para cargar baterías de 6 voltios, 12 voltios o 24 voltios. NOTA: No se recomiendan estos cargadores para sistemas de 8 o 16 voltios.
NOTA: Un cargadore de batería automático automáticamente pasa del Modo de carga al de mantenimiento según corresponda. El LED FULL CHARGED [cargado] (verde) iniciará el ciclo cuando la batería esté totalmente cargada y se terminará cuando la tensión descienda al nivel predeterminado y el cargador pase al Modo de carga. Este ciclo continuará y el LED FULL CHARGED [cargado] (verde) permanecerá por períodos más largos a medida que la batería se vaya cargando. No es aplicable a cargadores manuales.
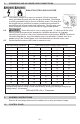
ÍNDICE/TIEMPO DE CARGA 2 6 10 12 15 30 AMP AMP AMP AMP AMP AMP min 2 - 4 45 6 - 12 AH horas -1¼ NR NR NR NR horas 1¼ 12 - 32 AH 4 - 10 - 3 ½ NR NR NR NR horas horas 11 ¼ 3¾ 40 - 60 2¼ – 3 2 – 2½ 1½ – 2 45 min 14 ½ 4¾ RC horas horas horas – 1 hr horas horas 14 ½ 4 60 - 85 3 – 3¾ 2½ – 3 2 – 2½ 1 – 1¼ - 18 ¼ ¾ - 6 RC horas horas horas horas horas horas ¼ 6 - 11 3¾ – 7 3 – 5¾ 2½ 1¼ 80 - 190 -18 34 ¾ ½ – 4¾ – 2½ RC horas horas horas horas horas horas 17 ½ 6 3½ 2½ 1¼ 80 RC horas horas horas 3 horas horas horas 27
15. LOCALIZACIÓN Y SOLUCIÓN DE PROBLEMAS PROBLEM No se manifiesta la lectura en el amperímetro. La lectura en el amperímetro permanece elevada. POSSIBLE CAUSE REASON/SOLUTION Cargador desenchufado. Enchufe el cargador a un tomacorriente de CA. No hay electricidad en el tomacorriente. Verifique la posible presencia de fusibles abiertos o disyuntores que suministren energía al tomacorriente de CA. Los ganchos no se encuentran bien conectados a la batería.
PROBLEM POSSIBLE CAUSE REASON/SOLUTION El amperímetro lee una cantidad menor al índice de carga seleccionado cuando se carga una batería descargada El alargador es demasiado largo o el calibre del cable es demasiado pequeño. Utilice un alargador de calibre más pequeño o pesado. Batería débil o placa sulfatada en la batería. Una batería sulfatada finalmente acepta una carga normal si se la deja conectada. Si la batería no acepta la carga, hágala revisar.
PROBLEM Ciclo reducido o sin inicio al arrancar el motor. POSSIBLE CAUSE REASON/SOLUTION Consumo mayor a el índice de arranque del motor. El tiempo de arranque varía según la cantidad de corriente consumida. Si el arranque consume más el índice de arranque del motor, el tiempo de arranque podría ser menor a 3 segundos. No espera 4 minutos (240 segundos) entre los arranques. Aguarde 4 minutos en tiempo de descanso antes del próximo arranque. Los ganchos no se encuentran bien conectados.
17. GARANTÍA LIMITADA SCHUMACHER ELECTRIC CORPORATION, 801 BUSINESS CENTER DRIVE, MOUNT PROSPECT, IL 60056-2179, REALIZA LA PRESENTE GARANTÍA LIMITADA AL COMPRADOR MINORISTA ORIGINAL DE ESTE PRODUCTO. LA PRESENTE GARANTÍA LIMITADA NO PUEDE TRANSFERIRSE NI CEDERSE.
• 31 •
DO NOT RETURN THIS PRODUCT TO THE STORE! Call Customer Service for Assistance: 800-621-5485 ¡NO LO DEVUELVA este producto A LA TIENDA! Llame a Servicios al Cliente para Asistencia: 800-621-5485