
Installation Guide

Configuration
3–10 975-0679-01-01 Revision F
To connect the Conext ComBox to a Xanbus network:
The assumption at this point is that there is an existing Xanbus network and all
Xanbus-enabled devices in that network have been previously interconnected
with each other.
1. Put the Xanbus-enabled inverters, inverter/chargers, and solar charge
controllers into standby mode before connecting the Conext ComBox to
avoid triggering any unintentional time-based events.
You may put the Xanbus-enabled inverters, inverter/chargers, and solar
charge controllers out of standby mode later when you have completed
configuration of the Conext ComBox.
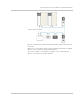
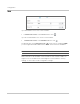
2. Using the sample illustration below, connect the Conext ComBox to the
Xanbus network.
Note:
Xanbus is a valid power source for the Conext ComBox. However, for first-
time setup, using Xanbus as a power source is not recommended. The Conext
ComBox clock will override the other Xanbus devices’ clocks and could trigger
unintentional time-based events. Therefore, DO NOT connect the Conext
ComBox to the Xanbus network prior to setting up the internal clock of the Conext
ComBox. If Xanbus is the only power source to the ComBox, after installation
verify the time settings in all devices
.
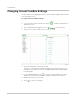
See “Changing the Time” on page 3–5.
NOTICE
EQUIPMENT DAMAGE
Do not connect a Xanbus RJ-45 cable plug into the 10/100 Ethernet port of the
Conext ComBox.
Failure to follow these instructions can damage equipment or affect
network performance.