
Installation Guide

Connecting the Conext ComBox to the Xanbus Network
975-0679-01-01 Revision F 3–9
Connecting the Conext ComBox to the Xanbus
Network
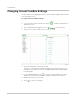
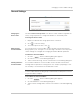
After you have installed and configured the Conext ComBox, you can add the
Xanbus devices. The Conext ComBox application automatically discovers new
devices, and Modbus addresses are assigned according to the starting address
configuration settings. Log out of the web user interface and then log in again to
check the Modbus address for the new device and its status.
The Xanbus network cable (a CAT5 cable) can provide both data communication
and power from Xanbus-enabled devices.
When applying power to the Conext ComBox by connecting it to the Xanbus
network, make sure the Xanbus network itself has power. The inverter/charger or
controller supplying power to the Xanbus network must be operating.
The following Xanbus-enabled devices can provide power to the Xanbus
network:
• Conext XW+ Inverter/Chargers
• Conext SW Inverter/Chargers
• MPPT 80 600 Solar Charge Controllers
The MPPT 60 150 Solar Charge Controller, Conext System Control Panel, and
Conext Automatic Generator Start cannot provide power to the Conext ComBox.
However, two or more Conext TX Grid-tie Inverters in the same Xanbus network
can supply enough power to the Conext ComBox.
Note:
• Use Xanbus network cables that are at least 6.5 feet (2 m) long such as:
25-foot (7.6-m) network cable (809-0940)
75-foot (22.9-m) network cable (809-0942)
• Using Xanbus network cables shorter than 6.5 feet (2 m) will result in
degraded Xanbus network performance
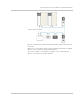
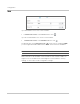
Note:
• Xanbus components can be arranged in any order
a
.
• Use a network terminator at both ends of the Xanbus network.
a.Similar to the Grid-Tie Solar Inverter Monitor, a maximum of five Grid-Tie inverters can be
connected in series to the Conext ComBox. Since the Conext ComBox can support up to 20 Grid-
Tie inverters, you can use a hub to connect four sets of 5 Grid-Tie inverters.