
Installation guide


224 Installing Custom Cable Systems
890 USE 100 00
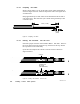
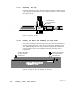
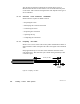
D .6.7 Replacing the Cap
Carefully replace the cap as shown in Figure 94 below. Make sure the
cap is properly aligned to fit over the wiring terminals. Do not install
the cap screw yet.
CAP IN PLACE
(DO NOT INSTALL
SCREW)
Figure 94 Replacing the Cap
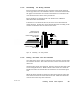
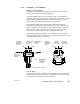
D .6.8 Seating the W ires and Installing the Cap Screw
Close the tool firmly to seat the wires into the connector terminals as
shown in Figure 95 below. Close the tool completely against its stop
tab. While holding the tool closed, insert the cap screw through the
hole provided in the tool and tighten it into the connector with a
screwdriver.
CLOSE TOOL FIRMLY
TO SEAT WIRES IN
CONNECTOR
INSERT AND TIGHTEN
CAP SCREW WHILE
HOLDING TOOL
Figure 95 Seating the W ires and Installing the Cap Screw