
Installation guide


154 Connecting an RR85 Repeater
890 USE 100 00
6.1 Mounting Methods
As supplied, the RR85 Repeater’s bottom surface is fitted with pads for
mounting on a horizontal surface, such as a shelf or platform. The unit
is supplied also with brackets for bolting it to a vertical panel.
The Repeater is supplied with a power cable of 6 ft (2 m) length. You
must provide either 110 ... 120 VAC or 220 ... 240 VAC single-phase
power. The power cable connects to a socket on the rear panel.
Grounding is supplied through the power cable.
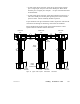
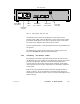
The Repeater has a set of network indicators located on its top surface,
near the front of the unit. These indicate the communication status of
the two links of the network that are connected to the Repeater. Your
choice of mounting method should include provision of access to the
device for observing these indicators. You should also locate the unit
for easy access to its rear panel power and network cable connectors,
and for future servicing.
6.1.1 Horizontal Mounting
For mounting on a horizontal surface, place the unit at or below eye
level to allow viewing the network indicators. Secure it to the surface
to prevent it from shifting its position. Do not allow the unit to pull or
strain on the network cables and power cable.
The mounting brackets supplied with the unit for vertical panel
mounting can also be used to secure the unit on a horizontal surface.
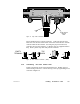
6.1.2 Vertical Mounting
For vertical mounting, use the brackets supplied with the unit for
bolting to a panel. The brackets have tabs that insert into slots
provided on the Repeater’s bottom panel. No additional hardware is
required for securing the brackets to the Repeater. You will have to
furnish hardware for bolting the Repeater brackets to your panel. Four
bolts are required. Typically, standard 1/420 (10 mm) bolts or
equivalent will be satisfactory.
The Repeater’s indicators will usually be readable at or slightly above
eye level when the unit is installed in the vertical position.