
Installation guide


142 Installing the Network Cable
890 USE 100 00
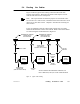
Refer to Figure 51. Route the cable between the site locations of the
node devices. Guidelines for cable routing are described below. For
dual-cable routing, follow these guidelines for each cable.
V Use a continuous length of trunk cable between locations. Do not
use any splices.
V In dual-cable installations, make sure that each trunk cable, tap,
and drop cable is properly marked so that it can be positively
identified as belonging to Cable A or Cable B over the entire
end-to-end length of the network.
V At each tap location, allow sufficient trunk cable length for a
service loop to prevent pulling or twisting the cable.
V For each drop cable, provide a service loop to allow the connector to
be connected and disconnected at the network node device without
any strain on the cable. A service loop of 6 in (15 cm) minimum
radius is adequate for most installations.
V Install cable ties or clamps on each trunk cable segment as required
for strain reliefs, to prevent the cable from pulling on the tap.
V Install cable ties or clamps on each drop cable as required for strain
reliefs, to prevent the cable from pulling on the tap or node device
connector.
V Use additional ties or clamps as required to secure each cable from
flexing or other damage in areas of mechanical motion devices and
traffic.