
Installation guide


138 Installing the Network Cable
890 USE 100 00
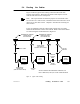
5.1 Overview of the Cable Installation
This chapter describes how to install the network trunk and drop
cables. It is intended primarily for the installer, but can also be useful
to the network planner in estimating installation time and labor
requirements. It also provides an overview of tap connections to assist
the network planner. Each tap package includes detailed instructions
for the tap installer.
You will be performing the following actions to install and check the
cable:
V Install a tap at each network node site. Mount it close enough to
the node device to allow the drop cable to be installed with a
sufficient service loop. Drop cables are available in lengths of 2.5 m
(8 ft) and 6 m (20 ft).
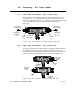
V At each tap location except the two ends of the section of trunk
cable, make sure that both of the internal jumpers are disconnected
and removed inside the tap. Chapter 1 describes the meaning of a
trunk cable section.
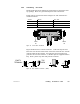
V At the tap locations at the two ends of the section of trunk cable,
connect both of the internal jumpers inside the tap. This chapter
describes how to connect the jumpers.
V Route the trunk cable in accordance with the layout diagram
described in Chapter 4, and connect it to the taps. Include a small
service loop at the tap connection to eliminate any pulling or
twisting of the cable.
V Connect the proper length of drop cable to each tap. Connect the
ground wire on the drop cable to the tap grounding screw and node
device panel ground.
V Label the trunk cable segments and drop cables to assist in future
maintenance.
V Inspect the cable run and check the cable’s continuity before
connecting it to the network node devices.