
DITRA-HEAT Installation Handbook

18 INSTALLATION
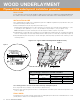
Heating Cables
Warning
• Before installing and operating this product, the user and/or installer must read, understand and follow these instructions and keep them handy for future
reference. If you have a question, please contact Customer Service by phone 800-472-4588 (USA) or 800-667-8746 (Canada) or from our website at
www.schluter.com.
• If these instructions are not followed, the warranty will be considered null and void and the manufacturer deems no further responsibility for this product.
• The following instructions must be adhered to in order to avoid personal injuries or property damages, serious injuries and potentially fatal electric shocks.
• This product must be installed by a qualified person in accordance with this installation handbook and with the Canadian Electric Code Part I (Canada) or
the National Electric Code (U.S.) as applicable. All electric connections must be made by a qualified electrician, according to the electrical and building
codes effective in your region.
• A dedicated circuit is recommended for each application.
• A Class A ground fault circuit interrupter (GFCI) is required for each circuit. The DITRA-HEAT-E thermostats include a GFCI, thus a GFCI circuit breaker
is not required when using these thermostats.
• NEVER install a cable designed for a 120 V power source on a 240/208 V power source.
• This cable must be grounded. Connect the heating cable ground to the ground wire from the electrical panel.
• Mark the circuit breaker in the electrical panel that is dedicated to the DITRA-HEAT floor warming system using the identification sticker provided.
Additional stickers provided may be placed on the electrical panel door.
• For installations requiring a cold lead trim or splice, the electrical rating label shall be fixed to the cold lead and visible at the termination junction box.
Removing the label will void the warranty.
• De-energize all power circuits before installation and servicing.
• Very important: Never CUT or modify the heating cable in any way. This would change the cable resistance, will cause damage to the cable, and
could cause cable overheating.
• Heating cables shall not be altered in the field. If the installer or the user modifies the unit, he will be held responsible for any damage resulting from this
modification, and the warranty and the product certification will be void.
• The heating section of the cable must be entirely installed under the floor covering. In order to prevent overheating and system failure, do not install it
anywhere else (e.g. in a wall).
• Do not run the heating cable under or through a wall, partition, or through a floor.
• A thermostat or applicable temperature control device is required for each enclosed area where a heating cable is installed.
• NEVER install the heating cable under vanities, bathtub platforms, free standing bathtubs, kitchen cabinets and islands or any other fixtures or in storage
or clothing closets. Excessive heat will build up in these confined spaces and may cause cable overheating. Walk in closets and toilet rooms are
considered a room and not a closet.
• NEVER use the heating cable for any purpose other than for indoor floor warming as explained in this Handbook.
• DITRA-HEAT is primarily intended to warm tile floors and make them more comfortable underfoot, but can contribute to space heating. See page 28 for
space heating guidelines.
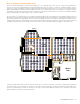
• Always keep a 3 stud (3-1/2" – 9 cm) spacing between cable runs. A narrower spacing may cause cable overheating and damage the floor covering. A
wider spacing (e.g., 4 studs) may not provide sufficient power to warm the floor to the desired temperature. Exception: a two stud spacing is used when
connecting the 240 V cable to a 208 V power supply. See page 31 for more information.
• Heating cables may not touch, cross over, or overlap one another.
• Minimum spacing from walls, partitions, and fixed cabinets is 2" (50 mm).
• Minimum spacing from other heat sources (baseboard heaters, fireplaces, forced air heating ducts, etc.) is 8" (200 mm).
• Minimum spacing from any plumbing drain is 4" (100 mm).
• Minimum spacing from the centerline of toilet drain is 7" (180 mm).
• It is helpful to plan the location of a buffer zone, as it is not possible to predict where the heating cable will end. The buffer zone is an area where heating
is not essential and heating cable installation is not planned (e.g., behind a toilet or adjacent to a door opening). This area allows for placement of excess
heating cable. Heating cables may also be installed 6" (150 mm) from the wall to create a buffer zone.
• NEVER install the factory splice (i.e., black plastic junction between the cold lead and gray heating cable) in the wall. This will cause overheating and
system failure. This splice must be installed entirely under the floor covering, as shown in the heating cable installation instructions.
• Install the two thermostat temperature sensors within the tile assembly. Two floor temperature sensors are provided - one with the DITRA-HEAT
thermostats and one with the DITRA-HEAT-E-HK heating cables.
• Heating cable testing is required while the heating cable is on the spool and at two subsequent steps during installation to ensure cable quality and for warranty
purposes.
• If a break or damage is detected during the heating cable testing, return the cable to the original place of purchase. Do not proceed with heating cable installation
into the DITRA-HEAT or DITRA-HEAT-DUO matting or with the tile covering installation.
• NEVER energize the cable while it is on the spool. This would lead to overheating that could damage the cable and may cause a fire.
• Keep ends of heating devices and kit components dry before and during installation.
• The minimum temperature at which the cable should be installed is 32˚ F (0˚ C).
• Avoid folding the heating cable on itself, a radius of curvature less than 0.0625 inch (1.6 mm) could damage its sheath.
• The minimum installed bending radius of the heating cable is 0.5 inches (12.7 mm).