
Use and Care Guide


Note: See section “Waterproofing” on
the use of KERDI-BOARD in bonded
waterproofing assemblies.
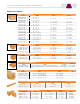
Use of KERDI-BOARD in
non-bearing partition wall systems
Minimum board thickness = 2" (50 mm)
1. Schluter
®
-KERDI-BOARD is adhered
to the permanent wall in such a way
as to provide lateral stability. This
can be achieved by sandwiching
the panel between adjacent KERDI-
BOARD panels, fixed building
elements, etc. As an alternative, the
KERDI-BOARD-ZW angle profile or
KERDI-BOARD-ZB U-shaped profile
may be screw-mounted to the wall prior
to partition installation.
2. Open-ended partition walls can be
further stabilized with the
corresponding KERDI-BOARD-ZA/-ZB
U-shaped profiles. If you plan to screw
finishing hardware (e.g., shower door
hinges) to the U-shaped profile, adhere
the matching KERDI-BOARD-ZFP flat
plastic profile to the back of the U-shaped
profile to improve the fastening of the
screws. U-shaped profiles may also be
used for connections in the floor and
ceiling areas.
3. If multiple KERDI-BOARD panels
are required to create the desired
partition, the panels must be
arranged horizontally with the joints
sealed using thin-set mortar or
Schluter
®
-KERDI-FIX adhesive. The
KERDI-BOARD-ZW angle profile or
KERDI-BOARD-ZB U-shaped profile
may be included in the joints for
improved stability.
4. Such partition walls are not to be
considered load-bearing structural
walls. As a rule, use the 2" (50 mm)
panels for these elements. Panels from
a thickness of 3/4" (19 mm) may be
used for building shelving. Again, this
must be evaluated in accordance with
the building specifications.
5. The tiles can be installed using Schluter
SET™, Schluter ALL-SET™, Schluter
FAST-SET™ or unmodified thin-set
mortar once the bonding materials used
to construct the partition have cured
sufficiently to stabilize the assembly.
Choose a notched trowel to match the
tile format, and back-butter the tiles, if
necessary, to attain full coverage.
Note: See section “Waterproofing” on
the use of KERDI-BOARD in bonded
waterproofing assemblies.
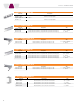
Countertops made of
KERDI-BOARD
Minimum board thickness = 1-1/2" (38 mm)
1. KERDI-BOARD is adhered directly
to base cabinets using the
Schluter
®
-KERDI-FIX adhesive. All joints
of KERDI-BOARD panels must be sealed
with KERDI-FIX or thin-set mortar.
2. The backsplash may consist of
KERDI-BOARD or other appropriate
tile substrate. Seal the countertop/
backsplash transition with Schluter
®
-
KERDI-BAND using Schluter SET™,
Schluter ALL-SET™, Schluter FAST-
SET™ or unmodified thin-set mortar.
3. Countertop edges may be finished
with the KERDI-BOARD-ZC brushed
stainless steel U-profile and
corresponding Schluter
®
-QUADEC
or Schluter
®
-RONDEC, RONDEC-CT,
or RONDEC-STEP profiles.
a. Apply KERDI-FIX to the inside vertical
surface of the KERDI-BOARD-ZC profile
and slide the profile over the edge of the
KERDI-BOARD, pushing it tightly against
the panel. The corresponding QUADEC
or RONDEC profiles are installed with
Schluter SET™, Schluter ALL-SET™,
Schluter FAST-SET™ or unmodified thin-
set mortar in conjunction with the tile.
b. RONDEC-CT and RONDEC-STEP
profiles are installed with Schluter
SET™, Schluter ALL-SET™,
Schluter FAST-SET™ or unmodified
thin-set mortar in conjunction with the tile.
4. The countertop/backsplash transition
may be finished with one of the
Schluter
®
-DILEX cove-shaped profiles.
Various materials and finishes
are available to match the sink rail
profiles above.
5. Sinks may be mounted on top of the
tile or tiled-under using RONDEC or
QUADEC profiles and corresponding
sink corners.
6. The tiles can be installed immediately
using Schluter SET™, Schluter ALL-
SET™, Schluter FAST-SET™ or
unmodified thin-set mortar. Choose a
notched trowel to match the tile format,
and back-butter the tiles, if necessary,
to attain full coverage.
Note: Please refer to the Walls and
Countertops Profiles data sheet for
additional information on profiles,
including installation instructions.
A bearing plate must be provided for
fastening fixtures (e.g., faucet, soap
dispenser, etc.) in tiled-under sink
applications to distribute the pressure of
the fixture hardware on the underside of
the assembly. This may be performed
by routing a section from the top of
the KERDI-BOARD in the area where
the fixtures are to be placed. Apply
a corresponding piece of ceramic tile
with thin-set mortar in the resulting
space flush with the surface of the
KERDI-BOARD. In general, it is
recommended that the tile be at
least 5/16" (8 mm) -thick and extend
approximately 1-1/2" (38 mm) beyond
the fixture hardware on all sides. Once
the countertop is tiled and grouted,
holes may be drilled through the
assembly to fit the fixture-mounting
studs. Additional material may be
removed from the underside of the
KERDI-BOARD to allow installation of
the fixture hardware.
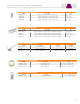
Pipe and column coverings made
of KERDI-BOARD
1. The KERDI-BOARD-E/-U L-shaped and
U-shaped panels allow for quick and
easy covering of pipes and columns.
2. The panels feature V-shaped grooves.
They are supplied flat, which makes
them easy to cut to the required size.
3. Apply thin-set mortar, KERDI-FIX
adhesive, or the KERDI-BOARD-ZDK
double-sided adhesive tape to the
V-shaped grooves. Fold the panels
prior to installation.
4. Adhere the edges of the L-shaped or
U-shaped panels to the existing
walls using either thin-set mortar or
KERDI-FIX. If required, mount the
KERDI-BOARD-ZW angle profile on the
wall area first for reinforcement.
5. The tiles can be installed immediately
using Schluter SET™, Schluter ALL-
SET™, Schluter FAST-SET™ or
unmodified thin-set mortar. Choose a
notched trowel to match the tile format,
and back-butter the tiles, if necessary,
to attain full coverage.
Note: As an alternative, you can also
cut a single U-shaped panel into two
L-shaped panels with shorter legs.
Note: See section “Waterproofing” on
the use of KERDI-BOARD in bonded
waterproofing assemblies.
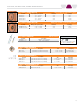
Curved wall areas made of
KERDI-BOARD
1. The Schluter
®
-KERDI-BOARD-V panels
feature grooves to allow for quick and
easy creation of curved elements.
SUBSTRATE, BUILDING PANEL, BONDED WATERPROOFING
3