
Installation Guide
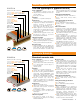

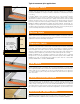

INSTALLATION 19
Apply DITRA or DITRA-XL to the floor, fleece side
down. Solidly embed the matting into the bonding
mortar using a float, screed trowel, or Schluter
®
-
DITRA-ROLLER (please observe the open time of
the bonding mortar).
When using the DITRA-ROLLER, place a weight
(e.g., bag(s) of mortar/grout or box of tile) not to
exceed 75 lbs on the DITRA-ROLLER shelf. Slowly
move the roller from one end of the matting to the
other, slightly overlapping successive passes.
Schluter
®
-DITRA
and
Schluter
®
-DITRA-XL
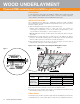
INSTALLATION
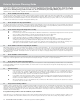
ESTIMATED THIN-SET COVERAGE
To bond DITRA to the substrate, using the
DITRA trowel: Use one 50 lb. (22.68 kg) bag
of mortar per 150 ft
2
(10.7 m
2
).
To bond DITRA-XL to the substrate, using
the DITRA-XL trowel: Use one 50 lb. (22.68
kg) bag of mortar per 100 ft
2
(9.3 m
2
).
To bond the tile to the DITRA, using a
1/4" x 3/8" (6 mm x 10 mm) square- or
U-notched trowel: Use one 50 lb (22.68 kg)
bag of mortar per 40 - 50 ft
2
(3.7 - 4.6 m
2
).
To bond the tile to the DITRA-XL, using
a 1/4" x 3/8" (6 mm x 10 mm) square- or
U-notched trowel: Use one 50 lb (22.68 kg)
bag of mortar per 35 - 45 ft
2
(3.3 - 4.2 m
2
).
A step-by-step installation video is available. E-mail us at info@schluter.com or call us at 800-472-4588 (USA) or 800-667-8746 (Canada).
To see a video clip, go to www.schluter.com.
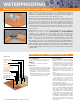
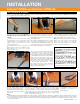
Waterproofing
The following steps are required for waterproofing only:
At the joints, fill the cut-back cavi-
ties with Schluter SET™, Schluter
ALL-SET™, Schluter FAST-SET™, or
unmodified thin-set mortar, approxi-
mately 8" (203 mm) wide, centered
over the joint.
Comb additional Schluter SET™, Schluter ALL-SET™, Schluter
FAST-SET™, or unmodified thin-set mortar over the joint using a
1/4" x 3/16" (6 mm x 5 mm) V-notched trowel or the Schluter
®
-KERDI
trowel, which features a 1/8" x 1/8" (3 mm x 3 mm) square-notched design.
Using the flat side of the trowel, firmly press the 5" (127 mm)-wide
Schluter
®
-KERDI-BAND into the mortar to ensure 100% coverage and to
remove excess mortar and air pockets.
At all wall junctions, apply KERDI-BAND
as described in steps 1-3, ensuring
a minimum of 2" overlap on to
DITRA/DITRA-XL.
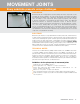
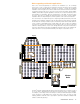
Easy Step-by-Step Installation
Using a thin-set mortar that is suitable for the
substrate, apply the thin-set mortar (mixed to a
fairly fluid consistency, but still able to hold
a notch).
For DITRA use a 1/4" x 3/16" (6 mm x 5 mm)
V-notched trowel, 5/16" x 5/16" (8 mm x 8 mm)
V-notched trowel, or the DITRA trowel which
features a 11/64" x 11/64" (4.5 mm x 4.5 mm)
square-notched design.
For DITRA-XL use a 1/4" x 1/4" (6 mm x 6 mm)
square-notched trowel or the DITRA-XL trowel,
which features a 1/4" x 1/4" (6 mm x 6 mm)
square-notched design.
1
1 2 3 4
Notes
KERDI-BAND must lap DITRA and DITRA-XL at seams and at floor/wall transitions by a minimum of 2" (50 mm) in order to maintain waterproof integrity.
In some applications the vertical section of the floor/wall transition will not accept a bond to unmodified thin-set mortar. Connections to such elements
can be achieved using Schluter
®
-KERDI-FIX or suitable trowel-applied waterproofing materials, such as those that require atmospheric moisture to cure
(e.g., urethane sealant).
Tile can be installed over DITRA and DITRA-
XL immediately; no need to wait for the mortar
to cure. Fill the cut-back cavities with Schluter
SET™, Schluter ALL-SET™, Schluter FAST-SET™,
or unmodified thin-set mortar and comb additional
mortar over the matting using a trowel that is
appropriate for the size of the tile. Solidly embed
the tiles in the setting material. Periodically remove
and check a tile to ensure that full coverage
is being attained. Back-buttering is a useful
way to help ensure proper coverage, particularly
when installing large-format tiles (e.g., 12" x 12"
(305 mm x 305 mm) and larger).
Lift up a corner of the matting to check coverage.
Proper installation results in full contact between
the fleece webbing and the thin-set mortar. Simply
abut end and side sections of adjacent sheets.
Note: Coverage may vary with mortar consistency,
angle at which the trowel is held, substrate
flatness, etc. If full coverage is not achieved,
remove and reapply, making sure to verify proper
mortar consistency and application.
2
4
3