
Installation Guide


18 INSTALLATION
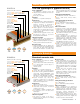
Apply DITRA or DITRA-XL to the floor, fleece side
down. Solidly embed the matting into the bonding
mortar using a float, screed trowel, or Schluter
®
-
DITRA-ROLLER (please observe the open time of
the bonding mortar).
When using the DITRA-ROLLER, place a weight
(e.g., bag(s) of mortar/grout or box of tile) not to
exceed 75 lbs on the DITRA-ROLLER shelf. Slowly
move the roller from one end of the matting to the
other, slightly overlapping successive passes.
Solidly embed the tiles in the setting material,
making sure to observe the open time of the
bonding mortar. If the mortar skins over prior to
tile installation, remove and reapply.
Schluter
®
-DITRA
and
Schluter
®
-DITRA-XL
INSTALLATION
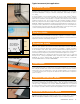
ESTIMATED THIN-SET COVERAGE
To bond DITRA to the substrate, using the DITRA trowel: Use one 50 lb. (22.68 kg) bag of mortar per 150
ft
2
(10.7 m
2
).
To bond DITRA-XL to the substrate, using the DITRA-XL trowel: Use one 50 lb. (22.68 kg) bag of mortar
per 100 ft
2
(9.3 m
2
).
To bond the tile to the DITRA, using a 1/4" x 3/8" (6 mm x 10 mm) square- or U-notched trowel: Use one
50 lb (22.68 kg) bag of mortar per 40 - 50 ft
2
(3.7 - 4.6 m
2
).
To bond the tile to the DITRA-XL, using a 1/4" x 3/8" (6 mm x 10 mm) square- or U-notched trowel: Use
one 50 lb (22.68 kg) bag of mortar per 35 - 45 ft
2
(3.3 - 4.2 m
2
).
A step-by-step installation video is available. E-mail us at info@schluter.com or call us at 800-472-4588 (USA) or 800-667-8746 (Canada).
To see a video clip, go to www.schluter.com.
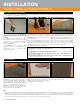
Easy Step-by-Step Installation
Tile Installation
Using a thin-set mortar that is suitable for the
substrate, apply the thin-set mortar (mixed to a
fairly fluid consistency, but still able to hold
a notch).
For DITRA use a 1/4" x 3/16" (6 mm x 5 mm)
V-notched trowel, 5/16" x 5/16" (8 mm x 8 mm)
V-notched trowel, or the DITRA trowel which
features a 11/64" x 11/64" (4.5 mm x 4.5 mm)
square-notched design.
For DITRA-XL use a 1/4" x 1/4" (6 mm x 6 mm)
square-notched trowel or the DITRA-XL trowel,
which features a 1/4" x 1/4" (6 mm x 6 mm)
square-notched design.
Tile can be installed over DITRA and DITRA-XL
immediately; no need to wait for the mortar to
cure. Fill the cut-back cavities with Schluter SET™,
Schluter ALL-SET™, Schluter FAST-SET™, or
unmodified thin-set mortar and comb additional
mortar over the matting using a trowel that is
appropriate for the size of the tile. Be sure the
trowel groves in the thin-set are all going the same
direction, as shown in the photo above.
1
1
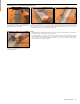
Lift up a corner of the matting to check coverage.
Proper installation results in full contact between
the fleece webbing and the thin-set mortar. Simply
abut end and side sections of adjacent sheets.
Note: Coverage may vary with mortar consistency,
angle at which the trowel is held, substrate
flatness, etc. If full coverage is not achieved,
remove and reapply, making sure to verify proper
mortar consistency and application.
Periodically remove and check a tile to ensure that
full coverage is being attained.
2
2
3
3
Note
Coverage may vary with mortar consistency, angle at which the trowel is held, substrate flatness, etc. If full coverage is not achieved, remove and reapply,
making sure to verify proper mortar consistency and application. For large-format tiles, e.g., 12" x 12" (305 mm x 305 mm) and larger, back-buttering
the tiles with a skim coat of thin-set mortar is a useful way to help ensure proper coverage. The skim coat can fill in the concave area on the back of the
tile (ceramic tiles are not perfectly flat) and improve contact with the mortar combed on the substrate.