iPhone / iPad / iPod Docking Station IPH-2609 USER MANUAL Please read and keep these instructions For instruction manual in another language, check online at http://manuel-utilisateur.logisav.
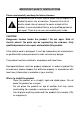
IMPORTANT SAFETY INSTRUCTIONS Please read carefully and keep for future reference To reduce the risk of fire or electric shock, do not expose this product to water, rain or moisture. To prevent the risk of electric shock, do not remove the cover or back of this product. In case of product failure, only qualified personnel can repair. There are no user-serviceable parts inside. CAUTION ! Dangerous tension inside the product ! Do not open. Risk of electric shock ! No parts can be repaired by the end-user.
Proper ventilation - Place the product in a sufficiently–aerated place to avoid overheating. Allow at least 10cm spacing at the back and top of the product, and 5cm spacing on both sides to prevent overheating. - Do not place items such as newspapers, tablecloth, curtains, in front of the ventilating openings. Do not expose the product to high temperatures, moisture, water and dust. - The apparatus shall not be exposed to dripping or splashing.
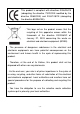
This product is compliant with directives 2006/95/CE (abrogating the directive 73/23/CEE modified by the directive 93/68/CEE) and 2004/108/CE (abrogating the directive 89/336CEE). - This logo set on the product means that the recycling of this apparatus comes within the framework of the directive 2002/96/EC of January 27, 2003 concerning the waste on electrical and electronic equipment (WEEE).
CONTENT IMPORTANT SAFETY INSTRUCTIONS .................................................. 1 CONTENT ................................................................................................. 4 PANELS .................................................................................................... 5 REMOTE CONTROL ................................................................................ 7 CONNECTION ..........................................................................................
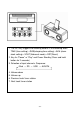
PANELS 1. 2. 3. 4.
1. The SET key triggers the following actions in the following order. TIME (time setting)→SL00(sleeping time setting)→ALM (alarm clock setting)→VOUT(Video out mode)→RST(Reset) 2. Key for “Pause” or “Play” and Power Standby (Press and hold button for 2 seconds) 3. Selection of input channels. Sequence: iPod → SD → USB → AUX/FM 4. Volume down 5. Volume up 6. Previous track/ tuner station 7.
REMOTE CONTROL 1. 2. 3. 4. 5. 6. 7. 8. 9. 10. 11. 12. Standby Mute/VOL decrease FM/Aux input selection iPod input selection SD/USB input selection iPod menu up iPod menu down iPod MENU Previous track/Fast backward Next track/Fast forward Enter iPod play/pause -7- 13. 14. 15. 16. 17. 18. 19. 20. 21. 22. 23.
Battery Installation 1. Release the side latch and pull out the battery holder; 2. Install only a 3 volts Cr2025 battery cell and place battery polarity + respectively to the + sign of the holder. 3.Replace the battery holder. Notes: 1. Use only the size and type of battery specified. 2. Be sure to follow the correct polarity when installing the battery as indicated in the battery compartment. A reversed battery may cause damage to the device. 3.
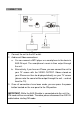
CONNECTION 1. Connect the unit to the A/C outlet. 2. Audio and Video connections: a. You can connect a MP3 player or a smartphone to the device’s AUX-IN input. The smartphone’s music is then output through the unit. b. Alternatively, if you have an iPhone, you can connect the unit to your TV screen with the VIDEO OUTPUT. Videos stored on your iPhone can then be displayed directly on your TV screen (please note the sound will be output through the unit – and not from the TV). 3.
BASIC OPERATION PREPARATIVE 1) Before the unit is turned ON, please check if all the connections are right and safe. Then connect the main power. 2) Press the POWER ON/OFF button on the back panel to turn on the main power. STATE INDICATION OF DISPLAY SCREEN 1. In radio mode, the display screen will show the currently tuned frequency. 2. In iPod/iPhone/iPad,USB,SD, and AUX status, show the playing time.
PREVIOUS & NEXT In play status, press the button to go to the previous audio file; press the button to go to the next audio file. Note: These buttons are unavailable in AUX input. FAST FORWARD & FAST REWIND Press and hold the or button to fast rewind or fast forward. Release the button to resume playing mode. Note: These buttons are unavailable in AUX input. MENU BUTTON While playing the iPod/iPhone, press the MENU button to return to the previous menu of iPod/iPhone.
PLAY/PAUSE BUTTON During playback, press the PLAY/PAUSE button on remote or on the top panel to pause, press the button again to continue playing. iPod/iPhone/iPad OPERATION 1. Insert the iPod/iPhone/iPad to the dock. 2. Press the iPod button on the remote control or repeatedly press the SOURCE button on the top panel to enter to iPod/iPhone/iPad mode. 3.
device. USB and memory slot can solely playback MP3-format music. - If you experience some noise or interference when playing content from your iPhone or iPad, please put your device into airplane mode. USB/DIGITAL CARD It is possible to listen to audio files through the USB and Card reader. 1. Connect the USB device or a SD card to the speaker system. 2. Press the SD/USB button on the remote control to play the USB or CARD. Press SD/USB button again to switch between USB and CARD modes. 3.
capacity up to 8G. We have tested this unit with most of the market’s memory cards(capacity is 8GB or lower) ; we cannot however guarantee a full compatibility with all the cards in the market because of the multiple technology standards in use. Should you have a compatibility problem, please connect the unit through a USB device. AUX Mode 1. Connect the audio cable between this unit and the device that has audio output (such as CD player, DVD player, TV, PC, etc.). 2.
3) Automatically search bands: Keep pressing the MEM button for about 3 seconds, it will search the frequency from 87.5M to 108.0MHz and store the radio stations automatically. 4) You can change the stored radio station by using button CH- or CH+ on remote control or / on top panel. 3. Save Bands Pressing the MEM button on the remote control when under FM mode, the LED screen will display ”Pxx”(where xx= preset radio station number, such as 01,02……).
pressing or button to adjust the hour and minute, and pressing ENTER button to confirm the alarm time setting. Alarm mode is “OFF” means cancel the alarm. User can also set alarm on top panel: Press SET button and when the LED screen shows ”ALM”, Press or to select alarm mode ”ON or “OFF”, and the LED screen will shows “ON” or “OFF” accordingly.
TROUBLE SHOOTING Power supply cannot be turned on * Make sure that the power plug is fully inserted in the mains outlet. * Switch the POWER button located on the rear panel to ON position. The remote control does not work * Low power or even No power in battery. Replace the battery.
device only. It cannot decode photos from the iPod, iPad or iPhone device. * Videos or photos cannot be decoded from a USB or Memory Card device. USB and memory slot can solely playback MP3-format music. * If you experience some noise or interference when playing content from your iPhone or iPad, please put your device into airplane mode.
SPECIFICATION VOLTAGE RATING: AC100-240V 50/60Hz; POWER CONSUMPTION: 15W POWER CONSUMPTION STANDBY: ≤1W FREQUENCY RESPONSE L/R CH (150Hz-20KHz at -2 / -2dB) SENSITIVITY L/R:300mV OVERLOAD SOURCE e.m.f. ≥2V SEPARATION ≥55dB S/N ≥70dB REMOTE CONTROL ≥5m/30° DIMENSION(with base plate) 302 (W)×123(D)×150(H)mm Note: Specifications subject to change without prior notice.
SAV ADMEA / LOGISAV ZI du clos des charmes 26 rue du clos des charmes 77090 COLLEGIEN - France For instruction manual in another language, check online at http://manuel-utilisateur.logisav.