22LE5101
Vorwort Sehr geehrter Kunde, vielen Dank, dass Sie sich für unser Produkt entschieden haben. Bei der Entwicklung dieses Gerätes wurde größte Sorgfalt auf Qualität und Bedienerfreundlichkeit gelegt. Bitte lesen Sie die Anleitung aufmerksam durch, denn Sie erfahren viel Wissenswertes über das Gerät und nur so können Sie alle Funktionen optimal nutzen. Dies dient auch Ihrer Sicherheit und bewahrt Sie vor möglichen Schäden. Zur weiteren Unterstützung oder im Falle von Fragen besuchen Sie unsere Webseite: www.
Inhalt Funktionen .............................................................. 3 Zubehör .................................................................. 3 Einleitung ................................................................ 3 Vorbereitung ........................................................... 3 Sicherheitsvorkehrungen ........................................ 4 Netzspannung..................................................... 4 Netzkabel ......................................................
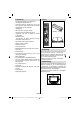
Funktionen Zubehör • LCD-Farbfernsehgerät mit Fernbedienung. • Voll integriertes Digital-/Kabel-TV. • HDMI-Anschlüsse für Digital-Video und -Audio sind vorhanden. Dieser Anschluss kann außerdem HighDefinition-Signale empfangen. SCREEN LANG SUBTTL PIP EPG FAV PRESETS SLEEP 1 2 3 4 5 6 7 8 9 0 • USB-Eingang • 200 Programme VHF, UHF (analog). • 1000 Programme im Digitalmodus (IDTV) • Integrierter Tuner TNT HD, MPEG 2- / MPEG 4-kompatibel.
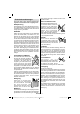
Sicherheitsvorkehrungen Lesen Sie bitte zu Ihrer eigenen Sicherheit die folgenden Sicherheitshinweise sorgfältig durch. Netzspannung Das Gerät darf nur an einer Netzsteckdose mit 220240 V Wechselspannung und einer Frequenz von 50 Hz betrieben werden. Stellen Sie sicher, dass Sie die richtige Spannung auswählen. Netzkabel Stellen Sie keine Gegenstände auf das Netzkabel (weder das Gerät selbst, noch Möbel usw.) und klemmen Sie das Kabel nicht ein.
Informationen für Benutzer in Ländern der Europäischen Union Dieses Symbol auf der Verpackung zeigt an, dass das elektrische oder elektronische Gerät am Ende seiner Lebensdauer getrennt vom normalen Haushaltsmüll entsorgt werden muss. Innerhalb der EU gibt es getrennte Sammel- und Recyclingsysteme. Für weitere Informationen wenden Sie sich bitte an die örtlichen Behörden oder an den Händler, bei dem Sie das Produkt gekauft haben.
Übersicht über die Fernbedienung 1. Mono-Stereo / Dual I-II / Actuelle Sprache (im DTV-Modus) (*) 2. Vergrößern (im TXT-Modus) / Bildgröße 1 2 3 4 5 6 3. Elektronischer Programmführer (im DTVModus) 4. Auswahl Favoritenmodus (*) (im DTVModus) 5. Rot (Menü Ton) / Kanalliste (*) (im DTVModus) 6. Grün / Menü Bild / Untertitel ein-aus (*) (im DTV-Modus) 7 7. Direkte Programmwahl 8. Teletex / Mix / Pat modus (im TXT-Modus) 8 9.
LCD-TV und Bedientasten 1. Standby-Taste 2. TV/AV-Taste 3. Tasten Programm aufwärts/abwärts P\CH TV/AV MENU 4. Tasten Lautstärke +/Hinweis: Drücken Sie gleichzeitig die Tasten “ ” /“ ” um das Hauptmenü aufzurufen. Ansicht der Anschlüsse – Anschlüsse an der Rückseite 1. SCART-Anschlüsse für Eingabe und Ausgabe von Zusatzgeräten. Schließen Sie das SCART-Kabel zwischen der SCART-Buchse des TV-Geräts und der b-Buchse des Zusatzgeräts (z.B. Decoder, VCR, DVD-Player) an.
3. Die Audioeingänge PC/YPbPr werden zum Anschließen des Audiosignals eines PCs oder für ein Gerät, das über YPbPr an das TV-Gerät angeschlossen wird, verwendet. Schließen Sie das PC-Audiokabel zwischen den AUDIOEINGÄNGEN am TV-Gerät und dem Audioausgang Ihres PCs an, um das PC-Audiosignal zu aktivieren. Schließen Sie das PC-Audiokabel zwischen den AUDIOEINGÄNGEN am TV-Gerät und dem Audioausgang Ihres Geräts an, um das Geräte-Audiosignal zu aktivieren. 4.
Anschluss von USB-Speichern Antennenanschluss • Schließen Sie den Antennen- oder Kabel-TV-Stecker an die Buchse ANTENNENEINGANG an der Rückseite des TV-Geräts an. • Stecken Sie das USB-Gerät in den USB-Eingang am TV-Gerät ein. WICHTIG: Das TV-Gerät unterstützt nur mit FAT32 formatierte Laufwerke. Das NTFS-Format wird nicht unterstützt. Anschließen des LCD-TVs an einen PC Zur Anzeige des Computerbilds auf Ihrem LCD-TV können Sie dieses an einen Computer anschließen.
Audiosignal wiederzugeben, verwenden Sie ein Component-Audiokabel wie unten in der Abbildung gezeigt. Wenn der Anschluss hergestellt ist, schalten Sie auf die Quelle YPbPr. Siehe dazu den Abschnitt “Eingangsauswahl”. • Sie können den Anschluss auch über den SCARTEingang vornehmen. Verwenden Sie wie unten gezeigt ein SCART-Kabel. Hinweis: Diese drei Anschlussmethoden haben dieselbe Funktion, aber auf verschiedenen Qualitätsstufen. Sie müssen nicht alle drei Anschlussarten verwenden.
Anschließen anderer Geräte über Scart Ein-/Ausschalten des TV-Geräts Einschalten des TV-Geräts Die meisten Geräte unterstützen einen SCARTAnschluss. Über die SCART-Buchse können Sie einen DVD-Recorder, einen Videorecorder oder einen Decoder an Ihr LCD-TV anschließen. Beachten Sie, dass die in der Abbildung gezeigten Kabel nicht im Lieferumfang enthalten sind. • Schließen Sie das Netzkabel an ein 220-240V ACNetz mit 50 Hz an.
AV-Modus Eingangsauswahl Wenn Sie externe Geräte an Ihr TV angeschlossen haben, können Sie dieses auf unterschiedliche Eingabequellen schalten. • Drücken Sie die Taste “SOURCE” auf der Fernbedienung, um die Quelle direkt zu ändern. oder, • wählen Sie die Option “Quelle” aus dem Hauptmenü über die Tasten “ ” oder “ ”. Markieren Sie dann mit den Tasten “ ” oder “ ” einen Eingang und drücken Sie dann die Taste “ ” um ihn auszuwählen.
Erste Einstellungen Wenn Sie Ihr TV-Gerät das erste Mal einschalten, erscheint das Menü für die Sprachauswahl auf dem Bildschirm. Es erscheint die Mitteilung “Willkommen. Bitte wählen Sie Ihre Sprache aus!”, die nacheinander in allen Sprachen im OSD-Menü eingeblendet wird. • Um eine “Ja” oder “Nein”-Option auszuwählen, markieren Sie die Option über die Tasten “ ” oder “ ” und drücken Sie die Taste OK.
zeigt die Namen der gefundenen Kanäle an. Dieser Vorgang dauert etwa fünf Minuten. Über die Taste “MENU” können Sie den Suchvorgang jederzeit abbrechen. Hinweis: Kann das Digital-TV keine Kanäle speichern, wird die Meldung “Keine Kanäle verfügbar” auf dem Bildschirm angezeigt.
OK (Ansehen / Erinnerung): zeigt den markierten Kanal an/stellt eine Erinnerung für zukünftige Programme ein Zifferntasten (Springen): zur direkten Auswahl des bevorzugten Kanals über die Zifferntasten. : Springt zur aktuellen Sendung. 0 (SEARCH): aktiviert das Fenster “EPG-Suche”. Die Bedienfunktion kann je nach Inhalt des digitalen Teletexts unterschiedlich sein. Folgen Sie den Anweisungen, die auf dem Bildschirm des digitalen Teletexts angezeigt werden.
Kanalliste Drücken Sie im Hauptmenü (Main Menu) die Tasten “ ” oder “ ” auf der Fernbedienung, stellen Sie sicher, dass die erste Option Kanalliste markiert ist und drücken Sie die Taste OK, um die Kanalliste (Channel List) anzuzeigen. Sie können die folgenden Tasten für die Funktionen Verschieben, Löschen und Sperren verwenden. • In der Option Kanalliste werden die Kanäle verwaltet. GELB: Wählt den Kanal aus bzw. hebt die Auswahl auf. BLAU: Wählt alle Kanäle aus bzw. hebt die Auswahl auf.
einem ‘a’ nach Drücken der AUF-Taste, und zu einem ‘c’ nach Drücken der AUF-Taste. Durch Drücken der Zifferntasten “0...9” können Sie das markierte Zeichen durch eines der Zeichen, die über der Taste aufgedruckt sind, ersetzen. Drücken Sie die Taste “MENU”, um die Bearbeitung abzubrechen oder die Taste OK, um den neuen Namen zu speichern. Kanäle sperren Das Sperren von Kanälen bietet die Möglichkeit, bestimmte Kanäle nur mit Passwort zugänglich zu machen.
Um die kostenpflichtigen Kanäle der digitalen, terrestrischen oder Kabel-Programme sehen zu können, ist es Voraussetzung, sich bei einem PayTV-Anbieter anzumelden. Besorgen Sie sich durch die Anmeldung bei einem Pay-TV-Anbieter die CAM-Module und die Smartcard und setzen Sie sie wie folgt in das TV-Gerät ein: • Schalten Sie das TV-Gerät aus und ziehen Sie den Netzstecker. • Setzen Sie das CAM-Modul ein und führen Sie anschließend die Karte in den Schlitz ein.
Jugendschutzeinstellungen zu gelangen. Es wird ein Dialogfenster geöffnet, in dem der Sperrcode abgefragt wird. Es gibt nur einen Code, der anfänglich auf “0000” gesetzt ist. Geben Sie den Sperrcode ein. Wenn der falsche Sperrcode eingegeben wurde, wird der folgende Hinweis “FALSCHER PIN” eingeblendet und das TV-Gerät kehrt zum vorhergehenden Menü zurück. Ist der PIN korrekt, wird das Menü Jugendschutzeinstellungen mit den folgenden Optionen eingeblendet.
• Markieren Sie das Menü “Nach Upgrade suchen” mit den Tasten “ ” oder “ ”und drücken Sie OK, um die Aktualisierung zu starten. einzustellen. Wenn der ausgewählte Kanal einen komprimierten Audiostream enthält, sollten Sie Ihr TV-Gerät über den SPDIF-Ausgang an eine externe Anlage anschließen, damit Sie den Ton hören können. Wenn Sie keine externe Anlage haben, stellen Sie die Option Digitaler Audioausgang mit der Taste “ ” oder “ ” bitte auf “PCM” ein.
Hinweis: Wenn anstelle einer aktiven eine Standardantenne verwendet wird, sollten die Option auf “Aus” gestellt werden. Übertragungstyp (Broadcast Type) Wenn Sie den gewünschten Übertragungstyp mit den Tasten “ ” oder “ ” einstellen, zeigt das TVGerät die entsprechende Kanalliste an. Gibt es für den gewählten Typ keine gespeicherten Kanäle, wird die Meldung “Keine Kanäle für diesen Typ gefunden” (“No channels for this type have been found.”) angezeigt.
Nach Abschluss der Suche nach digitalen Kanälen wird eine Meldung eingeblendet, die die Suche nach analogen Kanälen abfragt. Markieren Sie Ja und drücken Sie die Taste OK, um nach analogen Kanälen zu suchen. Das folgende Menü erscheint für die Suche nach analogen Kanälen: Stellen Sie die Option Sprache ein, indem Sie die Taste “ ” oder “ ” drücken. Drücken Sie die Taste “ ” oder “ ” um die Option Land zu markieren, und stellen Sie diese dann mit “ ” oder “ ” ein.
eingeben. Stellen Sie die gewünschte Startund Endfrequenz mit den Zifferntasten auf der Fernbedienung ein. Danach können Sie das Suchintervall (Search Step) auf 8000 kHz oder 1000 kHz einstellen. Wenn Sie 1000 kHz wählen, führt das TV-Gerät den Suchvorgang detaillierter durch. Die Dauer der Suche verlängert sich dementsprechend. Wenn Sie fertig sind, drücken Sie OK, um die automatische Suche zu starten. Wenn Sie fertig sind, drücken Sie OK, um die automatische Suche zu starten.
Sie diese mit den Tasten “ ” oder “ ” ein und drücken Sie OK, um fortzusetzen. Siehe den Abschnitt “Erste Einstellungen” für weitere Informationen. Wenn Sie die Option ANTENNE (AERIAL) aus dem Bildschirm Suchtyp (Search Type) wählen, sucht das Digital-TV nach digitalen terrestrischen TV-Sendern. Wenn die Option aktiver Antennenmodus ausgewählt worden ist, wird über eine Meldung der Start der automatischen Suche abgefragt.
Hinweis: Bestimmte USB-Geräte werden unter Umständen nicht unterstützt. Endloswiedergabe (BLAU) : Wiederholt die ausgewählte Datei immer wieder. Hinweis: Die Optionen Filmmodus und Pixellence können im Medienbrowser-Modus nicht eingestellt werden. Betrachten von JPEG-Dateien Hinweis: Wenn Sie den USB-Stick einstecken, während sich das TV-Gerät im analogen Modus befindet, schaltet es automatisch in den Digital-TVModus um.
Video-Wiedergabe (optional) W i e d e r g a b e ( Ta s t e R o t ) : S t a r t e t d i e Videowiedergabe. • Die Option Warm ergibt ein Bild mit leichter Betonung von Rot. • Wählen Sie Normal für normale Farben. Stop (Taste Blau): Stoppt die Videowiedergabe. Rauschreduktion Pause (Taste OK): Pausiert die Videowiedergabe. Wenn das Übertragungssignal schwach oder verrauscht ist, können Sie mit der Option Rauschreduktion das Bildrauschen verringern. Rücklauf (Cursor nach links): Startet den Rücklauf.
oder OK, um die Bildmodi auf die Werkseinstellungen zurückzusetzen. Menü Ton Kopfhörer Wählen Sie die Option Kopfhörer mit den Tasten “ ” oder “ ” aus. Drücken Sie die Taste “ ” um das Menü Kopfhörer aufzurufen. Hinweis: Wenn die Option SPDIF auf ein geschaltet ist, wird die Option Kopfhörer deaktiviert. Die Optionen des Untermenüs Kopfhörer werden im Folgenden beschrieben: Lautstärke Lautstärke Wählen Sie die Option Lautstärke mit den Tasten “ ” oder “ ” aus.
Menü Funktion Taste “ ” oder “ ” um die Option Blauer Hintergrund auf Ein bzw. Aus zu stellen. Menühintergrund Wählen Sie die Option Menühintergrund mit den Tasten “ ” oder “ ” aus. Sie können die Stärke des Menühintergrunds einstellen, indem Sie die Tasten “ ” oder “ ” drücken. Energiesparmodus Drücken Sie die Taste “ ” oder “ Energiesparmodus auszuwählen. Schlaf-Timer Wählen Sie Schlaf-Timer durch Drücken der Taste “ ” oder “ ” aus. Drücken Sie die Tasten “ ” oder “ ” um die Schlaf-Timer einzustellen.
HDMI-PC-Vollmodus (optional) Tonnorm Wenn Sie den PC-Bildschirm über einen externen Anschluss im HDMI-Modus sehen wollen, muss die Option HDMI-PC-VOLLMODUS aus Ein gestellt werden, damit das Bildverhältnis richtig eingestellt wird. Bei bestimmten Auflösungen kann sie auch deaktiviert sein. Wählen Sie die Option Tonnorm mit den Tasten “ ” oder “ ” aus. Drücken Sie die Taste “ ” oder “ ” um die Option Tonnorm auf BG,DK, I, L oder L’ zu ändern.
Durch Bewegen des Cursors in vier Richtungen können Sie auf einer Seite 20 Programme erreichen. Sie können den Cursor in den Seiten auf oder ab bewegen, indem Sie die Navigationstasten drücken, um alle dieser Programme im TV-Modus zu sehen (außer dem AV-Modus). Mit der Cursorbewegung erfolgt automatisch die Programmauswahl. Name Sie können den Namen eines ausgewählten Programmes durch Drücken der Taste ROT ändern. Der erste Buchstabe des ausgewählten Namens wird markiert.
Bildlage Horizontal Menüsystem im PC-Modus Lesen Sie den Abschnitt “Anschließen des LCDTVs an einen PC” für den Anschluss eines PCs an das TV-Gerät. Um auf die Quelle PC zu schalten, drücken Sie die Taste “SOURCE” auf der Fernbedienung und wählen Sie PC als Eingang. Sie können auch das Menü “Quelle” verwenden, um zum PC-Modus zu schalten. Mit dieser Option können Sie das Bild auf die rechte oder linke Seite des Bildschirms verschieben.
Anzeige der TV-Information Programmnummer, Programmname, Klanganzeige und Zoom-Modus werden am Bildschirm angezeigt, wenn ein neues Programm eingegeben wird oder die Taste “INFO” gedrückt wird. Stummschaltungsfunktion können Sie manuell zu einem anderen ZOOMModus wechseln. 16:9 Hier kann man die linke und die rechte Seite eines normalen Bildes (Bildseitenformat 4:3) gleichmäßig ausdehnen, um die Breite des TV-Bildschirms auszufüllen. Drücken Sie die Taste “ ” um den Ton abzuschalten.
Hält falls gewünscht eine Seite an. Um die Haltefunktion aufzuheben, nochmals diese Taste drücken. “ ” Unterseiten Untertitel Mit dieser Funktion wird ein breites Bild (Bildseitenformat von 16:9) mit Untertiteln auf volle Bildschirmgröße gezoomt. Wählt Unterseiten aus (sofern verfügbar), wenn der Teletext aktiv ist. Wenn der Teletext nicht aktiviert ist, wird die Zeitinformation angezeigt, sofern das entsprechende Programm Teletext überträgt. P+ / P- und Ziffern (0-9) Zum Auswählen einer Seite drücken.
Fernbedienung betätigt? Versuchen Sie es noch einmal. Tipps Pflege des Bildschirms Reinigen Sie den Bildschirm mit einem leicht angefeuchteten, weichen Tuch. Verwenden Sie keine aggressiven Reinigungsmittel, da diese Mittel die Bildschirmbeschichtung angreifen können. Stecken Sie zu Ihrer Sicherheit vor der Reinigung den Netzstecker des Geräts aus. Wenn Sie das TV-Gerät bewegen oder transportieren, halten Sie es bitte richtig an der Unterseite.
Anhang A: Typische Anzeigemodi PC-Eingang Das Display hat eine maximale Auflösung von 1600 x 1200. Die folgende Tabelle illustriert einige der typischen Anzeigemodi. Anhang B: AV- und HDMISignalkompatibilität (Eingangssignaltypen) Quelle Unter Umständen unterstützt Ihr TV keine verschiedenen Auflösungen. Die unterstützten Auflösungen werden unten aufgelistet. EXT-1 (SCART) Wenn Sie Ihren PC mit einer nicht unterstützten Auflösung betreiben, erscheint eine Warnmeldung am Bildschirm.
Anhang C: Im USB-Modus unterstützte Dateiformate Medium Film (optional) Musik Dateierweiterung Format Hinweise Video Audio (Max. Auflösung / Bitrate etc.) XviD/ 3ivx PCM/MP3 XviD-Version bis: 1.1.2 MPEG4 PCM/MP3 MS ISO MPEG4 PCM/MP3 SP und ASP unterstützt - - PCM Sample-Rate: 8K ~ 48KHz .mp3 - Layer 1/2/3 (MP3) .
Technische Daten Digitaler Empfang (DVB-T) TV-ÜBERTRAGUNG Übertragungsstandards: PAL/SECAM B/G D/K K’ I/I’ L/L’ DVB-T, MPEG2,DVB-T, MPEG4 HD EMPFANGSKANÄLE i. DEMODULATION VHF (BAND I/III) - Symbolrate: COFDM mit 2K/8K FFT-Modus. UHF (BAND U) HYPERBAND -Modulation: 16-QAM - 64-QAM FEC für alle DVBModi (wird automatisch gefunden) ANZAHL DER VOREINGESTELLTEN KANÄLE ii. VIDEO 200 -H.264 (MPEG-4 p. 10) Main- und High Profile Level 4.1/MPEG-2 MP@HL Videodecoder.
Hinweise Sicherheitshinweise Achtung: um Feuer oder elektrischen Schlag zu vermeiden, nicht das Gehäuse oder die Rückseite öffnen. Der Blitz mit Pfeilkopf in einem gleichseitigen Dreieck soll den Nutzer auf das Anliegen von nicht isolierter gefährlicher Spannung im Gerätegehäuse aufmerksam machen, die stark genug sein kann, um einer Person einen elektrischen Schlag zu versetzen.
Elektrische Geräte nicht in Kinderhände Lassen Sie Kinder niemals unbeaufsichtigt elektrische Geräte benutzen. Batterien/Akkus können bei Verschlucken lebensgefährlich sein. Bewahren Sie deshalb das Gerät und die Batterien für Kleinkinder unerreichbar auf. Wurde eine Batterie verschluckt, muss sofort medizinische Hilfe in Anspruch genommen werden.
Achtung! Zu hohe Lautstärken können bei Kindern irreparable Schäden hervorrufen. EINSTELLEN EINES SICHEREN LAUTSTÄRKEPEGELS •Bei fortwährendem Hören von lauter Musik gewöhnt sich Ihr Gehör allmählich daran und vermittelt Ihnen dann den Eindruck, als ob die Lautstärke niedriger wäre. •Was Ihnen normal erscheint, kann allerdings in Wahrheit schädlich sein. •Um sich davor zu schützen, stellen Sie die Lautstärke auf einen niedrigen Pegel ein.
Entsorgung Fachgerechtes Recycling Batterien und Verpackungsmaterialien gehören nicht in den Hausmüll. Die Batterien müssen bei einer Sammelstelle für Altbatterien abgegeben werden. Getrenntes entsorgen von Verpackungsmaterialien schont die Umwelt. Dieses Produkt darf am Ende seiner Lebensdauer nicht über den normalen Haushaltsabfall entsorgt werden, sondern muss an einem Sammelpunkt für das Recycling von elektrischen und elektronischen Geräten abgegeben werden.
Landesvertrieb für dieses Schaub Lorenz Produkt Area sales agent for this Schaub Lorenz product n Österreich / Austria HB Austria electronic products Vertiebs GmbH Pfarrgasse 52 1230 Wien AUSTRIA www.hb-europe.com n Deutschland / Germany HB Germany Vertriebs GmbH Martin-Behaim-Str.12 63263 Neu-Isenburg GERMANY www.hb-europe.com n Schweiz / Switzerland HB Switzerland AG Oberfeldstrasse 20 CH-8302 Kloten SWITZERLAND www.hb-europe.
Garantiekarte Garantiekarte bitte mit dem Kaufbeleg zwei Jahre aufbewahren! Sollte es zu einer Störung an Ihrem Gerät kommen, gewährt SCHAUB LORENZ 24 Monate Garantie auf Material- und Herstellungsfehler, beginnend mit dem Kauftag. Im Falle von Garantieansprüchen wenden Sie sich bitte an folgende Hotline: n A: 0800 255 58 88 (9 cent / Min.) n CH: 0800 563 67 9 (Kosten / Netzabhängig) n D: 0180 344 88 99 (9 cent / Min.
INTRODUCTION Dear customer, thanks for purchasing this product. During development of this product we especially take care of the quality and the usability of the product. Please read this instruction book carefully since you could learn a lot about he handling and the usage of this product. Apart of that it is important due to security reasons and to prevent injuries. In case of further questions or in case that any help is needed please visit our webpage: www.schaub-lorenz.
Contents Features ............................................................... 46 Accessories .......................................................... 46 Introduction ........................................................... 46 Preparation ........................................................... 46 Safety Precautions ............................................... 47 Power Source ................................................... 47 Power Cord .....................................................
Features Accessories • Remote controlled colour LCD TV. • Fully integrated digital TV (DVB-T - MPEG2) (DVB-TMPEG4) (DVB-C - MPEG2) (DVB-C- MPEG4). • HDMI connectors for digital video and audio. This connection is also designed to accept high definition signals. SCREEN LANG SUBTTL PIP EPG FAV PRESETS SLEEP 1 2 3 4 5 6 7 8 9 0 • USB input. • 200 programmes from VHF, UHF(analogue). Batteries: 2 X AAA • 1000 programmes for digital mode (IDTV).
Safety Precautions Please read the following recommended safety precautions carefully for your safety. Power Source The TV set should be operated only from a 220-240 V AC, 50 Hz outlet. Ensure that you select the correct voltage setting for your convenience. Power Cord Do not place the set, a piece of furniture, etc. on the power cord (mains lead) or pinch the cord. Handle the power cord by the plug.
For more information, please contact the local authority or the dealer where you purchased the product. Disconnecting the Device The mains plug is used to disconnect TV set from the mains and therefore it must remain readily operable. Headphone Volume Excessive sound pressure from earphones and headphones can cause hearing loss.
Overview of the Remote Control 1. Mono/Stereo - Dual I-II / Current language (in DTV mode) (*) 2. Expand (in TXT mode) / Image size 3. Electronic programme guide (in DTV mode) 4. Favourite Mode Selection (*) (in DTV mode) 5. Red (Sound Menu) / Channel List (*) (in DTV mode) 6. Green / Picture Menu / Subtitle on-off (*) (in DTV mode) 7. Direct Programme 1 2 3 4 5 6 7 8. Teletext / Mix / Pat mode (in TXT mode) 9. Volume Down 8 10.
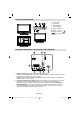
LCD TV and Operating Buttons 1. Standby button 2. TV/AV button P\CH TV/AV 3. Programme Up/Down buttons 4. Volume Up/Down buttons MENU Note: Press “ ”/“ ” buttons at the same time to view main menu. Viewing the Connections- Back Connectors 1. SCART socket inputs or outputs for external devices. Connect the SCART cable between SCART socket on TV and SCART socket on your external device (such as a decoder, a VCR or a DVD player).
4. S/PDIF Out outputs digital audio signals of the currently watched source. Use an S/PDIF coaxial cable to transfer audio signals to a device that has S/PDIF input.You should also set SPDIF Out option in the Sound Menu as On. 5. RF Input connects to an antenna or a cable. Note that if you use a decoder or a media recorder, you should connect the aerial cable through the device to the television with an appropriate antenna cable, as shown in the illustrationin the following pages. 6.
Audio Inputs Using Side USB Input • You can connect USB devices to your TV by using the USB input of the TV. This feature allows you to display/play JPG, video (optional) and MP3 files stored in a USB stick. PC Input PC audio cable (not supplied) to AUDIO INPUTS on the TV PC RGB cable (not supplied) to PC input • It is possible that certain types of USB devices (e.g. MP3 Players) may not be compatible with this TV.
Using Side AV Connectors You can connect a range of optional equipment to your LCD TV. Possible connections are shown below. Note that cables shown in the illustration are not supplied. • For connecting a camcorder, connect to the VIDEO IN socket and the AUDIO SOCKETS. For selecting the related source, see the section “Input selection” in the following parts. • To listen the TV sound from headphones, connect to the HEADPHONE jack of theTV.
Switching the TV On/Off To Switch the TV On • Connect the power cord to the 220-240V AC 50 Hz. • Press STANDBY switch. Then the standby LED lights up. • To switch on the TV from standby mode either: • Press the “ ” button, P+ / P- or a numeric button on the remote control. • Press the -P/CH or P/CH+ button on the TV. The TV will then switch on. Note: If you switch on your TV via PROGRAMME UP/DOWN buttons on the remote control or on the TV set, the programme that you were watching last will be reselected.
Programme Selection (Direct Access) • Press numeric buttons on the remote control to select programmes between 0 and 9. The TV will switch to the selected programme. To select programmes between 10 - 1000 (for IDTV) or 10-199 (for analogue), press the numeric buttons consecutively. The limit of the delay time is 3 seconds. • To select the “Yes” or “No” option, highlight the item by using “ ” or “ ” buttons and press OK button. • Press directly the programme number to reselect single digit programmes.
The IDTV will automatically tune to the UHF or VHF (** for EU countries) transmission channels, searching for digital terrestrial TV broadcasts and displaying the names of channels found. This process will take about a few minutes. To cancel searching, you can press the “MENU” button at any time during the process. Note: If the digital TV fails to store any channels, “No channels available.” message will be displayed on the screen.
BLUE button (Next day): displays the programmes of the next day. Follow the instructions displayed on digital teletext screen. INFO (Details): displays the programmes in detail. • When “Press “OK” button or similar message appears on the screen, press the OK button. OK (View / Timer): shows the highlighted channel / sets the reminder for future programmes. Numeric buttons (Jump): go to preferred channel directly via numeric buttons. : Jumps to current broadcast.
Navigating the Entire Channel List Renaming channels • Press “ ” or “ ” keys for selecting the previous or next channel. To rename a specific channel, the channel must be highlighted via pressing “ ” or “ ” buttons and then highlight the “Edit Name” item by pressing “ ” or “ ” buttons. Press “OK” button to activate rename feature. • You can press P+ / P- buttons to move page up or page down.
Adding a Channel to a Favourites List By pressing “ ” or “ ” buttons, highlight the channel that you want to add to the favourite list. By pressing OK button, the highlighted channel is added to Favourite List. F icon indicates that a channel is added to Favourite List. Removing a Channel from a Favourite List • Highlight the channel that you want to remove from the favourite list and press OK button to remove. You can press OK button again to re-adding a channel.
Setup The adjustments in this menu are given as the following: PIN is correct, the Parental Control menu including following items will be displayed: Maturity Lock (**) (**) If you set Country option as UK in the first time installation, Maturity Lock option will not be visible. Configuration You can configure the settings of your TV. Select Configuration from Setup menu and press OK to view this menu. Press the RETURN button on the remote control to exit.
• By pressing “ ” or “ ” buttons select Time Zone. Use “ ” or “ ” buttons to change the Time Zone between GMT-12 or GMT+12. Current Time on the top of the menu list will then change according to the selected Time Zone. Receiver Upgrade Over Air Download (OAD) To ensure that your TV always has the most up to date information, use this setting. Please ensure that the TV is set to standby mode. The TV automatically powers up at 3.00 A.M.
Active Antenna(*) Use “ ” or “ ” buttons to highlight Active Antenna option. When antenna power option is set as On by pressing “ ” or “ ” button, +5V will be transmitted to the antenna output.This feature enables the use of active antenna. Note: Antenna power should be “Off” when standard antenna is used instead of the active antenna. Broadcast Type When you set the desired broadcast type by using “ ” or “ ” button, the TV will display the related channel list.
Set Language item by pressing “ ” or “ ” button. Press “ ” or “ ” button to highlight Country item and then use “ ” or “ ” to set. Press “ ” or “ ” button to highlight TXT Language. Select a region by using “ ” or “ ” button. When finished, press OK or RED button to continue. To cancel, press the BLUE button. During the Network Search, if channels that have network search info are found, automatic search process will end by locating those channels.
Note: If you select an extended gap between Start and Stop frequency rate, automatic search duration will take a longer time. After search is completed for digital channels, a message asking whether to search for analogue channels appears on the screen: Operation of analogue channel installation is explained in “Automatic Channel Scan” section above. Frequency Search Enter the desired frequency, Modulation and symbol rate numbers. Modulation can be set as Auto, 16QAM, 32QAM, 64QAM, 128QAM and 256QAM.
Media Browser (in DTV mode) Whenever you plug a USB flash disk to your TV, the following message will be displayed on the screen: Select YES or NO by pressing “ ” or “ ” button and “OK” button to continiue. You can select frequency ranges from this screen. For highlighting lines you see, use “ ” or “ ” button. You can enter the frequency range manually by using the numeric buttons on the remote control. Set Start and Stop Frequency as desired by using numeric buttons on the remote control.
Shuffle (INFO) : Plays the files randomly. If shuffle mode is enabled, previous/next functions will also jump to the tracks randomly. Loop (BLUE) : Plays the selected file repeatedly. Skip backvard / Skip forward ( / button) Viewing JPEG Files Video Playback (optional) Play ( Stop ( button) : Starts the video playback. button) : Stops the video playback. Pause ( button) : Pause the video playback. Rewind ( button) : Goes backward. Forward ( button) : Goes forward.
• Setting Cool option gives white colours a slight blue stress. Sound Menu • Setting Warm option gives white colours a slight red stress. • For normal colours, select Normal option. Noise Reduction If the broadcast signal is weak and the picture is noisy, use Noise Reduction setting to reduce the noise amount. Press “ ” or “ ” button to select Noise Reduction. Press “ ” or “ ” to choose from one of these options: Low, Medium, High or Off.
Feature Menu Balance This setting is used for emphasizing left or right speaker balance. Press “ ” or “ ” button to select Balance. Press “ ” or “ ” button to change the level of the balance. Balance level can be adjusted between -32 and + 32. Headphone Press “ ” or “ ” button to select Headphone. Press “ ” button to view the headphone menu. Note: Headphone will be disabled when SPDIF option is set to on. Headphone sub-menu options are described below: Volume Press “ ” or “ ” button to select Volume.
Menu Background Press “ ” or “ ” button to select Menu Background. You can set menu background level by pressing “ ” or “ ” button. be adjusted correctly. If you set Normal, screen ratio may expand. Install Menu Power Save Mode Use “ ” or “ ” button to select Power Save Mode. Press “ ” or “ ” button to set Power Save Mode as On or Off. See the section, “Environmental Information” in this manual for further information on Power Save Mode.
Store Press “ ” or “ ” button to select Store. Press “ ” or OK button to store the settings. “Stored...” will be displayed on the screen. AV modes). By cursor action, programme selection is done automatically. Name Install Menu in AV Modes To change the name of a programme, select the programme and press the RED button. The following screen appears in the install menu when the TV is in AV modes. Note that limited options will be available.
If you wait until the end of APS, Program Table will be displayed with the programmes found and located. Source Menu Press “ ” or “ ” button and select the sixth icon. Then press “ ” or OK button. Source menu appears on the screen: Autoposition If you shift the picture horizontally or vertically to an unwanted position, use this item to put the picture into correct place automatically. This setting therefore automatically optimizes the display. Select Autoposition item by using “ ” or “ ” buttons.
Displaying TV Information Programme Number, Programme Name, Sound Indicator and Zoom Mode information is displayed on the screen when a new programme is entered or “INFO” button is pressed. Mute Function Press “ ” button to disable sound. Mute indicator will be displayed in the upper side of the screen. To cancel mute, there are two alternatives; the first one is pressing the “ ” button and the second one is increasing the volume level.
Zoom The coloured writings will appear, showing you which coloured buttons to use when TOP text transmission is present. Pressing P - or P + commands will request the next or previous page respectively. This option zooms to the picture. TXT (Teletext) Subtitle Note: You can shift to screen up or down by pressing “ ” / “ ” buttons while picture zoom is selected as panaromic, 14:9, Cinema or Subtitle.
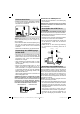
Remote Control Tips Screen Care Clean the screen with a slightly damp, soft cloth. Do not use abrasive solvents as they may damage the coating layer of the TV screen. For your safety, unplug the mains plug when cleaning the set. When moving the TV, hold it properly from the bottom part. Image Persistence Your TV no longer responds to the remote control. Perhaps the batteries are exhausted. If so you can still use the local buttons at the bottom of the TV.
Appendix A: PC Input Typical Display Modes Appendix B: AV and HDMI Signal Compatibility (Input Signal Types) The display has a maximum resolution of 1600 X 1200. The following table is an illustration of some of the typical video display modes. Source Your TV may not support different resolutions. Supported resolution modes are listed below. EXT-1 (SCART) If you switch your PC to an unsupported mode, a warning OSD will appear on the screen.
Appendix C: Supported File Formats for USB Mode Media Movie (optional) File Extension .avi Music Format Remarks Video Audio (Maximum resolution/Bit rate etc.) XviD/ 3ivx PCM/MP3 XviD Verson up to: 1.1.2 MPEG4 PCM/MP3 MS ISO MPEG4 PCM/MP3 Support SP and ASP PCM Sample Rate: 8K ~ 48KHz - MPEG 1/2 .mp3 - Baseline JPEG Photo .jpg Progressive JPEG External Subtitles (optional) .srt .
Specifications Digital Reception (DVB-T) TV BROADCASTING Transmission Standards: PAL/SECAM B/G D/K K’ I/I’ L/L’ DVB-T, MPEG2,DVB-T, MPEG4 HD RECEIVING CHANNELS i. DEMODULATION VHF (BAND I/III) -Symbol rate: COFDM with 2K/8K FFT mode. UHF (BAND U) HYPERBAND -Modulation: 16-QAM - 64-QAM FEC for all DVB modes (automatically found) NUMBER OF PRESET CHANNELS ii. VIDEO 200 -H.264 (MPEG-4 part 10) main and high profile level 4.1/MPEG-2 MP@HL video decoder.
Instructions Safety Warnings Attention: In order to prevent fire or electrical shock, do not open the casing or rear panel. A lightning bolt with an arrowhead in an equilateral triangle should indicate to the user that dangerous voltage inside the product is strong enough to give a person an electrical shock. CE Certification Symbol: We have conducted tests and demonstrated our compliance with all relevant EU guidelines and requirements.
Keep Electrical Devices Out of the Hands of Children Never allow children to use electronic devices unsupervised. Batteries can be deadly if swallowed. Therefore, keep the device and batteries where children cannot reach them. If a battery is swallowed, medical help must be sought immediately. Moisture and Cleaning This product is not waterproof! Do not immerse this device in water and do not let it come in contact with water. Water can cause serious damage inside the device.
Attention! Too high a volume can cause irreparable damage in children. SET A SAFE VOLUME LEVEL • After repeated listening to loud music, your hearing gradually becomes adjusted to this and gives you the impression that the volume is lower. • What seems normal to you can in fact be harmful in reality. • To protect yourself from this, set the volume to a low level. • Increase the volume slowly, until you can hear clearly and without difficulty.
Disposal Batteries and packaging material do not belong in domestic waste. The batteries must be delivered to a collection center for old batteries. The separate disposal of packaging materials protects the environment. This product may not be disposed of as regular household waste at the end of its lifetime, but instead must be delivered to a collection center for the recycling of electrical and electronic devices.
50177320