
Installation

Handmade Pickups For Acoustic Instruments
Cello Pickup Model C-12 Std.
Thank you for purchasing one of our cello pickups.
Each pickup is carefully hand built and tested to ensure that it meets our high standards for quality and durability.
Please read the instructions completely before installing your pickup.
Tools Required:
1 small phillips head screw driver.
Installation Instructions:
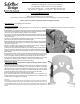
1) This pickup is designed to operate properly on any size of cello. It is intended to be installed in the area of the bridge as shown in the
accompanying pictures.
2) Reasonable care should be taken when handling the pickup until it is installed.
The lead wire from the pickup is quite flexible and is not prone to breakage. Please
refrain from any excessive pulling or tugging on the lead wire.
3) Loosen and remove the two phillips head screws that pass through the face of
the jack plate and are threaded into the two aluminum clamps on the underside of
the jack assembly.
4) Insert the jack assembly downward through the strings so that the jack plate
spans the center strings (as shown in the photo at right).
5) Reinstall the aluminum clamps on the underside of the strings so that they span
the distance between the two strings and clamp the jack assembly in place when
the screws are tightened.
6) Take a small amount of putty from that supplied with the pickup. Ideally, you
want to use a piece a little smaller than the size of a pea.
7) Stretch the putty and knead it between your thumb and fingers until it warms.
Place the putty on the brass side of the pickup and holding the pickup around its'
perimeter (and not by the wire) spread and push the putty around until it covers the
brass surface.
8) The putty should be uniformly spread and should be approximately 1/16" to 1/8"
in thickness. If you use too much putty and make it too thick, the pickup will not
achieve the proper output level and the sound quality may not be up to specs.
9) The pickup is designed to be placed on the bass side of the bridge and is to span
the wing slot. It should be touching both the wing of the bridge and the leg.
10) Lightly push the pickup into place against the bridge.
Removing The Pickup
:
Caution: Never pull the pickup off of the bridge by pulling on the wire, damage
to the pickup can result.
1) Since the C-12 Std. is installed spanning the open space between the wing and
the leg of the bass side of the bridge, you should have no difficulty in getting a
fingernail or the tip of your finger underneath the brass base of the unit. By gently
lifting at one edge or corner of the pickup, you should be able to lightly and easily
persuade the pickup (along with the putty) to come away from the bridge.
2) The mounting putty may be used over and over again.
3) To restore the stickiness of putty that's already been used and is still on the
pickup, remove the putty from the pickup, stretch and knead it until it becomes soft
and sticky and then reapply it to the pickup.
Warranty
We warrant to the original purchaser that our pickups are free from defects in materials and
workmanship for a period of 2 (two) years. Should a product fail to perform properly within the
specified warranty period you may contact your dealer or Schatten Design for instructions. No
product will be accepted for warranty return by Schatten Design without a Return Authorization
number.
Rev. 10-10
627 Colby Drive, Waterloo Ontario, Canada N2V 1B4
www.schattendesign.com email: tech@schattendesign.com
519-742-3862 toll free: 877-633-0177 fax: 519-742-1843