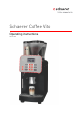
Schaerer Coffee Vito Operating instructions V03 / 07.2011 Schaerer Ltd. P.O.
Schaerer Ltd. P.O. Box Allmendweg 8 CH-4528 Zuchwil info@schaerer.com www.schaerer.
www.schaerer.com Schaerer Coffee Vito Operating instructions V03 / 07.2011 Published by Schaerer Ltd., P.O. Box, Allmendweg 8, CH-4528 Zuchwil Edition Version 03 | 07.2011 Software V 3.19.1 Concept and editorial department Schaerer Ltd., P.O. Box, Allmendweg 8, CH-4528 Zuchwil Copyright by © Schaerer Ltd., P.O. Box, Allmendweg 8, CH-4528 Zuchwil This document is copyrighted. All rights are reserved.
www.schaerer.com Table of contents Welcome . . . . . . . . . . . . . . . . . . . . . . . . . . . . . . . . . 6 Welcome . . . . . . . . . . . . . . . . . . . . . . . . . . . . . . . . . . . . . . . 6 Milk foam . . . . . . . . . . . . . . . . . . . . . . . . . . . . . . . . . . . . .29 Steam . . . . . . . . . . . . . . . . . . . . . . . . . . . . . . . . . . . . . . .30 Signs and symbols . . . . . . . . . . . . . . . . . . . . . . . . . . . . . . . . 6 Dispensing options . . . . . . . . . . . . . . . . .
www.schaerer.com Programming. . . . . . . . . . . . . . . . . . . . . . . . . . . . . .53 Navigation. . . . . . . . . . . . . . . . . . . . . . . . . . . . . . . . . . . . . .53 Overview. . . . . . . . . . . . . . . . . . . . . . . . . . . . . . . . . . . . . . .53 "Milk and foam" menu . . . . . . . . . . . . . . . . . . . . . . . . . . . . .53 Topping quality/foam quality . . . . . . . . . . . . . . . . . . . . . .54 Macchiato pause . . . . . . . . . . . . . . . . . . . . . . . . . . . . . . .
www.schaerer.com Welcome Welcome Welcome This coffee machine is part of the next generation of fully automatic coffee machines. Our company's core competence as well as decades of experience flowed into designing this equipment. These operating instructions provide information about the product, its operation and how to clean the coffee machine. If the coffee machine is not used according to the instructions, we shall not be held liable for any damages.
Product description www.schaerer.com Product description Intended use The Schaerer Coffee Vito has been designed to dispense diverse variants of coffee beverages, milk beverages or powdered beverages (toppings & chocolate) into cups or pots. In addition the unit can dispense steam for heating up milk or hot water. This unit is designed for industrial and commercial use. The unit may be placed in self-service areas if attended to by trained personnel.
www.schaerer.
Product description Example www.schaerer.com Option Description Side cooling unit Cooling unit for machines with Milk Smart. Milk capacity: 2- – 8 l, depending on the variant Example "My Fridge? Cup & Cool Cup warmer with a cooling unit for machines with Milk Smart. The milk temperature and the cup heating are regulable. Milk capacity: 4 l Cup capacity: max. 60 Cup warmer For preheating several different cups. The cup heating is regulable. Cup capacity: ca.
www.schaerer.com Product description Operating temperature*: Steam boiler ** Hot water boiler ** Minimum (Tmin. ) 10°C 10°C Maximum (Tmax. ) 192°C 192°C Overpressure: Steam boiler ** Hot water boiler ** Working overpressure 2.5 bar 2.5 bar Permissible working overpressure (pmax. ) 12 bar 12 bar Test overpressure 24 bar 24 bar Filling quantities Steam boiler ** Drinking water tank 4.5 l Coffee bean hopper ca.
Product description www.schaerer.com Declaration of conformity Manufacturer's address Manufacturer Responsible for documentation Schaerer AG P.O.Box Allmendweg 8 CH-4528 Zuchwil, Switzerland Tel. +41 (0) 32 681 62 00 F +41 (0)32 681 64 04 info@schaerer.com www.schaerer.com Schaerer AG Hans-Ulrich Hostettler P.O.
www.schaerer.com Product description China (CCC): • • • 12 GB4706.19-2008 GB4706.1-2005 GB4706.13-2008 BASCV_EN V03 | 07.
Installation and commissioning www.schaerer.com Installation and commissioning Setting up the coffee machine Location CAUTION! Risk of machine damage! The location where the coffee machine is set up must meet the conditions specified below. If these conditions are not ensured, the coffee machine may become damaged. The following conditions absolutely must be met: • • • • • The installation surface must be stable and level so that is does not become deformed under the weight of the coffee machine.
www.schaerer.com Installation and commissioning • • cable (operating instructions) and the locally applicable regulations. Route the power cord in such a way that it does not present a tripping hazard. Do not pull the cord over corners or sharp edges, pinch it between objects or allow it to hang loosely in the open. Do not position the cord over hot objects, and protect the cord from exposure to oil and aggressive cleaning products. Never lift or pull the device by the power cord.
Installation and commissioning www.schaerer.com Changeover between mains water supply and drinking water tank Changeover from mains water supply to drinking water tank and vice versa is possible with the optional facility "Aquaflex" (e.g. for the purpose of decalcification). Option 1: Changeover from mains water supply to drinking water tank. ► Close the main water valve on the water supply line and, if necessary, detach the hose. ► Remove the right-hand front cover.
www.schaerer.com Installation and commissioning Installing a waste water outlet Option 1: Inserting a drip tray without an opening ► Insert the drip tray. Option 2: Drip tray with opening ► Insert the drip tray. ► Fit the waste water connection (see below) Option 3: Waste water connection ► Push the hose with the elbow onto the end of the hose on the rear side of the machine. ► Connect the discharge hose to the waste water system. ► Make sure that the hose does not sag (shorten it if necessary!).
Installation and commissioning www.schaerer.com Option 2: Internal cooling unit ► Select the desired milk nozzle (included in the scope of supply) and insert it at the end of the hose that is located on the outside. ► Insert the milk hose into the guide (arrow) and connect the end of the hose to the milk container. The milk connection is ready for the internal milk cooling unit. The milk nozzles included in the scope of supply (1 mm - 1.7 mm) have an influence on the milk temperature.
www.schaerer.com Installation and commissioning ► Follow the instructions on the touch screen. Display/ display text Parameter description Setting range Notes The greeting text before the commissioning program begins. The presetting is "English". Hint that the ensuing instructions should be followed. The presetting is "English". Hint that this display comprises a "Continue" "touch screen" function. The presetting is "English". ► Touch the "Continue" field on the display.
Installation and commissioning Display/ display text www.schaerer.com Parameter description Setting range Notes Decalcification filter/water filter: "YES/NO" The setting water hardness can also be performed at later stage in the menu "Settings". "Continue" Option 1: "YES" ► Connect the decalcification filter in the water tank in accordance with the operating instructions and fill the water tank. "Exit" See "Service and maintenance" - "Water filter". ► Touch "Continue".
www.schaerer.com Display/ display text Installation and commissioning Parameter description Setting range Information about the system filling "Continue" and heating-up phase: The system is filled and heated up. - Fill with milk. ► Confirm by touching . The next commissioning step appears. - ► Fill with choco powder Optionally, various powder systems are possible. See "Operation" - "Filling and connecting" - "Machine powder" ► Confirm by touching . The next commissioning step appears.
Installation and commissioning Display/ display text www.schaerer.com Parameter description Setting range Notes Cup fill volume 50% - 150% The cup fill volume can also be set at a later time. Option 1: "NO" The commissioning program is completed. The coffee machine is now ready to use. Option 2: "YES" See "Programming" - "Settings menu" The display switches over automatically to operational readiness. ► Select the button "YES". ► Select the beverage button (pay attention to the level selected).
www.schaerer.com Operation Operation Check before switching on ► Before switching on the coffee machine, check whether the following conditions are fulfilled. Conditions for switching on the coffee machine: • • • • • • The fresh water supply is open or the water tank is filled. The waste water hose (optional) has been laid correctly. The coffee bean hopper(s) is/are filled and the locking mechanism is open. The powder container(s) is/are filled.
Operation www.schaerer.com Milk Option 1: Milk Smart No more than 40 cm should be between the milk package and the beverage outlet. ► Have fresh, pre-cooled milk (3 – 5°C) ready. ► Hang the hose or hoses into the milk. The hose end must be in contact with the container floor. See also "Safety notes" - "Hygiene" - "Milk". Option 2: Additional cooling unit ► Open the door. ► Remove and rinse the milk container. ► Fill in fresh, pre-cooled milk (3 – 5°C). ► Place the milk container into the cooling unit.
www.schaerer.com Operation The milk nozzles included in the scope of supply (1 mm - 1.7 mm) have an influence on the milk temperature. Milk foam that is too cold requires a smaller nozzle diameter. Milk foam that is too hot requires a larger nozzle diameter. Machine powder CAUTION! User at risk! CAUTION! Risk of machine damage! Danger of injury on the rotating dosing augers! Never reach into the powder container while the device is switched on.
Operation www.schaerer.com Switching on ► Keep the button pressed for 5 seconds. The coffee machine switches on and heats up. The "Ready for operation" main window appears as soon as the coffee machine is ready to dispense a beverage. The beverage buttons are lit. "Ready for operation" display with "2nd level" option "Ready for operation" display without "2nd level" option See also "Programming" - "Settings" - "Operating options".
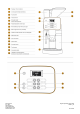
www.schaerer.com Operation Main touch screen window Visible and hidden symbols are displayed in the main window. The menus, information and functions behind these are described as follows: Symbol Description Shift field Each beverage button has two levels and can therefore be assigned two beverages. In order to do so, this function must be activated in the programming. Level 1 is always active by default. Level 1 active ► Touch the shift field. The 2nd level is active.
Operation www.schaerer.com Symbol Description MENU The field MENU is a hidden field. ► Touch the right-hand third of the touch screen. The hidden fields Information and MENU become visible (see illustration on the left). ► Touch the field. The main menu appears. See also "Programming" - "Menu, Settings" - "Operating options" for further options for this function. Dispensing Preheating cups Option 1: Cup warmer CAUTION! Hot surface! Hot surfaces can cause burns.
www.schaerer.com Operation ► Place a cup under the beverage outlet. ► Grasp the beverage outlet from the front and slide it into the correct position (see figure). ► Remove the cup after the beverage has been dispensed. Coffee beverages Lit beverage buttons signal that the respective beverage is ready for dispensing. CAUTION! Hot fluid! ► Place a cup under the beverage outlet. ► Slide the beverage outlet to the desired position. ► Press the required beverage button.
Operation www.schaerer.com CAUTION! Hot fluid! Option 1: Dosed ► Press the hot water button . The set quantity is dispensed. Dispensing cannot be interrupted. Option 2: Freeflow ► Press and hold the hot water button . Dispensing continues as long as the button is kept pressed. Option 3: Start/stop ► Press the hot water button . ► If desired, end the dispensing process by pressing the beverage button again. The dosing variant can only be set by the service technician.
www.schaerer.com Operation Option 3: Start/stop ► Press the [ Milk foam ] button. The set quantity is dispensed. ► If desired, end the dispensing process by pressing the beverage button again. The dosing variant can only be set by the service technician. Steam ► Place a cup under the steam wand. To dispense steam, three different dosing variants are available: CAUTION! Hot steam! Option 1: Dosed ► - Press the steam button. The set quantity is dispensed. Dispensing cannot be interrupted.
Operation www.schaerer.com A message appears on the display when the grounds container is full. Beverage dispensing is disabled until the grounds container is emptied and reinserted. ► Slide the beverage outlet to the highest position. ► Take out the grounds container. ► Empty the grounds container and reinstall it. The message shown here appears on the display. ► Acknowledge the display message accordingly. If acknowledged with "Yes": beverages can be dispensed again.
www.schaerer.com Operation There are two different categories of display messages: • • Prompt / request Error message If one of these display messages is pending on the machine: Option 1: It will appear directly. Option 2: The field appears with an error code. If an error code is displayed, a fault is pending. ► Comply with the displayed request to look in the operating instructions. Some error messages have the same display messages as prompts/requests.
Operation www.schaerer.com Display message Cause What to do Open the stopcock! The main water supply valve is closed. ► Open the main water valve. Only on machines with mains water supply or Aquaflex! Empty the container! grounds The grounds container is full. Beverages cannot be dispensed. ► Pull out the grounds container, empty it and push it back in. A query appears on the display. ► Confirm with [Yes]. Please clean soon Please clean now Daily cleaning is due.
www.schaerer.com Operation Switching off End of operation "Cleaning" ► Perform the daily cleaning routine. ► Press the button. The machine switches off. Option 1: Mains water supply and drinking water tank ► Close the main water valve of the mains water supply. Option 2: Drinking water tank ► Empty the drinking water container, clean it and reinsert it. Option 3: Aquaflex ► Perform and complete the steps described for options 1 and 2. ► Pull out the power plug.
Cleaning www.schaerer.
www.schaerer.com Cleaning Mandatory cleaning If a pending cleaning procedure is not performed although it is requested on the display, mandatory cleaning will set in (if programmed) after a certain time. When mandatory cleaning sets in, dispensing of beverages is blocked. Beverages cannot be dispensed again until after the machine has been cleaned. Mandatory cleaning and the period that elapses before it sets in can only be programmed by the service technician.
Cleaning www.schaerer.com See "Daily cleaning". BASCV_EN V03 | 07.
www.schaerer.com Cleaning Daily cleaning Daily cleaning card Daily cleaning Schaerer Coffee Vito Schaerer Ltd. P.O. Box See also "Safety instructions" and "Cleaning" in the operating instructions. CAUTION! User at risk! CAUTION! Risk of machine damage! There is a risk of scalding in the beverage, hot water and steam dispensing area. During dispensing or cleaning, never reach under the dispensing areas. The touch screen can suffer damage from improper handling.
Cleaning www.schaerer.com Fill the cleaning container with ± 400 ml of fresh water. Immerse the milk hose with the nozzle in the container. Select . ; Water rinsing starts. ; A request for foamer cleaning appears. Demount the foamer head parts. Lay the parts and the milk hose for ± 30 min in a solution of 500 ml of hot water and 25 ml of cleaning product (Milkpure). Clean all the parts in lukewarm running water. Refit the foamer head parts.
www.schaerer.com Cleaning Side cooling unit CAUTION! User at risk! There is a risk of contamination of the milk and cooling unit due to milk deposits and bacteria. Clean the cooling unit daily. ► Take the milk out of the cooling unit. ► Thoroughly clean the interior of the cooling unit with water and a household cleaning product. ► Place the milk back into the cooling unit.
Cleaning www.schaerer.com Weekly cleaning Weekly Cleaning Reference Card Weekly cleaning Schaerer Coffee Vito Schaerer Ltd. P.O. Box See also "Safety instructions" and "Cleaning" in the operating instructions. CAUTION! User at risk! CAUTION! It is dangerous to reach into the machine. Before any manual cleaning, switch off the machine and disconnect it from the mains supply.
www.schaerer.com Cleaning Brewing unit Switch off the machine with the button. Disconnect the power plug. Push the beverage outlet to its highest position. Take out the grounds container. Pull out the drip tray. Hold the brewing unit from below and pull the slider to the front. ; The brewing unit is released. Tip the brewing unit vertically downwards and pull it out to the front.
Cleaning www.schaerer.com ► Switch off the coffee machine using the button and pull out the power plug. ► Release the powder container by pressing the button and lift it out. ► Empty the powder container. ► Loosen the securing screw(s) and pull out the drive wheel(s). ► Pull out the slider. ► Take out the dosing screw(s) and thoroughly clean the component parts. ► Thoroughly clean the powder container with a damp cloth. ► Let the parts dry fully. ► Reassemble the dosing screws in the reverse order.
www.schaerer.com Cleaning Option 2: Defrosting the additional cooling unit CAUTION! Risk of machine damage! The surface of the cooling unit’s interior may get damaged. Never remove the ice layer with pointed or sharp objects; always let it defrost. ► Switch off the additional cooling unit or pull out the mains plug. ► Open the front door and leave it open. ► Wipe up the condensation water incurred with an absorbent cloth. ► Repeat the procedure until the ice layer has melted completely.
Cleaning BASCV_EN V03 | 07.2011 www.schaerer.
www.schaerer.com Cleaning Cleaning products CAUTION! Risk of machine damage! Use of incorrect cleaning products can damage the machine. Use only cleaning products for daily and weekly cleaning that are recommended by Schaerer AG. Daily cleaning Weekly cleaning Schaerer cleaning tablets - Milkpure milk system liquid cleaner - Cleaning tablet Before using the cleaning tablet, carefully read the information on the packaging and the "HEALTH & SAFETY DATA SHEET".
Service and maintenance www.schaerer.com Service and maintenance Maintenance The coffee machine does not require regular maintenance. The maintenance schedule depends on multiple factors, especially the degree to which the machine is used. When maintenance is due, the machine indicates this on the display. The machine can continue to be operated normally. ► Notify your service partner that maintenance is due.
www.schaerer.com Service and maintenance Decalcification Decalcification message When the machine needs to be decalcified, a corresponding request appears on the display. The decalcification interval depends on the following factors: • • • CAUTION! User at risk! CAUTION! Risk of machine damage! Water hardness Water flow rate Use of a water filter Danger of poisoning from ingesting or inhaling the decalcifier.
Service and maintenance www.schaerer.com The decalcification process consists of four stages: • • • • Cooling down of the machine, the "cooling down routine" (ca. 5-10 min). The decalcification system (ca. 36 min). 3-fold system rinsing (ca. 8 min per rinse cycle). Making ready for operation (ca. 5 min). The display provides guidance through the entire decalcification process. ► Select the menu "Care".
www.schaerer.com Service and maintenance ► Rinse the drinking water tank with water, fill it and reinsert it. ► Empty the collecting container and drip tray and place them back under the outlets. ► Continue the decalcification process by pressing the field "Continue". Rinsing starts and is then repeated with 2 further identical rinsing procedures. ► Empty the collecting container and drip tray after the 3rd system rinsing cycle and then put them back under the outlets.
Service and maintenance www.schaerer.com ► Open the sealing plug on the water tank coupling by turning it anticlockwise with a flat-tip screwdriver (size 3) and remove the plug. ► Follow the ensuing display requests, see decalcification process. Water filter (Option) Installing the water filter for the internal drinking water tank The supplied water filter is only suitable for installation in the machine’s internal drinking water tank.
www.schaerer.com Service and maintenance Changing the water filter for the internal drinking water tank When the filter needs to be changed, a corresponding prompt appears on the display. ► Take the drinking water tank out of the machine. ► Take the old filter cartridge out of the adapter. ► Unpack the new filter cartridge and mount it on the adapter. ► Slide the drinking water tank back into the machine. The replacement cartridges can be ordered from Schaerer AG as a 6-piece set (order number: 071397).
Programming www.schaerer.com Programming Navigation Symbol Description Starts a program or a function Confirms a step and continues to the next step Confirms a query Answers a query in the negative Skips a page up or down in the menu Increases or reduces the respective setting Saves settings, confirms a query Quits a menu or message Clears or resets Overview ► In the main window touch the hidden field "Menu". The "Selection menu" is displayed.
www.schaerer.com Programming Topping quality/foam quality Coffee machines with a powder system have the parameter "Topping quality", and coffee machines with fresh milk have the parameter "Foam quality". Display/ display text Parameter description Setting range Notes Topping quality Setting of the milk powder intensity. 20 - 100 Reducing the value = lighter flavour ► Touch the [Topping quality] field in the menu "Milk&foam". The window "Topping quality" appears.
Programming www.schaerer.com Timer status Display/ display text Parameter description Setting range Timer status In this menu the timer function can be activated and On/Off deactivated. Notes When the timer is activated, the timer symbol , a small clock, appears in the main window. ► Touch the [Timer status] field in the "Timer program" menu. A query window appears and the new timer status is displayed. ► Confirm by touching . The new settings are active.
www.schaerer.com Programming Clear timer Display/ display text Parameter description Setting range Notes Clear timer In this menu the timer times can be cleared. Days: Monday to Sunday This procedure cannot be undone! ► Touch the [Clear timer] field in the "Timer program" menu. The "Clear timer" window appears. ► Select the desired day or option. A query window appears. ► Confirm the query with The timer is cleared. Options: working days, whole week .
Programming www.schaerer.com The menu contains the following subitems: • • • • • • • • • • • • Recipes/buttons Boiler temperature Reset Time/date Language Contrast Calcium filter Water hardness Warm-up rinsing Operating option Lighting Intro Recipes and beverage buttons ► Touch the [Recipes/buttons] field in the "Settings" menu. The "Recipes/buttons" menu is displayed.
www.schaerer.com Programming Display/ display text Parameter description Setting range Change recipes ► Press the [Change recipes] field. The "Select beverage" window appears. Dependent on the components of a beverage ► Press the required beverage button. The "Change recipes" window shown here appears. The window shows all parameters that are settable for the selected beverage.
Programming www.schaerer.com Boiler temperature Display/ display text Parameter description Setting range Notes Boiler temperature ► Touch the [Boiler temperature] field in the "Settings" menu. The "Boiler temperature setting" window appears. 91 – 99°C – Setting range Notes ► Set the desired boiler temperature by touching and . ► Confirm by touching . The new settings are active.
www.schaerer.com Programming Contrast Display/ display text Parameter description Setting range Notes Contrast In this menu the display contrast can be set. 0 – 100 – Setting range Notes ► Touch the [Contrast] field in the "Settings" menu. The "Contrast setting" window appears ► Adjust the contrast by touching and . ► Confirm by touching . The new settings are active.
Programming www.schaerer.com The menu contains the following subitems: • • • • • Warm rinse field Barista field 2nd level ON/OFF button ( Menu field button) Display / display text Parameter description Warm rinse field By means of this parameter the warm rinse field active / inacti- For self-service mode it is can be switched on and off in the main window. ve recommended that this function is deactivated. ► Touch the [Warm rinse] field.
www.schaerer.com Programming Display / display text Parameter description Menu field The behaviour of the hidden fields MENU and immediate / Information can be set by means of this parame- delayed ter. With the setting "immediate" the hidden fields appear directly when the right-hand third of the touch screen is pressed. With the setting "delayed" the hidden fields do not appear until they are double pressed or given a sustained press.
Programming www.schaerer.com "PIN entry" menu Display/ display text Parameter description Setting range PIN entry Individual levels or functions can be protected 0 – 9 with a PIN (Personal Identification Number). For access to a PIN-secured level the corresponding "PIN" must be entered in the PIN entry window. ► Touch the field in the selection menu. The window "PIN" appears. Notes Switching on and off of the machine can be protected by means of a "PIN".
www.schaerer.com Programming Display/ display text Parameter description Setting range Define / delete PIN ► Select desired level. The window "PIN entry" appears. 0-9 Notes Defining a PIN: ► Enter desired 4-digit PIN. ► Confirm by touching . The level is now protected by the entered PIN. Deleting a PIN: ► Touch the field. The PIN is deleted.
Troubleshooting www.schaerer.com Troubleshooting Faults with display message The coffee machine is equipped with a diagnosis program. When outside intervention is necessary, a corresponding display message appears. There are two different types of display messages. • • Prompts error messages Pending prompts or error messages are displayed with: Option 1: Direct messages The prompt or error message is indicated directly on the display.
www.schaerer.com Troubleshooting Display message Empty the container! Cause grounds The last emptying has not been confirmed. What to do ► Pull out the grounds container again, wait for a short time and reinsert it. A confirmation query appears on the display. ► Confirm the display query with [Yes]. Grounds container missing! The grounds container has not been correctly inserted. ► Check the grounds container for correct seating. The monitor sensor is faulty. ► Contact service partner.
Troubleshooting www.schaerer.com Code Designation Cause and effect What to do 88 Boiler temperature too high • • Option 1: With drinking water tank The water supply is interrupted. Dispensing of beverages is blocked. ► Check that the drinking water tank is filled and installed correctly. Option 2: With mains water supply ► Check whether the main water valve is open. • • The brew unit is blocked. Dispensing of beverages is blocked. ► Clean the brew unit. • • The machine is overheated.
www.schaerer.com Troubleshooting Code Designation Cause and effect 188 Steam boiler temperature too high • What to do • The steam wand or beverage outlet is ► Check and clean the steam wand and/or clogged. beverage outlet. Dispensing of beverages is blocked. See "Cleaning". • • The machine is overheated. Dispensing of beverages is blocked. ► Switch off the coffee machine and let it cool. ► Switch the coffee machine back on. ► If not rectified, contact your service partner.
Troubleshooting www.schaerer.com Fault description Cause and effect Pump runs permanently, water in the grounds container. • • What to do PC board defective. ► Switch the machine off and back on. Electrical problem between the pump and ► Disconnect the machine from the mains powthe PCB. er supply and reconnect it. ► If not rectified, contact your service partner. Choco/topping container cannot be inserted. BASCV_EN V03 | 07.
www.schaerer.com Water quality Water quality A cup of coffee consists of 99 percent water. Therefore, the water has a significant effect on the coffee's taste. To obtain an excellent cup of coffee, you need excellent water. The water is important not only to the taste of the coffee but also to the coffee machine itself. Poor water quality can lead to permanent machine damage.
Water quality www.schaerer.com The water values must also be entered when the machine is taken into service and can be readily adjusted in the machine menu. On the basis of the entered values, the machine calculates the time to the next filter change (if a filter is in use) and the time to the next decalcification routine. ► Check whether a house filter system is already connected upstream from the machine. In most water, the carbonate hardness is markedly lower than the total hardness.
www.schaerer.com Safety notes Safety notes Maximum safety is one of Schaerer AG's most important product features. The effectiveness of the safety devices is guaranteed only if the following instructions are observed to prevent injuries and health hazards: • • • • Read the User Manual carefully before using the device. Do not touch hot machine parts. Do not use the coffee machine if it is not working properly or is damaged. Under no circumstances may the installed safety devices be modified.
Safety notes www.schaerer.com Risk from cleaning products Application CAUTION! User at risk! Danger of poisoning from swallowing cleaning products. The following instructions absolutely must be complied with: • • • • • • • • • • Store cleaning products away from children and unauthorised persons. Do not swallow the cleaning products. Never mix cleaning products with other chemicals or acids. Never put cleaning products in the milk container.
www.schaerer.com Safety notes Risk of damage to the machine CAUTION! Risk of machine damage! Improper handling of the coffee machine can lead to damage or contamination. The following instructions absolutely must be complied with: • • • • • • • • • • • • • • • For water with a carbonate hardness above 5°dKH, install a calcium filter, as otherwise the coffee machine can be damaged due to calcification.
Safety notes www.schaerer.com Coffee CAUTION! User at risk! Improper handling of coffee can lead to health problems. The following instructions absolutely must be complied with: • • • • • • • • Check the packaging for damage before opening. Do not add more beans than will be needed for one day. Close the bean hopper lid immediately after filling. Store coffee in a cool, dry and dark location. Store coffee separately from cleaning products. Use the oldest products first ("first-in-first-out" principle).
www.schaerer.com Liability Liability Operator responsibilities The operator must ensure that the machine undergoes regular maintenance and that the safety devices are checked regularly by a Schaerer AG service partner, a representative thereof, or other authorised persons.