
User guide


12 SDMX PS/2 Mini Extender Range
How to Use This Guide
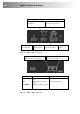
This guide describes the installation and configuration of the SDMX PS/2 Mini
range of KVM extenders. Although the connection and operation of the system
is relatively straightforward, you should consider the following before getting
started:
Connection & Compatibility
If you have purchased an SDMX Extender kit, this will contain all the cables
required to connect the Local Unit to your PC or KVM switch. The remote
console (keyboard, monitor and mouse) and any audio and serial equipment
connect directly to the Remote Unit.
If you have purchased an SDMX Remote Unit, ensure that it is compatible with
your Local Unit (see Compatibility, page 10).
For information about connection and installation, see Installation, page 13.
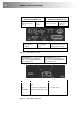
Interconnection Cable
You will need CATx (any category 5, 5e, 6 or higher) cable, terminated with
RJ45 plugs, to connect the Local and Remote Units (see Interconnection
Cable Requirements, page 14.
Adjusting Video
Video signals become distorted when transmitted over CATx cables. To get the
best from your extender system, it is essential that you adjust the SDMX PS/2
Mini Remote Unit to optimize the video image quality.
• For experienced users, there is a Quick Setup section at the start of this
guide (see page 5).
• For the full procedure, see Adjusting Video, page 23.