
User guide

16 CAT5/5e KVM Extender Range
Connecting the Remote Unit
To install a Remote Unit:
1. Switch off all devices.
2. Connect your keyboard, monitor(s) and mouse to the Remote Unit as shown
in Figure 3 (Standard), Figure 4 (SUN) or Figure 5 (Serial).
These ports may also be attached to the CPU side of a KVM switch in order
to have a remote CPU. However, if you are attempting to use the extender
between cascaded KVM switches this may not work. Please contact Technical
Support to discuss your application.
3. If appropriate, connect serial devices.
See Appendix D: Serial Port Setup and Operation, page 39 for
information about the configuration of extender units for serial
communication.
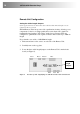
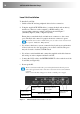
4. Connect the CATx cable to the INTERCONNECT socket on the front of the
Remote Unit as shown in Figure 6.
5. Turn the PEAK and EQ controls fully anticlockwise.
6. Connect the 9V power supply to power the unit.
SUN Versions only: During power-up, the CPU seeks a language ID code
from the Remote Unit. If the Remote Unit is not connected when you power
up the Extender system, the Local Unit reports a US keyboard layout by default. To
ensure proper keyboard language selection, connect the keyboard to the Remote
Unit; power on the Remote Unit and leave it powered during the rest of the
installation procedure.
Only use the power supply originally supplied with this
equipment or a manufacturer approved replacement.
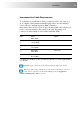
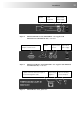
Figure 3 SDLink Standard Remote Unit (SDLink/R - also supplied with SDLink1
and SDLink2 kits) – rear view
Connect to
monitor.
Connect PS/2
keyboard and
mouse.
Connect
approved 9V
power supply.