
User manual


Program Configuration – Saving Options 14
Saving options
Once an image is imported, it can be saved to a file or to the clipboard. Images can be
saved in two ways:
Manual save: The image is saved to the hard disk or to the clipboard as soon as the
user clicks on the Save button or immediately after the scanning, depending on user
settings.
Automatic save: The image is saved to the hard disk in a predefined directory.
Saving can be performed as soon as scanning is complete, or when the next card
scanning starts.
Image manual save
The scanned image can be saved manually either to a file on the hard disk, or to the
clipboard. You select the file destination as follows:
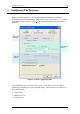
Save to clipboard: To save the scanned image to the clipboard, check the ‘Save to
clipboard’ checkbox (See Figure 2 page 12
).
Note that the Save button in the main screen now displays a clipboard icon.
Save to file: To save the scanned image to a file, check the ‘Save to file’ checkbox
(See Figure 2 page 12
).
Note that the Save button in the main screen now displays a diskette icon.
Once this option is selected, you can set the default file format that will appear in the
Save As dialog box. ScanShell supports seven image file formats: BMP, JPG, PCX,
PNG, TIFF, TGA, PSD.
Scan scheme: This function is set to single-sided document in ScanShell.
Image auto save
Image auto save is particularly useful for large batch scanning jobs. This option
enables chain-feeding the scanner while image saving is done automatically without
user interference.
Scan scheme: This function is set to single-sided document in ScanShell.
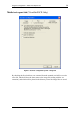
Once the ‘Auto save’ checkbox is checked, the ‘File naming and type’ button is
enabled, and clicking on it opens the ‘AutoSave file naming’ configuration dialog:
ScanShell User Manual version 8.15.5
©
Card Scanning Solutions, all rights reserved