
User manual


2.2 Capture and alignment 31
select the scans that will remain fixed during alignment, whereas the bottom one allows to select the ones
that will change, that is, the ones that will be moved during alignment. To align select at least one fixed scan
(in the top list) and one moving (in the bottom list). When an element is selected in one list it will become
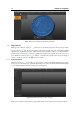
impossible to select it in the other, and its name will be marked in red (ref. Figure 2.23.a). Once selected the
fixed and moving scans, the interface will present itself as in Figure 2.23.b: the central area of the display,
divided in three panels, shows to its upper left the fixes scans in red, on its upper right the moving ones in
green, down below all scans.
(a)
(b)
Figure 2.23: Fixed and moving scans selection.
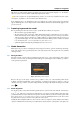
In this stage it’s necessary to provide to the algorithm at least three common points in the two scan sets
to obtain a first approximate alignment: proceed selecting three points in the upper left panel, and three
corresponding points in the upper right one, as showed in Figure 2.24.a.
To best tackle the issue it is very important that the point are not placed in the same straight line, but
that they rather create a triangle as wide as possible.
Once obtained the approximate alignment, IDEA will be able to refine it automatically: clicking on the button