
User manual


2.2 Capture and alignment 27
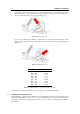
Before launching the 3D scan it is necessary to go through a sequence of operations (ref. Figure 2.17):
(a)
(b)
(c)
Figure 2.17: Preparation to acquisition.
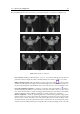
• Live activation
: clicking on the button Turn on live two windows will appear in the 3D view
panel. These windows display the surface currently framed by the cameras, as well as a crosshair;
• White pattern projection
: make sure that the projection of the white pattern of the drop-down
menu located in the acquisition settings section is activated (Figure 2.16), so that the scanner projects on
the object with white light a vertical black line in the center of the projection, as shown in Figure 2.17.a;
• Color auto adjustment (optional)
: to obtain a good coloring of the scan, this button allows to
automatically adapt the parameters of the camera to better the color balance. To proceed the scanner
has to frame either the master or a white sheet bigger than the framed area; this setting is automatically
established during he scanner calibration and therefore could be treated as an optional step;
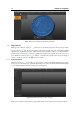
• Distance regulation
: to obtain an optimal acquisition the scanner must be placed at an appropriate
distance form the object: this is reached when the vertical line projected by the scanner passes through
the center of the crosshair: if the line is closer to the left side (blue) of the crosshair (see Figure 2.17.a),
the distance between object and scanner must be reduced, whereas if it’s closer to the right side (green),
it must be increased. When the line passes trough the yellow center(see in Figure 2.17.b), the work