
User manual


2.2 Capture and alignment 25
the frame in the center of the master and acquire the ninth pair of images; to confirm and get to the
following position click on Next pair
The recalibration procedure only requires the acquisition of 3 pairs of images namely the first, the second
and the third; it has to be used when the optical setup of the scanner is not modified and the user wants to
perfect the operational parameters of the scanner if it has been a while since it was calibrated. The Next pair
and Previous pair buttons allow to navigate through the described steps, to examine the results of
the elaboration or to recapture a specific pair of images. After capturing the necessary images the calculation
of the calibration can be initiated with the Calibrate button and confirmed with Confirm calibration
. On the other hand, to close the mode without saving click on Exit calibration mode button.
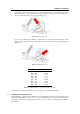
(a) master orthogonal to the scanner. (b) master tilted to the left. (c) master tilted to the right.
(d) master seen from the bottom. (e)
master seen from the bottom and
tilted to the left.
(f)
master seen from the bottom and tilted
to the right.
(g) master seen from the top. (h)
master seen from the top and tilted to
the left.
(i)
master seen from the top and tilted to
the right.
Figure 2.13: Calibration positions.
2.2 Capture and alignment
The first step of the procedure that allows to create the 3D model is the acquisition of a set of range images.
Similarly to what happens for a photo set, each of the scans need to be acquired varying the position of
the object (or the scanner), so that the entire surface of interest is covered. The positioning of the object in
front of the scanner can be performed by the Turn Table, when available. Moreover it is very important for
every range image to be aligned with the others: with this purpose IDEA provides a manual alignment tool
that makes it easy to reconstruct the scanned data (ref. Sect. 2.2.3.1). Alternatively the alignment is fully
automated by the use of the Turn Table. The next sections will intruce the use of Scan in a Box in free mode
and thereafter describe the use in combination with the Turn Table.