
User manual


24 Chapter 2. Using IDEA
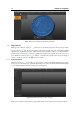
Figure 2.12: Calibration panel.
• Erase current pair: erases the current image pair;
• Calibrate
: starts the calibration procedure once finished the image acquisition cycle; the proce-
dure elaborates on the acquired data and determines the operational parameters of the scanner. On the
right panel are shown the residual error stats at the end of calibration;
• Confirm calibration
: the user confirms the calibration that is internally saved and can be used to
operate with the scanner;
• Exit calibration mode
: terminates at any moment the calibration process and gets back to the
acquisition or optical setup.
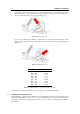
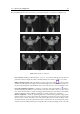
For the complete calibration procedure the user has to take images of the calibration master in 9 different
positions; the user him/herself should put the master in these positions (Figure 2.13) or move the scanner to
match the positions:
1. master orthogonal to the scanner
: initially the master is in a frontal position; to start the procedure
push the button Start calibration; the parameters of light intensity and framed field are set; to acquire
the first pair of images by clicking on Acquire images pair; to confirm and get to the following position
press Next pair;
2. master tilted to the left
: tilt the master approximately 15~20
°
to the left, try to maintain the frame in
the center of the master and acquire the second pair of images; to confirm and get to the following
position click on Next pair;
3. master tilted to the right: tilt the master approximately 15~20° to the right starting from position 1,
try to maintain the frame in the center of the master and acquire the third pair of images; to confirm
and get to the following position click on Next pair;
4. master seen from the bottom
: put the master in position 1 and lower the scanner so that it frames
the master from the bottom at and angle of approximately 15~20
°
; try to maintain the frame in the
center of the master and acquire the fourth pair of images; to confirm and get to the following position
click on Next pair;
5. master seen from the bottom and tilted to the left
: put the master as in position 2; try to maintain
the frame in the center of the master and acquire the fifth pair of images; to confirm and get to the
following position click on Next pair;
6. master seen from the bottom and tilted to the right
: put the master as in position 3; try to maintain
the frame in the center of the master and acquire the sixth pair of images; to confirm and get to the
following position click on Next pair;
7. master seen from the top
: put the master in position 1 and lift the scanner so that it frames the master
from the top at and angle of approximately 15~20
°
; try to maintain the frame in the center of the
master and acquire the seventh pair of images; to confirm and get to the following position click on
Next pair;
8. master seen from the top and tilted to the left
: put the master as in position 2; try to maintain the
frame in the center of the master and acquire the eighth pair of images; to confirm and get to the
following position click on Next pair;
9. master seen from the top and tilted to the right
: put the master as in position 3; try to maintain