
User manual


22 Chapter 2. Using IDEA
•
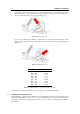
open the iris of the camera’s lenses as wide as possible; higher the exposure time if the images of the
framed master are too dark; regulate the focus of the cameras so that the circles of the master are as
sharp as possible; tighten the focus screws (ref. Figure 2.8);
Figure 2.8: Focus setup screw.
•
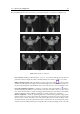
set the exposure time based on Table 2.3 and close the iris of the cameras until the images of the
master are clear, equally on the left and the right, and not saturated; tighten the screws of the iris (ref.
Figure 2.9).
Figure 2.9: Diaphragm’s screw.
Scanning area (mm) Exposure time (ms)
100 × 80 16.66
150 × 120 16.66
200 × 160 33.33
250 × 200 33.33
300 × 240 33.33
350 × 280 50.00
400 × 320 50.00
450 × 360 66.66
500 × 400 66.66
Table 2.3: relationship between scanning area and exposure time.
At this stage the optical setup is finished and it is possible to proceed with the calibration.
2.1.2 Calibration of the optical head
After finishing the optical setup the calibration sets the functioning parameters of the scanner in its new
configuration. The button start calibration procedure, described in Sect. 2.1.1, allows transitioning to this
phase. The program shows the dialogue window New optical head calibration of Figure 2.10 in which the
user indicates: