
User guide


PAGE 22IRONKEY ENTERPRISE USER GUIDE
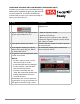
USING RSA SECURID ON YOUR IRONKEY (WINDOWS ONLY)
# Step Description
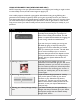
1 Open the RSA SecurID application. Click the icon in the IronKey Control Panel’s
application list.
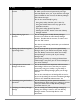
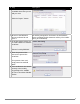
2 Import a .stdid le. This might be done
by your System Admin for you.
1.Click the “Options” button.
2.Click the “Add” button.
3.Browse on your computer to the .stdid le.
A password might be required to unlock the le.
Your tokens are added.
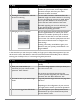
3 If you prefer, rename your tokens. Click the “Rename” button to create a name for
the selected token.
4 In the Options window, you can also
delete tokens by clicking the “Delete”
or “Delete All” button.
Be careful when deleting tokens because this
action cannot be undone.
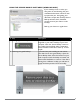
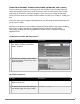
5 To generate a one-time password, select
a token from the list.
NOTE:
• If a PIN is required, enter it in the
“PIN” box and press “Enter.”
• A valid PIN is between 4 and 8 digits.
• To save a PIN for a selected token,
click the “Save PIN” button.
• To delete a saved PIN, click the
“Clear PIN” button. (Be careful when
deleting PINs because this action
cannot be undone.)
Periodically, a new one-time password
is generated. To copy your password to
the clipboard, click the “Copy” button.
If enabled, your IronKey can provide additional strong
authentication capabilities by generating RSA SecurID
one-time passwords. Your System Administrator
provides a le to import your tokens and is likely to
import your tokens for you.