
Operating Guide


5 | P a g e
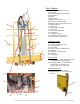
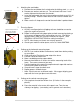
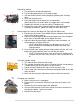
6. TTAttaching the cord holder
a. Remove the cord holder that is attached to the folding stand. (see step 2)
b. Remove one washer and one nut. The rod should still have 1 nut &
washer tightened to the end of the threads.
c. Insert the rod through the hole in the retraction mechanism until it is all
the way through. Place the other washer and nut on the holder and
tighten.
d. Make sure the V shape on the end of the cord holder is pointed down.
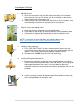
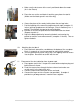
7. TTEnsuring Square
a. All units are aligned prior to shipping so there should be no need to
adjust the square of your unit.
b. Before installing measuring tapes please check accuracy by placing a
full sheet on the bottom rollers and making a test cut. Start with a
squared sheet, make test cut and re-measure for square. (See
GENERAL USE INSTRUCTIONS for cutting instructions.)
c. NOTE: Most factory cut sheets are not truly square!!!!
d. Should your machine not be square, call us at 1-888-SAWTRAX.
8. TTPutting on the horizontal measuring tapes
a. NOTE: If you ordered builder’s extensions, install them before putting
on your tapes.
b. Clean measuring Track on the top edge of the fence.
c. Position saw to the fence level.
d. Move saw blade guard to expose blade
e. Measure from blade to 12 inches & mark the measuring track of the
fence. Then move saw out of your way.
f. Peel the backing of the measuring tape and match tape with mark on
the measuring track of the fence.
g. Snap off excess tape from both ends.
h. Repeat process for both fences.
i. Note: Each insert cuts at different marks. We suggest aligning your
tapes with the insert you plan to cut with most.
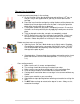
9. TTPutting on the vertical measuring tape
a. Using a piece of material of known size. (21 inches in the example
picture)
b. Place the material in the center of the panel saw. Turn the saw
sideways for ripping. (see rotating saw in general use instructions)
Cord Holder Rod
Washer & Nut
Nut & Washer
Square if measurement of
Line A = Line B & they
intersect in the center.
b.
b.
d.
e.
c.
.
a.