
Operating Guide


4 | P a g e
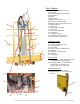
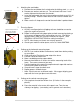
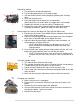
c. On the carriage, lift the pins by pulling up and twisting a 1/4P
th
P
turn. The
pins will stay in the up position so you may insert the saw into the
carriage. Remove the saw insert from the box and place it into the
carriage by placing the base of the plate on the bottom lip of the
carriage (make sure the cord is facing the top of the plate as pictured)
Next, tilt the plate inward until the plate is completely inserted. Ensure
that the holes are lined up with the pins by applying inward pressure to
the plate. Twist to drop pins and make sure pins are completely
seated.
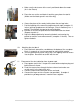
d. Push the carriage with the saw in it all the way up and lock in place by
tightening the black knobs on each side of the carriage.
e. To attach the retraction cable to the carriage, ensure the hose channel
bracket on top of the retraction mechanism is all the way down. Slide
the top bracket so the slot is down preventing the square rod from
spinning.
f. Attach the S hook on the cable to the carriage and crimp closed with
pliers. While holding the carriage, loosen the black knobs and allow it
to slowly descend to the ground.
NOTE: If you have a double spool system attach the smaller spool's "S"
hood to the larger spool's "S" hook and proceed to the next step.
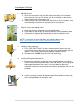
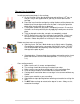
5. TTAdjust the tension of the retraction spool
a. A spool wrench has been taped to the side of the retraction
mechanism.
b. Place the slot of the wrench onto the square rod that holds the spool in
the retraction housing and apply upward pressure with the wrench to
loosen the hose channel
c. Raise the hose channel and rotate the wrench up until you cannot go
further. Lower the hose channel to lock the square rod in place.
d. Remove the wrench to readjust the position & repeat the steps above
until the desired tension is obtained. Usually, raising the carriage about
a foot from the top will work well. Save the wrench for future use.
b.
c.
.