
Operating Guide


3 | P a g e
UInstallation & Set Up
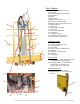
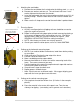
1. TTMoving the unit
a. Once you uncrate the unit you will need to transport it to a location
where you will set it up. To roll the unit, tilt it vertically so the wheels
make contact with the ground & roll.
b. Stand & wheels are not standard on the Basic or Classic models- See
wall mounting instructions in the Accessories Instructions.
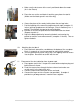
2. TTOpen & secure the folding stand
a. Open legs that are attached to the triangle bracket.
b. Push down on the hinges to securely lock the stand completely open.
c. Cord holder is taped to the back brace for later installation & use.
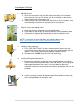
NOTE: If you have an 88 or 100 cross cut machine please see:
http://www.sawtrax.com/video/2.2MtrAssemblyhi.wmv
3. TTLowering side stand legs
a. FULL SIZE UNITS ONLY: Using a socket wrench, loosen the side
stand legs on each side of the unit so they may make contact with the
ground. Then tighten each bolt to properly stabilize the unit.
b. Compact units do NOT need or have side stand legs.
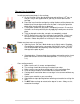
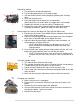
4. TTInstalling Retraction Mechanism
a. Remove the retraction mechanism from the packed box to install on
frame. Remove the two center bolts, nuts and washers in the top guide
tube support bracket of the frame. Use these bolts to attach the
retraction mechanism to the top of the machine and tighten the nuts on
the back.
b. Lock the carriage in place by tightening the black knobs on each side
of the carriage before inserting the saw.
Bolts
a.
..
b.
..
c.
..