
Operating Guide

17 | P a g e
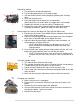
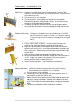
TTFloating router PlateTT – This insert will allow you to use a router to make
consistent depth dados.
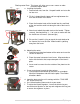
a. Installing the handle-
1. Remove both nuts from the J-shaped handle and set aside
for later use.
2. Fit the J-shaped handle (open end face up) between the
arm and the router insert frame.
3. Place the threaded studs of the handle into the small hole
of the arm and the small hole along the side of the insert’s
frame.
4. Attach nuts to both threaded studs on the handle. Tighten
securely, than back off by ¼ - ½ of a turn to make sure that
the handle can still move. (Not too tight.)
5. Ensure the J handle is lying on top of the stud attached to
the frame of the insert and the Yellow handle is pointing
away from the frame
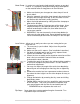
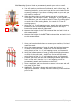
b. Mounting the router
1. Remove base plate from bottom of the router and save the
screws for later use.
2. Place the router into router insert frame. Align router base
holes with the holes that are pre-stamped on the insert’s
plate.
3. Insert router’s screws from the outside of the plate into the
router.
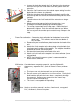
c. If your router doesn’t match the hole pattern-
1. Use base plate from bottom of the router as a template.
Mark the hole pattern and drill into the plate. Then follow
directions above.
d. Insert the plate onto the unit’s carriage with the “THIS SIDE
UP” sticker on the top.
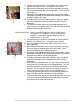
e. Use Yellow handle to lower and raise your router.
f. To adjust the Depth Regulator, loosen the black wing nut,
set the desired position of the top and retighten the wing nut
to secure the regulator in place.
5.
2.
Arm
Frame
3. Match these studs to these holes
1.
2.
f.