Operating Instructions Maintenance Guide 1 Read this manual carefully before you use this product and keep it handy for future reference. For safety, please follow the instructions in this manual.
Introduction This manual contains detailed instructions on the operation and maintenance of this machine. To get maximum versatility from this machine all operators should carefully read and follow the instructions in this manual. Please keep this manual in a handy place near the machine. Please read the Safety Information before using this machine. It contains important information related to USER SAFETY and PREVENTING EQUIPMENT PROBLEMS.
Trademarks Microsoft®, Windows® and Windows NT ® are registered trademarks of Microsoft Corporation in the United States and/or other countries. IPS-PRINT™ Printer Language Emulation© Copyright 1999-2000, XIONICS DOCUMENT TECHNOLOGIES, INC., All Rights Reserved. Other product names used herein are for identification purposes only and might be trademarks of their respective companies. We disclaim any and all rights in those marks. Notes: Some illustrations might be slightly different from your machine.
Safety Information When using your printer, the following safety precautions should always be followed. Safety During Operation In this manual, the following important symbols are used: R WARNING: Indicates a potentially hazardous situation which, if instructions are not followed, could result in death or serious injury. R CAUTION: Indicates a potentially hazardous situation which, if instructions are not followed, may result in minor or moderate injury or damage to property.
R CAUTION: • Protect the equipment from dampness or wet weather, such as rain, snow, and so on. • Unplug the power cord from the wall outlet before you move the equipment. While moving the equipment, you should take care that the power cord will not be damaged under the equipment. • When you disconnect the power plug from the wall outlet, always pull the plug (not the cable). • Do not allow paper clips, staples, or other small metallic objects to fall inside the equipment.
ENERGY STAR Program As an ENERGY STAR Partner, we have determined that this machine model meets the ENERGY STAR Guidelines for energy efficiency. The ENERGY STAR Guidelines intend to establish an international energy-saving system for developing and introducing energy-efficient office equipment to deal with environmental issues, such as global warming. When a product meets the ENERGY STAR Guidelines for energy efficiency, the Partner shall place the ENERGY STAR logo onto the machine model.
How to Read This Manual Symbols In this manual, the following symbols are used: R WARNING: This symbol indicates a potentially hazardous situation which, if instructions are not followed, could result in death or serious injury. R CAUTION: This symbol indicates a potentially hazardous situation which, if instructions are not followed, may result in minor or moderate injury or damage to property. * The statements above are notes for your safety.
TABLE OF CONTENTS 1. Replacing Consumables and Maintenance Kit Detaching the SR770 (2 Tray Finisher).................................................... 1 Opening and Closing the Duplex Reversal Unit ..................................... 2 Replacing the Toner Cartridge ................................................................. 3 Replacing the Fuser Oil Unit .................................................................... 6 Replacing the Photoconductor Unit ........................................
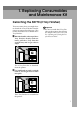
1. Replacing Consumables and Maintenance Kit Detaching the SR770 (2 Tray Finisher) There are times when you might have to detach the 2 Tray Finisher from the printer to remove misfed paper. This section describes how to detach the 2 Tray Finisher. A Hold the handle at the top of the 2 Important ❒ Be sure to attach the 2 Tray Finisher to the printer after closing the Duplex Reversal Unit. See P.2 “Opening and Closing the Duplex Reversal Unit”.
Replacing Consumables and Maintenance Kit Opening and Closing the Duplex Reversal Unit 1 There are times when you might have to detach the Duplex Reversal Unit to remove misfed paper. This section describes how to detach the Duplex Reversal Unit. A Push up the lock release button and keep it in place. Note ❒ You do not have to remove the External Tray even if the 2 Tray Finisher is attached. The D u plex Reve rsal U n it is opened.
Replacing the Toner Cartridge Replacing the Toner Cartridge R WARNING: • Do not incinerate spilled toner or used toner. Toner dust is flammable and might ignite when exposed to an open flame. Disposal should take place at an authorized dealer or an appropriate collection site. If you dispose of the used toner cartridges yourself, dispose of them according to local regulations. R CAUTION: • The inside of the machine becomes very hot. Do not touch the parts with a label indicating a "hot surface".
Replacing Consumables and Maintenance Kit B Remove the toner cartridge for the color you want to replace. A Unhook the green hook on the toner cartridge with one hand. 1 Note ❒ The black toner cartridge contains more than the other toner cartridges. D Shake the toner cartridge back and forth 5-6 times. ZDJT999J B Holding the toner cartridge with the other hand, pull out the cartridge up slowly.
Replacing the Toner Cartridge F Insert the toner cartridge slowly until the green hook snaps on the metal contact area. 1 ZDJT005J Important ❒ Do not install and remove the toner cartridges over and over. This could result in a toner leak. G Close the upper right cover. ZDJH042J The following message appears on the panel display. Please wait a while. Loading Toner... Important ❒ Do not turn off the power switch during "Loading Toner..." appears on the panel display to avoid a printer malfunction.
Replacing Consumables and Maintenance Kit Replacing the Fuser Oil Unit R CAUTION: • The Fusing Unit becomes very hot. When installing the new Fuser Oil Unit, turn off the printer and wait about an hour. After that, install the new Fusing Unit. Not waiting for the unit to cool down can result in a burn. 1 D If the External Tray is attached to the printer, raise it in the direction of the arrow (A A), and remove it (B B).
Replacing the Fuser Oil Unit G Holding the green handle, pull up the Fusing Unit slowly in the direction of the arrow. J Take out the Fuser Oil Unit from the bag, and remove seal (A A), and then remove seal (B B) as shown in the illustration. 1 ZDJH208J ZDJH053J Important ❒ Do not touch any areas other than the handle. H Put the removed Fusing Unit in a stable and level place. I Lift the Fuser Oil Unit in the di- rection of the arrow to remove it, and put it in a stable and level place.
Replacing Consumables and Maintenance Kit K Hold the Fuser Oil Unit in the manner shown in the illustration. Match (U U) on the front of the Fuser Oil Unit and (T T) on the Fusing Unit at three places. While pushing the green lever on the left side of the Fusing Unit (A A), insert the left and right protrusions of the Fuser Oil Unit into the white holders of the Fusing Unit (B B ), and then move the Fuser Oil Unit in the direction shown by the arrow (C C ) to attach the Fuser Oil Unit to the Fusing Unit.
Replacing the Fuser Oil Unit R Plug in the power cable and turn on the power switch. Note ❒ If you dispose of the used toner cartridges by yourself, dispose of them according to local regulations.
Replacing Consumables and Maintenance Kit Replacing the Photoconductor Unit If "Replace Black PCU (Type F)" appears on the panel display, replace the black Photoconductor Unit. 1 D Turn the light brown lever counterclockwise. Replace Black PCU (Type F) If "Replace Color PCU (Type A)" appears on the panel display, replace the three color Photoconductor Units. Replace Color PCU (Type A) ZDJH014E A Turn off the power switch and unplug the power cable.
Replacing the Photoconductor Unit F Lift the inner cover until it clicks into place and holds. G Remove the Photoconductor Unit you want to replace. For black, remove the upper left one, and for color, remove the three on the right. A Move the green hook slowly to the right as shown in the illustration. The green hook is located on the upper right of the Photoconductor Unit. 1 ZDJH016J The Photoconductor Units are installed as shown in the illustration.
Replacing Consumables and Maintenance Kit C Lift and hold the green handle at the top (A A), and pull out the unit slowly (B B). C Match the green arrow at the tip of the Photoconductor Unit to the rail inside the printer. 1 ZDJH210J H Install a new Photoconductor Unit. For black, install one, and for color, install three. A Take the unit out from the bag. ZDJH223J Important ❒ Make sure the green arrow fits securely on the rail before proceeding to the next step.
Replacing the Photoconductor Unit E Remove the cover and push in the Photoconductor Unit until it stops. K Turn the light brown lever clockwise. 1 ZDJH020E ZDJX702E I Lower the inner cover slowly. L Close the front cover slowly by pushing the two areas on the left and right. ZDJH018J J Tighten two screws using provided screwdriver. ZDJH041J M Plug in the power cable and turn on the power switch. The following message appears on the panel display. The printer starts calibration.
Replacing Consumables and Maintenance Kit Replacing the Development Unit If "Replace Black Dev. Unit(TypeD)" appears on the panel display, replace the black Development Unit. 1 C Take out the green screwdriver. Use this screwdriver for all attachment and detachment of screws. Replace Black Dev. Unit(TypeD) If "Replace Color Dev. Unit(TypeB)" appears on the panel display, replace the three color (CMY) Development Units. Replace Color Dev.
Replacing the Development Unit F Lift the inner cover until it clicks into place and holds. Important ❒ Pulling out the Development Unit quickly might cause it to drop. 1 B Hold the right side of the Development Unit with your right hand, and pull out the unit slowly. ZDJH016J The Development Unit is installed shown in the illustration. Starting from the upper left, the units are attached in the order of black (K), yellow (Y), cyan (C), and magenta (M).
Replacing Consumables and Maintenance Kit B Insert the Development Unit along the rail, and push in slowly until it stops. I Lower the inner cover slowly. 1 ZDJH018J ZDJH227J C Holding the Development Unit, pull out the tape slowly in a level manner. J Tighten two screws using provided screwdriver. ZDJH019J ZDJH039J Important ❒ Be sure to pull out the tape to avoid printer malfunction during operation. ❒ The removed tape is dirty. Be careful not to let it get in contact with your hands or clothes.
Replacing the Development Unit L Close the front cover slowly by pushing the two areas on the left and right. 1 ZDJH041J M Plug in the power cable and turn on the power switch. "Please Wait " appears on the panel display, and initial adjustments begin. Please wait until it stops. Please Wait Important ❒ Do not turn off the power switch during adjustments to avoid a printer malfunction.
Replacing Consumables and Maintenance Kit Replacing the Fusing Unit R CAUTION: • The Fusing Unit becomes very hot. When installing the new Fusing Unit, turn off the printer and wait about an hour. After that, install the new Fusing Unit. Not waiting for the unit to cool down can result in a burn. 1 D If the External Tray is attached to the printer, raise it in the direction of the arrow (A A), and remove it (B B). If "Replace Fusing Unit (Type C)" appears on the panel display, replace the Fusing Unit.
Replacing the Fusing Unit G Holding the green handle, pull up the Fusing Unit slowly in the direction of the arrow, and then put it in a stable and level place. ZDJH208J H Take out the new Fusing Unit from the bag and put it in a stable and level place. J Attach the Fuser Oil Unit removed in step I to the new Fusing Unit. Hold the Fuser Oil Unit in the manner shown in the illustration. Match (U U) on the front of the Fuser Oil Unit and (T T) on the Fusing Unit at three places.
Replacing Consumables and Maintenance Kit A) and M Close the upper left cover (A push the handle (B B) slowly to the back until it clicks into place. 1 Q Plug in the power cable and turn on the power switch. The following message appears on the panel display. Please wait for a while. Please Wait ZDJH051J N If you removed the External Tray in step D, reattach it to the printer. Insert the hooks of the External Tray into the printer slits, and lower it toward you.
Replacing the Fusing Unit S Confirm that the following message is displayed on the panel display, and then load the A3 paper which comes with the Fusing Unit in the Bypass Tray. D Adjust the side guides to the paper width. 1 Set Sheet in Bypass, then # A Open the Bypass Tray. ZDJH205J Important ❒ Be sure to shuffle the paper before loading the stack onto the tray so multiple sheets are not fed in at one time. ZDJH202J B Pull out the Bypass Tray Extension, and then flip it open.
Replacing Consumables and Maintenance Kit U Check the test sheets and select the correction value for A through H. • Select "1", if black and magenta square overlap sharply and you can see white slits as the sample. • Select "0", if black and magenta square do not overlap sharply and you can not see white slits clearly. 1 A B C D E F G H 0 0 0 0 0 0 0 0 Press {U U} or {T T} to select "0" or "1" as the values for A - H. Press {Enter} to move to the next letter.
Replacing the Dustproof Filter Replacing the Dustproof Filter The dustproof filter is attached to the black Development Unit. When replacing the black Development Unit, also replace the dustproof filter. The dustproof filter is attached to the left side of the printer shown in the illustration. C From the box which contained the 1 black Development Unit, take out the new dustproof filter and glove. ZDJH214J D Wear the glove on either hand.
Replacing Consumables and Maintenance Kit E With the hand wearing the glove, take out the dustproof filter that is attached to the dustproof filter cover slowly, one by one, and put them into the box which contained the black Development Unit. 1 F Attach the new dustproof filters to the dustproof filter cover one by one. A Attach the large filter. ZDJH216J B Attach the small filter. ZDJH213J ZDJH217J ZDJH215J Important ❒ Handle the removed dustproof filters with care.
Replacing the Waste Toner Bottle Replacing the Waste Toner Bottle If "Replace Waste Toner (Type E)" appears on the panel display, replace the waste toner bottle. D Remove the used waste toner bot- 1 tle slowly from inside the printer. Replace Waste Toner (Type E) A Turn off the power switch and unplug the power cable. B Open the front cover slowly by pulling down from the two areas on the left and right. ZDJH802J Important ❒ Be sure to remove the waste toner bottle in a level manner.
Replacing Consumables and Maintenance Kit G Insert the new waste toner bottle in the position shown in the illustration. 1 ZDJH230J H Push it in until it stops. ZDJH231J Important ❒ Be sure to insert the waste toner bottle firmly to avoid the toner from leaking inside the printer. I Close the front cover slowly by pushing the two areas on the left and right. ZDJH041J 26 J Plug in the power cable and turn on the power switch.
Replacing the Paper Feed Rollers Replacing the Paper Feed Rollers R CAUTION: • The inside of the machine becomes very hot. Do not touch the parts with a label indicating a "hot surface". Touching a "hot surface" could result in a burn. C Pull out all trays slowly while lift- Note ❒ The following illustrations are the an examples of replacing the paper feed rollers of Tray 1. The same procedure is followed with the other trays. A Check the contents of the box.
Replacing Consumables and Maintenance Kit E While pushing the pin of the paper feed roller A outwards (A A ), remove the paper feed roller (B B). 1 H Hold the new paper feed roller C with its gear towards the shaft. Insert it into the rear shaft so that the roller gear is meshed with the shaft gear (A A ). Lock the roller with the stopper (B B). ZERH040E F Remove the stopper from the paper feed roller B (A A), and remove the paper feed roller (B B).
Replacing the Paper Feed Rollers J Hold the new paper feed roller A with its pin towards you (A A). Insert the roller onto the front shaft until it clicks into place (B B). 1 ZERH090E K Slide all trays back into the printer slowly until it stops. Note ❒ If you replaced the paper feed rollers of the optional 2000sheet Large Capacity Tray, load stocks that you removed at step 2 in the tray.
Replacing Consumables and Maintenance Kit 1 30
2. Clearing and Adjusting the Printer Cautions to Take When Cleaning R WARNING: • Do not remove any covers or screws other than those specified in this manual. Some parts of the machine are at a high voltage and could give you an electric shock. Also, if the machine has laser systems, direct (or indirect) reflected eye contact with the laser beam may cause serious eye damage. When the machine needs to be checked, adjusted, or repaired, contact your service representative.
Clearing and Adjusting the Printer Cleaning the Registration Roller R CAUTION: • The inside of the printer becomes very hot. Do not touch the parts with a label indicating the "hot surface", otherwise it could cause a burn. 2 C Wipe around the registration roller by turning with a soft damp cloth. Clean the roller when replacing the black Development Unit. A Turn off the power switch and unplug the power cable. B Open the right cover shown in the ZDJH704J illustration.
Cleaning the DustProof Glass Cleaning the DustProof Glass The dustproof glass may require cleaning if white lines appear on the print side of the document. A Turn C Slide the cleaning brush in and out slowly 8 to 10 times to clean all four areas. off the power switch and unplug the power cable. 2 B Open the front cover and remove the cleaning brush. ZDJP707J ZDJP705J There are four holes for cleaning the dustproof glass.
Clearing and Adjusting the Printer Adjusting the Color Registration 2 When the printer is moved, when the Fusing Unit is replaced, or after printing repeatedly for some time, registration shifting might occur. By performing color registration adjustment, you can maintain optimum print results. C Press {U} or {T} to display "Col- Note ❒ Normally, do not perform manual color adjustment. played, and then press {Enter} }.
Adjusting the Color Registration Automatic color adjustment takes about two minutes. When it completes, a check message is displayed, and the display is returned to the color adjustment menu. Completed Color Regist.: Auto Adjust G When you have made all the set- tings, press {On Line} }. "Ready " appears on the panel display.
Clearing and Adjusting the Printer D Press {U} or {T} to display "Fus- er Adjust", and then press {Enter} }. Color Regist.: Fuser Adjust Important ❒ When the toner cartridge is almost empty or "Auto Adjust” is not finished, the following message appears on the panel display and Fuser Adjust is not available. 2 Cannot Adjust See User’s Guide Confirm that the toner cartridge is installed. The toner cartridge must be installed. See P.3 “Replacing the Toner Cartridge”.
Adjusting the Color Registration E Press {U} or {T} to display "Fus- When color shifting occurs er Adjust", and then press {Enter} }. Perform this procedure when color shifting occurs even after performing "Auto Adjust". L or larger paper in the A Load A4L Bypass Tray. Note ❒ Be sure to select paper size in the "Paper Input" menu. Reference For details about paper size and the procedure for loading paper in the Bypass Tray, see "Loading Paper" in Maintenance Guide 2. B Press {Menu}}.
Clearing and Adjusting the Printer Note ❒ The current resolution is displayed on the printer driver properties. ❒ To adjust the color registration on thick paper, select "Thick: 600dpi" regardless of the current resolution. 2 H Confirm that the following message is displayed, and then press {Enter} }. Press # for Test Print (Bypass) The following message appears on the panel display. The size of the paper loaded in step A is shown.
Adjusting the Color Registration D Press {U} or {T} to display "Manual Adjust", and then press {Enter} }. Color Regist.: Manual Adjust E Confirm that "Print" is displayed in the menu for printing the Test Sheet, and then press {Enter} }. Test Sheet: Print The Test Sheet is printed. See P.40 “Test Sheet Samples”. F Enter the corrective values for A through L on the Test Sheet in order. Adjustment A: (-7.0 +7.0) +0 Note ❒ Confirm the printed Test Sheet to enter the correction values.
Clearing and Adjusting the Printer Test Sheet Samples Following images are samples for the test sheet.
Adjusting the Color Registration ❖ Fuser Adjust Sheet II 2 41
Clearing and Adjusting the Printer Adjusting the Image Density Adjust the image density when the print side of the page is a hazy gray or the print image looks patchy. Important ❒ Extreme settings may create output that appears dirty. 2 ❒ Image density settings should be made from the application or the printer driver whenever possible. Note ❒ Changing the image density setting might cause a deterioration of color balance. We recommend that you leave the image density at its factory default setting.
Adjusting the Registration of the Trays Adjusting the Registration of the Trays You can adjust the registration of each tray. The vertical adjustment is used for all trays. Normally, you need not update the registration. But when the optional Paper Feed Unit or the Duplex Unit is installed, updating the registration is useful in some cases. The following procedure describes how to adjust Tray 3. You can use the same procedure to adjust the other tray as well. A Press {Menu}}. On Line settings.
Clearing and Adjusting the Printer C Press {U} or {T} to display the tray to adjust, and then press {Enter} }. Adjustment: Vert.: Tray 3 Vert.: Tray 3: (-4.0 +4.0) 0 Note ❒ Increase the value to shift the print area in a positive direction, and decrease to shift in a negative direction. Feed Direction Printable area ZDJX900J ❒ Pressing {U U} or {T T} makes the value increase or decrease by 1.0 mm step. E Press {Enter} }. F Press {Escape} }.
3. Appendix Removing Misfed Paper in the Duplex Feed Unit You can remove misfed paper from the Duplex Feed Unit following the procedure below. C Take out the green screwdriver. Use this screwdriver for all attachment and detachment of screws. Note ❒ When a paper misfeed occurs in the Duplex Feed Unit, the printer usually sends the misfed paper to the right cover and there is no need to execute following procedure. See "When “Remove Misfeed A:Internal Path” Appears" in Maintenance Guide 2.
Appendix E Pinch the upper left area of the Duplex Feed Unit, and pull it out slowly halfway. H Close the Duplex Feed Unit. I Holding the Duplex Feed Unit with both hands, insert it along the rails slowly until it stops. 3 ZDJP213J F Holding the Duplex Feed Unit firmly with both hands, pull it straight out. ZDJP056J The top and bottom rails are located in the position shown in the illustration. ZDJP214J G Place the Duplex Feed Unit on the floor slowly. Open it slowly, and remove the misfed paper.
Removing Misfed Paper in the Duplex Feed Unit Note ❒ Be sure to return the provided screwdriver to its original position on the inside of the front cover. K Close the front cover slowly by pushing the two areas on the left and right. 3 ZDJH041J L Plug in the power cable and turn on the power switch.
Appendix When the Front Cover Does Not Close When "Close Front Cover" appears on the panel display, even if the cover seems to be closed properly, it is not. C Push in the Transfer Unit until it stops. Close Front Cover When the front cover does not close, confirm that the Transfer Unit is attached firmly. The Transfer Unit is attached to the position shown in the illustration. 3 ZDJH999J Confirm that the protrusion inside the printer is in the upper left hole of the Transfer Unit.
When the Front Cover Does Not Close E Close the front cover slowly by pushing the two areas on the left and right. 3 ZDJH041J F Plug in the power cable and turn on the power switch.
Appendix Consumables R CAUTION: • Our products are engineered to meet the highest standards of quality and functionality. When purchasing expendable supplies, we recommend using only those specified by an authorized dealer.
Consumables ❖ Other consumables Note ❒ Actual life of consumables depends on the type and size of paper you are using, the contents of your print images, and printing environment conditions. All that means that consumables might require replacement sooner than the life indicated.
Appendix Paper Recommendations Loading Paper Important ❒ Do not use paper that is meant for an ink-jet printer or it may stick to the Fusing Unit and cause a paper misfeed. ❒ When printing on an OHP transparency that has a print side, load it with the print side over on the Bypass Tray. Not taking this precaution may cause it to stick to the Fusing Unit and cause a misfeed. ❒ Print quality cannot be guaranteed if recommended paper is not used.
Paper Recommendations ❖ Thick Paper • Use the Bypass Tray. • The Bypass Tray can hold paper up to 135 kg (163 g/m2) in weight. The print quality on paper that is thicker cannot be guaranteed. • Confirm that the top of the stack is not higher than the limit mark inside the tray. • When printing on thick paper, select thick paper mode with the printer driver.
Appendix ❖ Envelopes • When printing on envelopes, use the Bypass Tray. • Specifications of envelopes are as follows: Metric version Weight Recommended weight and size 72 - 90 g/m 72 g/m 2 114 × 162 mm (C6 Env) 2, Inch version 19 - 24 lb 24 lb, 37/8" × 71/2" (Monarch) • You can load up to 10 envelopes (72 - 92 g/m2, 19 - 24 lb) in the Bypass Tray at the same time, without forcibly pressing them.
Paper Recommendations Printable Area The following shows the printable area for this printer. Be sure to set the print margins correctly by the application. 4.2mm (0.166 inch) Feed Direction 4.2mm (0.166 inch) 4.2mm (0.166 inch) 3 4.2mm (0.166 inch) A : printable area Note ❒ The printable area may vary depending on the paper size, printer language and printer driver settings.
INDEX A Adjusting the Color Registration, 34 Auto Adjust, 34 Manual Adjust, 38 Adjusting the Image Density, 42 Adjusting the Registration of the Trays, 43 Appendix, 45 C Caution, ii Cleaning the DustProof Glass, 33 Cleaning the Registration Roller, 32 Clearing and Adjusting the Printer, 31 Color Adjustment Checking the Test Sheet, 40 Consumables, 50 D Detaching the SR770 (2 Tray Finisher), 1 E Energy Star, iv Envelopes, 54 R Removing Misfed Paper into the Duplex Feed Unit, 45 Replacing Consumables and M
Copyright © 2001
UE USA G060-6920