
Installation Guide
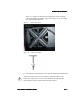
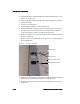
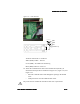
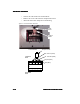
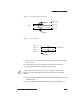
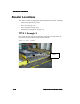
Table Of Contents

ULD Reader Installation
ULD Reader InstallationULD Reader Installation
ULD Reader Installation
2-12
2-122-12
2-12 ULD Reader Installation Guide
ULD Reader Installation GuideULD Reader Installation Guide
ULD Reader Installation Guide
4. Attach
the
Reader
to
the
Reader
Brackets
using
Retaining
Bolts
“A”
(see
Figure
2-6
on
page 2-8).
5. Check
for
Reader
distance
from
the
roller
tangent
(0.480
-0.5”)
at
both
ends
of
the
Reader.
6. Check
for
any
interference.
7. Remove
Retaining
Bolts
“A”
from
both
brackets.
8. Remove
the
Reader,
and
place
it
with
the
top
(Dock
Plate)
facing
down
onto
the
two
2x4
wooden
work
blocks
for
communication
and
power
connection,
pulling
two
meters
of
cable
slack
from
the
pit.
9. Remove
the
Terminal
Access
Panels
for
power
and
communication
on
the
bottom
of
the
Reader.
Figure
2-9
shows
the
Reader
face
down
with
its
access
panels
for
power
and
communication.
Figure 2-9 Terminal Access Panels
10. With
power
OFF
to
both
the
communication
and
power
cables
leading
to
the
Reader,
use
a
Multi-meter
to
perform
a
continuity
check.
11. Attach
the
230VAC
wire
connections
to
the
terminal
block,
as
shown
in
Figure
2-10.
Power
Access
Power
Cable
Communication
Access
Communication
Cable