
User's Manual

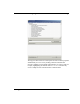
Table Of Contents
- Savi Signpost SP-65X Series Installation Guide
- Contents
- Figures
- Introduction
- Hardware Installation
- Signpost Configuration

&+$37(5
6LJQSRVW&RQILJXUDWLRQ
6DYL6LJQSRVW63;6HULHV,QVWDOODWLRQ*XLGH
$GGLQJD6LJQSRVW0DQXDOO\8VLQJDQ
(WKHUQHW
&RQQHFWLRQ
You can manually add a signpost that is plugged into an Ethernet by
assigning a static IP address. SmartChain Site Manager must have a TCP/IP
subnet that is compatible with the signpost’s default IP address (10.7.19.11).
The signpost should be connected to SmartChain Site Manager through a
hub, switch, or cross-over cable.
On the Windows desktop, click the Site Manager Console icon.
In the Network area of the console, right-click a protocol and select
Add Device.
Fill in the device properties.
&RQILJXULQJ2SHUDWLRQ6HWWLQJV
8VLQJ&RQILJXUDWLRQ6RIWZDUH
Before configuring signpost operation settings, you must connect a service
computer to the signpost. See “Communicating with the Signpost Using
RS-232” on page 23.
Configure the Signpost ID (1 to 65535).
The Signpost ID is a unique number in the facility. The signpost can be
identified in the system by associating this number with a description in
the SmartChain Site Manager configuration.
Program the transmit group number (0 to 3) for the signpost.
The factory setting is 0. The signpost will not synchronize when the
group number is set to 0. When you program a number from 1 to 3,
signposts having the same group number will transmit simultaneously.
Signposts having different group numbers will transmit independently.
Set the beacon control on/off.
You use the beacon control on/off option to program the beacon mode of
a tag. When this option is disabled, you cannot change the tag beacon
mode. When the option is enabled, you can change the tag beacon mode.