
Manual

5. Look and feel to be sure there are no
cartridges in the chamber.
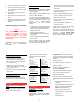
6. As shown in FIGURE 5, load the correct
caliber cartridges into the removable magazine
by pressing downward and to the rear.
7. Insert the removable magazine back into
the stock opening, pressing upward until the
latch snaps into position and is fully engaged.
8. Pull the cocking handle fully to the rear and
release it, allowing the handle to “snap”
forward.
• This will pick up a cartridge and chamber it.
The gun is now ready for firing.
ALWAYS KEEPTHE MUZZLE POINTED IN A
SAFE DIRECTION.
TO FIRE
DO NOT MOVE THE SAFETY FORWARD TO
THE OFF SAFE [READY TO FIRE] POSITION
UNTILYOU ARE READY TO SHOOT.
1. Keep your finger off the trigger and out of the
trigger guard until you are ready to shoot.
THE ONLY TIME YOU CAN BE ABSOLUTELY
C E RTAIN THAT A GUN CANNOT FIRE IS
WHEN THE ACTION IS OPEN AND IT IS
COMPLETELY EMPTY OFAMMUNITION.
2. Always look carefully around to be sure that no
one will cross in front of you when you are
ready to shoot.
3. Place the firearm in shooting position and
move the safety forward to the OFF SAFE
[READY TO FIRE] position and take aim.
NEVER TOUCH THE TRIGGER ON A FIREARM
UNTILYOU ACTUALLY INTEND TO SHOOT.
NEVER POINT YOUR GUN AT ANYTHING YOU
DO NOT INTEND TO SHOOT.
4. Place your finger into the trigger guard and when
you are on target, squeeze the trigger slowly.
• From this point on it is only necessary to
pull the trigger for each shot until the
magazine is empty, as the loading and
ejection are done automatically.
NO ONE CAN CALL A BULLET BACK !!!
ALWAYS KEEPTHE MUZZLE POINTED IN A
SAFE DIRECTION.
5. Move the safety fully rearward to the ON SAFE
position when not firing.
5
FIGURE 5
FIGURE 4
counter bore
6
UNLOADING
1. With the muzzle pointed in a safe direction,
move the safety fully rearward to the ON SAFE
position.
K E E P YOUR FINGERS AWAY FROM THE
TRIGGER.
2. With one hand prepared to catch the
removable magazine, push the latch at the
front of the magazine forward, ejecting the
magazine into your hand.
3. Placing one hand over the ejection port, slowly
pull the cocking handle fully to the rear.
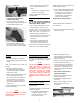
4. Let the cocking handle come forward slowly
and push the handle into the counter bore
(see FIGURE 4), locking the bolt open, and
extract the live cartridge from the chamber
(if there is one).
A LOADED GUN HAS NO PLACE IN OR NEAR
A VEHICLE OR BUILDING.
CAUTION
LOOK AND FEEL! BE SURE THE CHAMBER
AND MAGAZINE ARE COMPLETELY EMPTY –
DO NOT ASSUME!
CLEANING AND CARE OF YOUR FIREARM
YOUR GUN IS A MECHANICAL DEVICE THAT
WILL NOT LAST FOREVER AND IS SUBJECT
TO WEAR.
CAUTION
THE GUN OPERATES AT ITS BEST WHEN THE
FIRING MECHANISM IS CLEAN. THE
FUNCTIONING OF YOUR A U TOLOADER IS
DEPENDENT ON THE ENERGY O F THE
B U L L E T, WHICH EXPOSES THE CHAMBER
TO GASES. CONSEQUENTLY, KEEPING
YOUR FIREARM CLEAN OR CLEANING YOUR
FIREARM AFTER EXTENSIVE USE WILL
MAINTAIN THE DESIRED OPERATION OF THE
GUN.
TO DISASSEMBLE THE ACTION
ALWAYS KEEP THE MUZZLE POINTED IN A
SAFE DIRECTION.
ALOADED GUN HAS NO PLACE IN OR NEAR A
VEHICLE OR BUILDING.
• Suggested tools for general maintenance
and cleaning: padded vise, Phillips
screwdriver, 7/16” box end or socket
wrench, 9/64” Allan wrench.
1. With one hand prepared to catch the
removable magazine, push the latch at the
front of the magazine forward, ejecting the
magazine into your hand.
2. Placing one hand over the ejection port, slowly
pull the cocking handle fully to the rear.
3. Let the cocking handle come forward slowly
and push the handle into the counter bore
(see FIGURE 4), locking the bolt open, and
extract the live cartridge from the chamber
(if there is one).
4. Look and feel to be sure there are no
cartridges in the chamber.
5. Move the safety forward to the OFF SAFE
[READY TO FIRE] position.
6. Pull the trigger to disengage the hammer
from the sear.
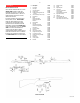
7. Remove the stock assembly screw, and lift
the action and barrel from the stock.
See FIGURE 6.
FIGURE 6
12.
7.
9.
10.