
Manual


19 GB 07.01
Dismantling Assembl
y
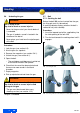
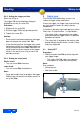
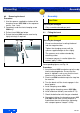
8.3 Removing the barrel
Procedure:
1. Use the spanner supplied to slacken off the
clamping screws 306, 306a in the sequence
centre - rear - front.
2. Completely undo the front clamping screw
306a only.
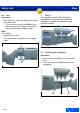
3. Pull out insert 308 from below.
4. Extract the barrel 400 from the receiver by
lightly twisting it if required.
9 Assembly
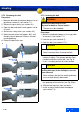
9.1 Fitting the barrel
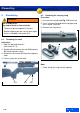
Corresponding figure, see Fig. 18.
Procedure:
1. Insert the barrel 400 from below up to the stop
into the clamping device. Ensure that the
barrel is aligned in such a way that the insert
remains easy to move all the time.
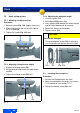
2. Place insert 308 from below up to the stop into
the receiver.
3. Turn the barrel until the insert engages in the
barrel groove.
4. Install clamping screw 306a.
5. Lightly tighten clamping screws 306, 306a.
6. Install and close the bolt (see section 5.7.3).
7. Check the bolt action with the gun unloaded.
8. Alternatively tighten the clamping screws 306
and 306A a little more so that the barrel is
fixed without tension (alternative: tightening
with a torque spanner: torque 7-8 Nm).
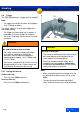
Abb. 18
306 306a
308
400
CAUTION!
Gun may be damaged
• Only assemble cleaned gun parts.
CAUTION!
Gun may be damaged
• Do not use force when inserting the barrel
into the magazine tube.
• Tighten the clamping screws until the
spanner supplied begins to flex slightly.
• The spanner must not be extended by
attaching a tube.
• If a torque spanner is used to tighten the
screws, apply 7-8 Nm.
d