Table of contents 1 General instructions 2 2 2.1 Safety regulations Safety instructions 3 4 3 3.1 3.2 3.3 Product description Main parts Main features Scope of supply 5 5 6 6 4 4.1 Transporting the gun Transport 7 7 5 5.1 5.2 5.3 5.4 5.5 5.6 5.7 5.7.1 5.7.2 5.7.3 5.7.4 5.8 5.8.1 5.8.2 5.8.3 5.9 5.9.1 5.9.2 5.9.
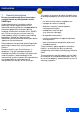
Instructions 1 General instructions Be sure to read through these instructions carefully before any manipulation on this SAUER gun. Understanding these instructions and the technically correct implementation of the information contained therein are imperative for the correct preparation and safety during handling, maintenance and care of this SAUER gun. Do not use the gun until you have fully understood all safety instructions and handling procedures.
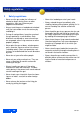
Safety regulations 2 Safety regulations • Never use the gun under the influence of alcohol or drugs, during illness or other complaints; they may influence your judgement and reflexes. • Always treat the gun as loaded and unlocked until you have made sure to the contrary by unloading it. • During all manipulations, keep the muzzle of the gun pointed in a safe direction. Safe directions are defined as areas where there are no people, other living creatures or other people's property.
Safety regulations 2.1 Safety instructions In the individual sections of these instructions, the following safety indications alert you to various risks: WARNING! Information on risks which, if not scrupulously observed, can lead to severe bodily harm or death. CAUTION! Information on risks which, if not scrupulously observed, can lead to bodily harm or damage to the gun. CAUTION! Information on technical requirements which, if not scrupulously observed, can lead to damage to the gun.
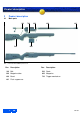
Product description 3 Product description 3.1 Main parts 100 700 500 300 400 402 600 Abb. 1, SSG 3000 with McMillan plastic stock Pos. Description Pos. Description 100 Bolt 500 Stock 300 Magazine tube 600 Magazine 400 Barrel 700 Trigger mechanism 402 Flash suppressor 5 GB 07.
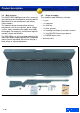
Product description 3.2 Main features 3.3 Scope of supply The SAUER SSG 3000 precision rifle is a manual type repeating rifle developed to meet the specific requirements of law-enforcement and military sharp-shooters. The standard scope of delivery includes: The modular design concept allows primary components such as the receiver, barrel, trigger system, stocks and bolt to be rapidly and readily exchanged. Consequently, maintenance logistics are both simple and efficient.
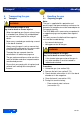
Transport Handling 4 Transporting the gun 5 4.1 Transport 5.1 WARNING! Uncontrolled discharge of shot May lead to death or severe injuries • When transporting your firearm, always keep it unloaded (see section 5.6) and decocked for your own safety and for the safety of others. • Never carry a cocked gun containing a round in the barrel chamber. • Always carry the gun in such a manner that, should you fall or otherwise slip, you are able to control the direction of the muzzle.
Handling 5.2 Ammunition WARNING! Incorrect ammunition May lead to death or severe injuries and damage to the gun • Only fire commercially available ammunition in the original packaging and of the correct caliber from this gun. • Never use recharged, "reconditioned", handcharged or non-standard ammunition in your gun. • Never use dirty, wet, corroded, bent, damaged or oiled ammunition. • Never spray lubricants, preservatives or cleaning agents directly onto the rounds.
Handling Procedure: 5.4 Discharging a shot 1. Lock the gun (see section 6.2). 2. Insert the bolt (see section 5.7.3). 3. Unlock the gun (see section 6.1). WARNING! 4. Open the bolt and pull it back to the stop. Insufficient awareness of the dangers May lead to death or severe injuries 5. Fill the magazine (see section 5.8.3). • Ensure that the target and the environment allow shots to be fired without danger.
Handling Procedure: 5.5 Reloading during shooting 1. Aim the gun at a safe target. 2. Unlock the gun (see section 6.1). WARNING! 3. Place finger on trigger and pull back the trigger to discharge the shot. Insufficient awareness of the dangers May lead to death or severe injuries 4. Keep the gun aimed at the target and repeat and fire further shots as required. • Never let the gun out of your hands. 5. If the magazine is empty, reload the gun (see section 5.5).
Handling 5.6 Unloading the gun WARNING! Gun is ready to fire May lead to death or severe injuries • Never let the gun out of your hands before it is unloaded. • The gun is loaded, a round is located in the chamber of the barrel. • Never place your hand over the ejection port 5.7 Bolt 5.7.1 Cocking the bolt Before the bolt 100 can be inserted into the gun, the firing pin must first be cocked. A cocking indicator displays whether the bolt is cocked or not (red = cocked). Procedure: 1.
Handling 5.7.3 Inserting the bolt 5.7.2 Removing the bolt Procedure Procedure: 1. Move the buttstock cheekpiece down as far as possible or remove it (see section 7.1). WARNING! 2. Release the gun safety (see section 6.1). Uncontrolled discharge of shot May lead to death or severe injuries 3. Open the bolt and draw it back approx. half of its travel. • The gun must be unloaded. 4. Activate the safety catch (see section 6.2). Procedure: 5. Rotate the bolt to the left (approx.
Handling 5.7.4 Uncock the firing pin 311 WARNING! Uncontrolled discharge of shot May lead to death or severe injuries • Only uncock the firing pin with the gun unloaded and the barrel chamber empty. Procedure: 1. Unload the gun and make sure that there is no round or cartridge case in the barrel chamber or in the magazine (see section 5.6). 2. Pull the trigger and slowly close the bolt with the trigger still pulled. Note: • The cocking indication must not be visible (see Fig. 4). Abb. 6 5.8.
Handling 5.9 Trigger 711 The SSG 3000 features a trigger with let-off point. Note: • The trigger pull weight has been set to approx. 15 N (1.500 g) at factory. The match trigger is a let-off point trigger with adjustable take-up. – The trigger must be pulled until it reaches a noticeable resistance (trigger let-off point). – The shot is fired after the resistance has been overcome. WARNING! 709a must only be modified by a qualified gunsmith. He can adjust the trigger pull weight between approx.
Handling Safety lock 5.9.2 Setting the trigger position 6 Refer also to Fig. 8. The SAUER SSG 3000 safety system is an indirect firing pin safety mechanism. The trigger 710 can be displaced along the longitudinal axis by set screw 711. Procedure: 1. Slacken off set screw 711. 2. Shift the trigger 710 to the desired position. 3. Tighten the screw 711. Caution: • Ensure that in the foremost position, the trigger does not contact the unlock slide 708.
Safety lock 6.2 Stock 7 Lock Procedure: 1. Press down the safety lock 313 up to the stop with your thumb. – This causes the unlock slide 708 to slide downwards out of the trigger unit where it is easily controlled by the trigger finger. Stock The cheekpiece of the SSG 3000 stock is adjustable for height and offset and can be completely removed. The buttplate can be adjusted in length. . Note: Gun locked: – Red mark not visible – The unlock catch can be felt with the trigger finger .Stock 708 Abb.
Stock 7.2 Stock setting options 7.2.3 Adjusting the buttplate length 1. Unscrew screws 515. 7.2.1 Adjusting cheekpiece offset 2. Pull buttplate 516 back a little. Procedure: 1. Release screws Fig. 13/A (approx. four turns). 3. Press spacers 519 towards the left on the top and turn them downwards for removal. 2. Slide cheekpiece to the left or to the right or jam it as required. 4. Extract the spacers to the bottom. 5. Tighten screws 515. 3. Tighten the screws Fig. 13/A well. CAUTION! .
Dismantling 8 Dismantling 8.2 Removing the carrying sling Procedure: WARNING! 1. Unscrew the knurled knob Fig. 17/A to the left. Gun is ready to fire May lead to death or severe injuries • There must be no magazine in the gun. 2. Press in the knurled knob with the plunger and twist it by 90° to the left. 3. Remove the sling swivel. • Before stripping your gun, ensure once again that it is unloaded (see section 5.6). 8.1 Removing the stock Procedure: A 1.
Dismantling 8.3 Assembly 9 Removing the barrel Procedure: 1. Use the spanner supplied to slacken off the clamping screws 306, 306a in the sequence centre - rear - front. 2. Completely undo the front clamping screw 306a only. 3. Pull out insert 308 from below. 306 306a CAUTION! Gun may be damaged • Only assemble cleaned gun parts. 9.1 4. Extract the barrel 400 from the receiver by lightly twisting it if required.
Assembly 9.2 Installing the stock CAUTION! 9.3 Fitting the carrying sling Corresponding figure, see Fig. 17. Procedure: Gun may be damaged 1. Insert the open sling swivel. • The spanner must not be extended by 2. Press the knurled knob with the plunger and turn it to the right until the hinged plate snaps onto the stud. attaching a tube. • If a torque spanner is used to tighten the stock retention screws, apply 5 Nm. Corresponding figure, see Fig. 16 Procedure: 1.
Training system 10 Training system cal. 22 lr. (optional) 10.1 Caliber conversion cal. 22 lr. Procedure: 1. Remove barrel (see section 8.3) 5. With the slot facing downwards, insert barrel 450 into the receiver. Align slot with the slot in the receiver. 6. Place insert 308 into the receiver from below. 7. Lightly tighten clamping screw 306a and remove the magazine (see section 5.8.1). . 8. Insert the magazine adapter into the magazine well until it contacts the barrel. 301 9.
Accessories 11 Accessories 11.1 Scopes 11.1.1Installing the scope 1. Slacken off the Allen screws 204 on the scope rail 200 until the scope can be slid on. 2. Hold the scope at an angle and parallel to the rifle. 11.2 Adjusting eye relief length 1. Slacken off the Allen screws 205 until the scope can be slid along its own axis. 2. Select the desired eye relief length of the scope. 3. Tighten the Allen screws 204. 3. Snap the scope rail 200 from the left side onto the receiver dovetail. 4.
Accessories 11.3 Removing the mirage band CAUTION! 11.4 Installing the mirage band CAUTION! The mirage band is only loosely connected with the gun May lead to injuries and damage to the gun The mirage band is only loosely connected with the gun May lead to injuries and damage to the gun • Keep the gun pointed in a safe direction in • Keep the gun pointed in a safe direction in order to prevent the mirage band from injuring persons or damaging property if it slips unintentionally.
Care 12 Care 12.1 General remarks Proper functioning and precision of the gun can only be maintained through regular and expert care. The gun must be cleaned and protected against corrosion after each use. The bore must be cleaned and protected against corrosion after each firing. Wooden stocks must be treated with a suitable agent in accordance with the corresponding instructions and must be protected against the weather. For the optimum care for your SSG 3000 we recommend SAUER care products, e.g.
Care Extras 12.3 External metal surfaces Procedure: For the care and preservation of the external metal and wood surfaces we recommend SAUER Premium gun grease. Minute spherical Teflon® particles seal the pores of all wood and metal surfaces and provide perfect protection and optimal sliding characteristics. 1. Thoroughly clean the gun using suitable cloths and cleaning agents. Benefits: 2.
Dealing with problems 14 Dealing with problems 14.1 Cause and correction of malfunctions Gun maintenance (cleaning and inspection) according to the instructions can prevent malfunctions. Should, nevertheless, a malfunction occur during shooting, proceed as follows: WARNING! Uncontrolled discharge of shot May lead to death or severe injuries • Hold the gun pointed in the firing direction (safe direction) and keep your fingers off the trigger while you carry out the steps described below. 1.
Dealing with problems Fault Potential cause Remedy No round chambered. Magazine not properly inserted, deformed or dirty. Insert magazine all the way until it engages (see section 5.8.2). Gun faulty. Repair by manufacturer. Mainspring is decocked. Cock the bolt (see section 5.7.1). Gun faulty. Repair by manufacturer. Gun is decocked. Cock the gun (see section 5.7.1). Gun faulty. Repair by manufacturer. Bolt cannot be inserted into the magazine tube. Gun cannot be locked. 27 GB 07.
Dealing with problems Optics und accessories Note: 15 Installation of optics and accessories • Familiarise yourself fully with regional Note: 14.2 Shipping the gun legislation governing the shipping and transportation of firearms. 1. Check the gun to ensure that it is unloaded and decocked. 2. Pack the gun well (if possible in its original packaging) to prevent damage in transit. To prevent the gun being recognised as such during shipping, wrap the original packaging in a second outer layer.
Technical specifications 16 Technical specifications Functional principle Repeater rifle Bolt type Direct lug locking in the barrel Calibre 7.62 mm x 51 NATO (.308 Win.) Length, overall 1.180 mm Height, excl. scope 190 mm Rifling twist 1:12“ / 305 mm Width 95 mm Barrel length, excl. flash suppressor 600 mm No. of grooves 4 Weight incl. magazine, excl. scope 5.1 kg Trigger pull weights Double stage: N approx.
Accessories 17 Accessories Your SAUER SSG 3000 is a modular precision rifle, which can be easily adapted to new uses at a later date. Accessories make it possible to adapt the gun to individual needs: – Mounting rails (Picatinny) – Shooting sling – Spacers for a longer butt stock – Scopes – Night vision devices – Mirage band – Bipod Spare parts 18 Spare parts J. P. Sauer & Sohn GmbH only supplies to authorised dealers in Germany or to the respective SAUER importer abroad.
Spare parts 18.1 SSG 3000 spare parts Pos.Designation Pos.Designation 100 Bolt, complete 101 Cyl.
Spare parts Pos.Designation Pos.
Spare parts Abb. 25, Spare parts for SSG 3000 33 GB 07.
Spare parts 18.2 Spare parts for training system .22 lr. (optional) Pos.Designation 150 Bolt assy. .22 lr. 151 Lock 152 Clamping sleeve 153 Spring counter bearing 154 Bolt head 155 Firing pin sub-assy. (Pos. 156 - 159) 156 Firing pin 157 Firing pin spring 158 Bushing 159 Circlip 160 Firing pin tip 161 Pressure spring 162 Bolt cylinder 163 Pressure spring 164 Extractor seat 165 Retention claw 166 Extractor Abb. 26, Spare parts for training system .22 lr. 07.
J. P. Sauer & Sohn GmbH gegr. 1751 Sauerstr. 2-6 D-24340 Eckernförde Germany Phone +49 4351 471 100 Fax +49 4351 471 160 www.sigsauer.