Table of contents 1 General instructions 2 2 2.1 Safety regulations Safety instructions 2 3 3 3.1 3.2 3.3 Product description Main parts Main features Scope of delivery 4 4 5 5 4 4.1 4.2 Transporting the gun Transport in assembled state Transport in the compact case 6 6 6 5 5.1 5.2 5.3 5.4 5.5 5.6 5.7 5.7.1 5.7.2 5.7.3 5.7.4 5.8 5.8.1 5.8.2 5.8.3 5.9 5.9.1 5.9.2 5.9.3 5.
Instructions 1 General instructions Be sure to read through these instructions carefully before any manipulation on this SAUER gun. Understanding these instructions and the technically correct implementation of the information contained therein are imperative for the correct preparation and safety during handling, maintenance and care of this SAUER gun. Do not use the gun until you have fully understood all safety instructions and handling procedures.
Safety regulations • Never shoot a gun into which there has been ingress of water, sand, dirt or other foreign bodies. • Never release the tension on the firing pin 106 merely by pulling the trigger. • Never let a loaded gun out of your hands. • Always unload the gun immediately after shooting, before putting it down, putting it in its case or handing it to another authorised person.
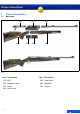
Product description 3 Product description 3.1 Main parts 100 400 200 700 600 300 500 Fig. 1 Item Description Item Description 100 Bolt 500 Front stock 200 Magazine tube 600 Magazine 300 Barrel 700 Trigger 400 Main stock 06.
Product description 3.2 Main features 3.3 Scope of delivery The SAUER 202 is a high precision hunting gun built to the latest technology. It is an easy to handle repeater with rifle trigger which can be fitted with a rear set trigger. The standard scope of delivery includes: The modular construction makes it easy to change individual components including the caliber. – 1 x special socket spanner (2 parts) Both mechanical and optical aims can be fitted.
Transporting 4 Transporting the gun 4.2 4.1 Transport in assembled state Procedure: Procedure: 1. Remove the magazine (see section 5.8.1). 2. Unload and lock the gun (see section 5.6, 6.2). 3. Remove the bolt (see section 5.7.2). 4. If necessary remove the sling attachment (see section 7.1) to prevent scratching the stock components. 5. Clean the gun (see section 11). WARNING! Transport in the compact case 1. Remove the magazine (see section 5.8.1). 2. Unload the gun (see section 5.6). 3.
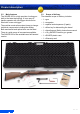
Handling 5 Handling the gun 5.1 Preparing the gun Note: The gun is supplied with a protective and preserving oil and grease coating, and excessive protective oil and grease must be removed prior to first commissioning. The SAUER 202 is supplied in a shock-proof durable plastic case. For safety reasons the bolt and the magazine must not be inserted during: – first commissioning and – taking possession of the gun.
Handling 5.3 Loading the gun (ready to fire) WARNING! 5.4 Discharging a shot WARNING! Insufficient awareness of the dangers May lead to death or severe injuries Insufficient awareness of the dangers May lead to death or severe injuries • Never load or unload the gun inside a vehicle, • Ensure that the target and the environment inside a building or any other confined space (except in a designated firing range).
Handling Procedure: 1. Aim the gun at a safe target. 2. Unlock the gun (see section 6.1). 3. If necessary, set the trigger (see section 5.9.2). 4. Place finger on trigger tongue and pull back the trigger tongue to discharge the shot. The trigger behaviour depends on the trigger fitted (see section 5.9). 5. Keep the gun aimed at the target and repeat and fire further shots as required. 6. If the magazine is empty, reload the gun (see section 5.5). 7. Lock and unload (see section 5.6). WARNING! 5.
Handling 5.6 Unloading the gun WARNING! Gun is ready to fire May lead to death or severe injuries • Never let the gun out of your hands before it is unloaded. • The gun is loaded, a round is located in the chamber of the barrel. • Never place your hand over the ejection port 5.7 Bolt 5.7.1 Cocking the bolt In order to insert the bolt 100 into the gun, the firing pin must be cocked. A cocking indication provides information about the cocking state of the bolt. Procedure: 1.
Handling 5.7.2 Removing the bolt 5.7.3 Inserting the bolt Procedure: Procedure WARNING! 1. Unlock the gun (see section 6.1). 2. Open the bolt and pull approximately half way back. Uncontrolled discharge of shot May lead to death or severe injuries 3. Fully push in the bolt lock bolt slide 711 and pull out the bolt. • The gun must be unloaded. 1. Unlock the gun (see section 6.1). 2. Cock the bolt (see section 5.7.1). 3.
Handling 5.7.4 Uncock the firing pin WARNING! Uncontrolled discharge of shot May lead to death or severe injuries • Only uncock the firing pin with the gun 5.8 Magazine 5.8.1 Removing the magazine Procedure: 1. Hold magazine 600 by hand. 2. If fitted: Push magazine safety towards the magazine (see section 10.2). unloaded and the barrel chamber empty. Procedure: 1. Unload the gun and check that there is no round in the barrel chamber (see section 5.6). 2.
Handling 5.8.2 Inserting the magazine 5.9 Procedure: Three trigger variants are available for the SAUER 202: A rifle trigger, a rifle trigger with rear set trigger, and a pressure point match trigger. 1. Insert the magazine into the magazine shaft and push upwards until the magazine engages audibly. Do not jam the magazine. 2. If fitted: Push magazine safety towards the barrel (see section 10.2). 5.8.3 Loading the magazine Procedure: 1. Push the rear feeder down. 2.
Handling 5.9.2 Rifle trigger with rear set trigger Procedure: Note: 1. Unlock the gun (see section 6.1). • The trigger weight of the rifle trigger has been 2. Press the trigger tongue 706 forward with the thumb until it engages. set to approx. 13 N (1,300 g) at factory. The rifle trigger with rear set trigger is a direct trigger without creep, which allows for a reduced trigger resistance by way of setting. The trigger resistance of the rear set trigger can be set individually (see page 15).
Handling Resetting Adjusting downwards: Procedure: – Turn the adjustment screw 729 clockwise. 1. Lock the gun (see section 6.2). Adjusting upwards: 2. Aim the gun at a stop-butt. – Turn the adjustment screw 729 anti-clockwise. 3. Grip the trigger tongue with the thumb and index finger and pull back slowly. Note: • If the bolt is opended, a reset will be carried out automatically. Modifying the trigger weight 729 Note: • The trigger weight of the set trigger has been set to approx.
Handling 5.9.3 Match trigger WARNING! Note: • The trigger weight has been set to approx. 7 N (700 g) at factory. The match trigger is a pressure point trigger with adjustable creep. – The trigger tongue must be pulled until it reaches a noticeable resistance (pressure point). – The shot is fired after the resistance has been overcome. WARNING! Gun is ready to fire May lead to death or severe injuries • For safety reasons the trigger weight must only be modified by a qualified gunsmith.
Safety 6 Safety lock The safety lock of the SAUER 202 is an indirect firing pin safety lock. It locks the trigger tongue, the trigger stop, and the firing pin nut and thus blocks all safety-relevant components. Its function is based on a principle proven a million times over: A single function – a single button. – The safety lock bolt is positioned at the top of the handle of the stock. – The unlock bolt is positioned well protected and easy to grip within the trigger guard in front of the trigger tongue.
Safety 6.2 Locking . CAUTION! Gun may be damaged • If the gun has its trigger set and is then locked, the gun cannot be unlocked and opened. To unlock and open the gun again, it has to be unset manually (see section 5.9.2). Procedure: 1. Press the safety lock bolt 210 down with thumb up to the stop. 210 – The unlocking bol 714 is pushed out of the trigger device at the bottom where it can be easily controlled with the trigger finger.
Dismantling 7 Dismantling WARNING! Gun is ready to fire May lead to death or severe injuries • There must be no magazine in the gun. • Before stripping your gun, ensure once again that it is unloaded (see section 5.6). 7.1 7.2 Removing the main stock Procedure: 1. Removing the string attachment (see section 7.1). 2. Unscrew the main stock screw in the hole of the main stock 401 anti-clockwise using the long end of the special spanner supplied (approx. 5 turns). 3.
Dismantling 7.3 7.4 Front stock removal Barrel removal Procedure: Procedure: 1. Removing the string attachment (see section 7.1). 1. Open and remove the bolt (see section 5.7.2). 2. Insert the special spanner with the long end through the sling attachment bushing 503. 2. Remove the front stock (see section 7.3). 3. Turn the front stock screw with the special spanner clockwise until the resistance at the spanner disappears. 3.
Assembly 8 Assembly 7. Check the bolt action with the gun unloaded. Gun may be damaged 8. Alternatively tighten the clamping screws 203 and 203A a little more until the barrel is held without tension (alternative: tightening with a torque spanner: torque 7 Nm). • Only assemble cleaned gun parts. 9. Fit the front stock (see section 8.3). CAUTION! • Only tighten the screws for the stock attachment by hand (only operate the special spanner with two fingers), (see Fig. 17). 8.
Assembly 8.2 8.4 Fitting the main stock Fitting the sling attachment Corresponding figure, see Fig. 13. Corresponding figure, see Fig. 12. Procedure: Procedure: 1. Slide the main stock onto the gun. 1. Insert the bolt of the rear sling attachment into the sling attachment bushing 407. 2. Hand-tighten the main stock screw clockwise with the long end of the special spanner supplied (approx. 5 turns). 2. Press in the spring bolt. 3. Fit the sling attachment (see section 8.4). 3.
Modular principle 9 Modular principle Components manufactured to perfect dimensions make it possible to produce a hunting rifle optimally tailored to your needs. It also allows you to modify and specialise your S 202 at a later date. The complete and current option selection and invidual possibilities can be found in the price list, the SAUER hunting catalogue or most conveniently on the SAUER homepage (www.sigsauer.de). 9.1 Barrel with caliber Magazine Bolt 7x64 Medium Medium .308 Win.
Extras 10 Extras 10.1 Muzzle brakes If your SAUER 202 is equipped with a muzzle brake (MagNaPort, Pendelton or SAUER muzzle brake) the sound pressure during firing increases by approx. 30 percent. This can result in severe damage to the hearing including deafness. For this reason a suitable ear protection must be worn whenever the gun is used. . WARNING! Increased sound pressure Potential severe hearing damage 10.1.1SAUER muzzle brake The SAUER muzzle brake is screwed onto the barrel if required.
Extras 10.2 Magazine lock MagLock 10.3 Express sights The special magainze lock MagLock is a 100% effective safety lock against unintentional unlocking of the magazine. Nonetheless, the shooter can rapidly change the magazine when required. The SAUER Express sights are the perfect aiming device for hunting moving game or for all those who frequently hunt without telescopic sights. The sights consist of an Express sight with a mechanical sight and a flap.
Care 11 Care 11.1 General WARNING! The proper functioning and precision of the gun can only be maintained through regular and expert care. The gun must be cleaned and protected against corrosion after each use. The bore must be cleaned and protected against corrosion after each firing. Wooden stocks must be treated with a suitable agent in accordance the corresponding instructions and must be protected against the weather.
Care 5. Check whether deposits of the rounds have collected in the sections. If necessary, clean the barrel with a commercial grade barrel cleaning agent (observe the respective instructions for use) designed for firing residue. 6. Coat the barrel bore and the barrel chamber with a little gun oil or gun grease. 7. Dry the barrel bore and the barrel chamber from the back usng a plastic coated cleaning rod of the correct caliber 11.
Care 3. After a reaction time of at least 60 minutes wipe dry and polish the gun with a clean cloth. 4. Dependent on the weather and frequency of use the protective effect will last between two to six months. Note: • The sling attachments must also be cleaned Trouble-shooting 12 Trouble-shooting 12.1 Cause and correction of malfunctions Gun maintenance (cleaning and inspection) according to the instructions can prevent malfunctions.
Trouble-shooting Fault Potential cause Remedy No round chambered. Magazine not properly inserted, deformed or dirty. Insert magazine all the way until it engages (see section 5.8.2). Gun faulty. Repair by manufacturer. Bolt lock bolt slide not pressed. Press bolt lock bolt slide (see section 5.7.3). Mainspring is uncocked. Cock the bolt (see section 5.7.1). Gun faulty. Repair by manufacturer. Gun is uncocked. Cock the gun (see section 5.7.1). Gun faulty. Repair by manufacturer.
Trouble-shooting 12.2 Shipping the gun Optics and accessories 13 Installation of optics and accessories Note: • Familiarise yourself fully with regional legislation governing the shipping and transportation of firearms. Procedure: 1. Check the gun to ensure that it is unloaded and decocked. 2. Pack the gun well (if possible in its original packaging) to prevent damage in transit. To prevent the gun being recognised as such during shipping, wrap the original packaging in a second outer layer.
Technical Specifications 14 Technical Specifications Functional principle Repeater rifle Action type Direct lug locking in the barrel Caliber Mini: .222 Rem., .223 Rem. Medium: .22-250 Rem.; .243 Win.; .25-06 Rem.; 6,5x55; 6.5x57; .270 Win.; 7x64; .308 Win.; .30-06; 8x57 IS; 9.3x62 Magnum: 6.5-284 Norma; 6.5x68; .270 Wby. Mag.; 8x68 S; 7 mm Rem. Mag.; .300 Win. Mag.; .300 Wby. Mag. BigGame: .375 H&H Mag.; .416 Rem. Mag.; .458 Lott Length, overall Mini: Medium: Magnum: BigGame: approx.
Accessories 15 Accessories Spare parts 16 Spare parts Your SAUER 202 is a modular hunting gun which can be easily adapted to new uses at a later date. The complete and current option selection and invidual possibilities can be found in the price list, the SAUER hunting catalogue or most conveniently on the SAUER homepage (www.sigsauer.de). There you will also find all telescopic sight assemblies, replacement barrels, replacement magazines, sights and any other gun accessories. J. P.
Spare parts Item designation Item designation Item designation 100 102 103 104 105 106 107 108 109 110 111 112 113 400 401 402 403 404 405 406 407 408 409 713 714 715 716 717 718 719 720 721 722 723 724 725 726 727 728 729 730 Bolt assembly Straight pin Striking pin nut Brazed nipple Firing pin spring Firing pin Ejector pin Ejector pressure spring Clamping sleeve Extractor Pin for extractor spring Bolt Lock 200 Magazine tube assembly 201 Magazine ejector spring 202 Magazine case, light alloy or steel
Spare parts 307 100 102 103 304 303 106 105 308 300 305 302 306 104 301 212 201 200 202 501 503 502 109 210 108 111 211 110 208 500 203 107 112 108 405 113 209 205 204 206 404 207 713 403 711 402 712 409 407 401 409 718 710 406 707 705 700 408 702 400 704 714 709 716 708 715 709 717 706 604 719 722 703 603 702 720 701 602 721 726 730 715 601 723 600 724 728 729 727 725 Fig. 22, Spare parts for S 202 06.
J. P. Sauer & Sohn GmbH gegr. 1751 Sauerstr. 2-6 D-24340 Eckernförde Deutschland Telefon +49 4351 471 100 Telefax +49 4351 471 160 www.sigsauer.