
Operation Manual


9
mild detergent and soft lint-free cloth.
5. Clean the interior of the tip ejector collar and
the tip cone (cylinder) with a cotton swab.
Be careful with the pipettes so that the seal
inside the tip cone will not damage.
6. Rinse the parts with distilled water if needed
and let the parts dry.
7. Pipettes≤100µl:
Put a thin layer of grease on the piston (4).
Pipettes 250, 500 and 1000 µl:
Put a thin layer of grease around the piston
seal (4).
Pipettes 2000, 5000 and 10 ml:
Put a thin layer of grease on the piston seal
(4) and the interior of the tip cone cylinder
(3).
NOTE: Avoid excess grease. Use only the grease
provided with the pipette.
NOTE: Before reassembling check that no lint or
particles are on the surface of the piston.
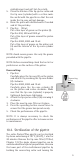
Reassembling:
1. Pipettes:
Carefully place the tip cone (3) on the piston
and attach it by screwing the tip cone holder
(2) clockwise.
Pipettes 2000, 5000 and 10 ml:
Carefully place the tip cone cylinder (3)
on the piston and screw clockwise. Make
sure that the tip cone (cylinder) is properly
tightened. Avoid over-tightening.
2. Attach the tip ejector collar (1) by screwing it
clockwise.
3. Place the new tip cone filter on its place.
4. Press the operating button several times to
ensure that the grease has spread evenly.
5. Check the performance of the pipette.
NOTE: It is always necessary to check the
performance of the pipette after in-house service
or maintenance.
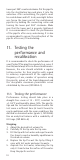
10.3. Sterilization of the pipette
The entire Proline®Plus pipette can be sterilized
by steam autoclaving at 121°C, (252°F), 1 atm for
20 minutes. Remove the tip cone filter (if fitted,
Chapter 7.3). The single channel pipettes can be
autoclaved without special preparations. Unscrew
the lower part of the multichannel pipettes by
holding the connecting collar and turning the
360°
Connecting
collar