98648-010-27 Sartorius IS16EDE-H, IS16EDE-H0CE, IS34EDE-H, IS34EDE-H0CE, IS64EDE-H, IS64EDE-S, IS64EDE-H0CE Weighing Platform for Display and Control Unit for Standard Use or Verified for Use in Legal Metrology Installation and Operating Instructions ial y Industr g Technolog in Weigh
Contents General View of the Weighing Platform Intended Use Warranty Storage and Shipping Conditions Safety Instructions Page 3 4 4 4 4 Installation Instructions Ambient Conditions Conditioning the Weighing Platform IP65 Protection 5 5 5 5 Getting Started Setting Up the Weighing Platform Leveling the Weighing Platform Connecting the Weighing Platform Separate Power Connection for the Weighing Platform (Optional) Safety Precautions Fixed Power Connection Warmup Time Menu Access Switch 6 6 6 6 Operating
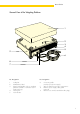
General View General View of the Weighing Platform 1 2 3 4 5 9 6 8 7 No. Designation No.
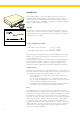
Intended Use This weighing platform is part of a modular system that consists of the weighing module (weighing platform) and a display and control unit or isi industrial terminal. The display and control unit comes with a separate instruction manual. Before installing or operating your weighing equipment, please read all instructions thoroughly. Warranty Do not miss out on the benefits of our full warranty. Please contact your Sartorius office or dealer for further information.
Installation Instructions Installation Instructions The equipment must be installed and put into operation by a trained Sartorius dealer or service technician, who will also show you how to work with it. Ambient Conditions Choose a suitable place to set up the weighing platform.
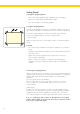
Getting Started Setting Up the Weighing Platform - Remove the weighing platform and load plate from the packaging - Remove the foam material and manufacturer’s labels - Place the load plate on the weighing platform Leveling the Weighing Platform Level the weighing platform at the place of installation using the leveling feet (4) so that the air bubble is centered within the circle of the level indicator (5): To raise the weighing platform, extend the leveling feet (turn clockwise).
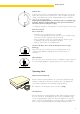
Getting Started Separate Power Connection (Optional) for the Weighing Platform An adapter kit must be installed by a Sartorius dealer or service technician to connect the weighing platform separately to line current (mains supply). In addition, this separate power connection is required if you interface the weighing platform directly with a computer.
The weighing platform is powered by the external industrial-grade ING 2 AC adapter (see “Accessories”). Make sure that the voltage rating printed on this unit is identical to your local line voltage. If the voltage specified on the label or the plug design does not match the rating or standard you use, please contact your local Sartorius office or dealer.
Getting Started Warmup Time To deliver exact results, the weighing platform must warm up for at least 30 minutes after initial connection to AC power or after a relatively long power outage. Only after this time will the weighing platform have reached the required operating temperature. Preparing the Weighing Platform for Verification for Use in Legal Metrology in the EU:* Allow the weighing platform to warm up for at least 24 hours after initial connection to the power supply.
General Instructions for Integration into Conveyor Systems The IS weighing platform is suitable for installation in conveyor systems. Follow the general instructions given below and refer to the “Dimensions (Scale Drawings)” to meet the requirements for such installation. – Any moving or rotating parts intended to be permanently attached to the load plate must be designed so that they cannot negatively affect the accuracy of weighing results. For example, rotating mechanisms must be properly balanced.
Specifications Chards Specifications Charts Access the configuration menu of the connected Sartorius terminal or display and control unit of your choice. You need to set the appropriate codes before verification of the platform as a legal measuring instrument. Please note that when you change the configuration, this may also change the accuracy class besides the weighing capacity and the readability.
IS34EDE-H0CE (Type of weighing instrument: iso-TEST + BF BF or SARTOCOWAT + BF BF) verifiable for use in legal metrology. Specifications group (code): Spec. gp.1 (10 3 1) Spec. gp.2* (10 3 2) Spec. gp.3 (10 3 3) 34 26.1 Maximum capacity kg 34 Readability g 0.1 Standard Configurable Configurable Zero tracking±2% kg ±0.68 ±0.68 ±0.52 Initial zero-setting range kg ±1 ±1 ±1 Preload 1) kg 4 4 yes yes Weighing range isoTEST function2) Spec. gp.4 (10 3 4) 34 Spec. gp.
Specifications Chards IS 64 EDE-H0CE (Type of weighing instrument: iso-TEST + BF BF or SARTOCOWAT + BF BF) verifiable for use in legal metrology. Specifications group (code): Spec. gp.1* (10 3 1) Spec. gp.2 (10 3 2) Spec. gp.3 (10 3 3)4) Spec. gp.4 (10 3 4)4) 16 Maximum capacity kg 64 51 31 Readability g 1 1 1 Standard Configurable Configurable Weighing range 1 Configurable Zero tracking±2% kg ±1.3 ±1 ±0.6 ±0.3 Initial zero-setting range kg ±1.3 ±1.3 ±1.3 ±1.
General Specifications (applicable for use in standard applications, not in legal metrology) Model IS 16 EDE-H IS 34 EDE-H IS 64 EDE-S IS64EDE-H Maximum capacity kg 16 34 64 64 Readability g 0.1 0.1 1 0.1 Linearity g Repeatability (standard deviation) g ≤±0.2 ≤±0.05 ≤±0.2 ≤±0.1 ≤±0.5 ≤±0.3 ≤±0.3 ≤±0.1 Response time (average) s <1.5 <1.5 <1 <1.5 <1 <1 <0.8 <0.
Specifications Chards Pin Assignment Chart for the RS-485 Interface Cable length: 3 m (approx. 10 ft.
Troubleshooting Guide Problem No segments appear on the display Possible Causes No line current is available The AC adapter is not plugged in The weighing platform has been in standby mode for more than 5 minutes The weight display shows “H” The load exceeds the capacity of the weighing platform Solution Check the power supply Plug the AC adapter into the platform and into an electrical outlet Turn on the display and control unit Unload the weighing platform The weight display shows “L” or The load pl
The error code “ERR 10” is displayed There are values stored in the tare memories for your application, and you tried to clear the lowerlevel tare memory Clear the tare memories for your application first, then clear the lower-level tare memory The error code “ERR 12” is displayed You tried to store a value in the tare memory for applications, although this memory has been blocked by menu code 2 2 x Check the configuration You entered a numeric tare that is not allowed Check the number you have enter
Care and Maintenance Service Regular servicing by a Sartorius technician will extend the service life of your weighing platform and ensure its continued weighing accuracy. Sartorius can offer you service contracts, with your choice of regular maintenance intervals ranging from 6 months to 2 years. Cleaning Before cleaning the weighing platform, disconnect it from the power supply (e.g., unplug the AC adapter).
Care and Maintenance In this case, notify your nearest Sartorius Service Center or the International Technical Support Unit based in Goettingen, Germany. Maintenance and repair work may be performed only by authorized Sartorius service technicians who have access to the required maintenance manuals and have attended the relevant service training courses. Instructions for Recycling the Packaging Sartorius products are packaged to ensure safe shipment using environmentally friendly materials.
Declaration of Conformity Use of the Weighing System in Legal Metrology in the EU Components of a Verifiable Weighing System Your weighing platform is a modular device. The weighing system in which this weighing platform is connected is verifiable for use in legal metrology only if this platform is combined with a suitable terminal or with a PC running Sartorius software (“Winscale”).
Approved Auxiliary Measuring Devices If the weighing system is used in legal metrology, any auxiliary devices connected must also be verifiable. Auxiliary devices that are metrologically relevant, such as printers, remote display units, or the like, must have the metrology label (black “M” on a green background). The auxiliary device must be verified at the same time that the entire system is verified.
Selecting and Attaching ID Plates The ID plate is to be selected and attached according to the specification block (configuration of scales) and the display and control unit (terminal). For details of how to position the ID plate on the scales or tag holder, refer to the instructions in "Plates and Markings". If display and control units (terminals) of type TA, models CAIS1, CAISL1, CAIS2, CAISL2, CAIS3, CAISL3 are being used, EC Type Approval Certificate No. T7899, type SARTOCOWAT is applicable.
Plates and Markings Dimensions (Scale Drawings) All dimensions given in millimeters 300 120.
Accessories (Options) Order No.
Accessories Order No.: Stainless steel tag plate for metrological ID labels (fastens to cable; required when weighing platform is used for legal metrology in a weighing system) YAS 01 IS Adapter kit for DC power supply to YAS 03 IS the weighing platform (without using an external AC adapter or power supply) IP67 cable gland (to be installed by an authorized service technician only) External rechargeable battery pack; hours of operation: approx.
Sartorius Weighing Technology GmbH 37075 Goettingen, Germany Weender Landstrasse 94 - 108, 37075 Goettingen, Germany (+49/551) 308-0, (+49/551) 308-3289 Internet: http://www.sartorius-mechatronics.com Copyright by Sartorius Weighing Technology GmbH, Goettingen, Germany. All rights reserved. No part of this publication may be reprinted or translated in any form or by any means without the prior written permission of Sartorius.